Posts

Freezer Meal: Breakfast Burritos (Gluten-Free, Grain-Free)

These powerhouse breakfast burritos are perfect for Sunday Meal Prep! Stick them in the freezer, and heat them up in the morning when you’re ready. With both veggies and protein, they are an easy way to get yourself going on those hectic weekday mornings.

Freezer Meal Breakfast Burritos. Perfect for Sunday Meal Prep! Grain-free, gluten-free

You know those mornings when you get to sit down and have a wonderful, elaborate, healthy breakfast before work or school? No? Me neither. If you’re like me, on the mornings you need to get out the door, you’re scrounging for something that takes little-to-no effort, or can be taken on the go. Oh and yeah… it’s supposed to actually nourish my body for the start of the day. Let me introduce your mornings’ new best friend: the Freezer Breakfast Burrito. If you have about 30 minutes to spare on your Sunday afternoon, you can get yourself ready for every morning of the week mindlessly and painlessly.

Freezer Meal Breakfast Burritos. Perfect for Sunday Meal Prep! Grain-free, gluten-free

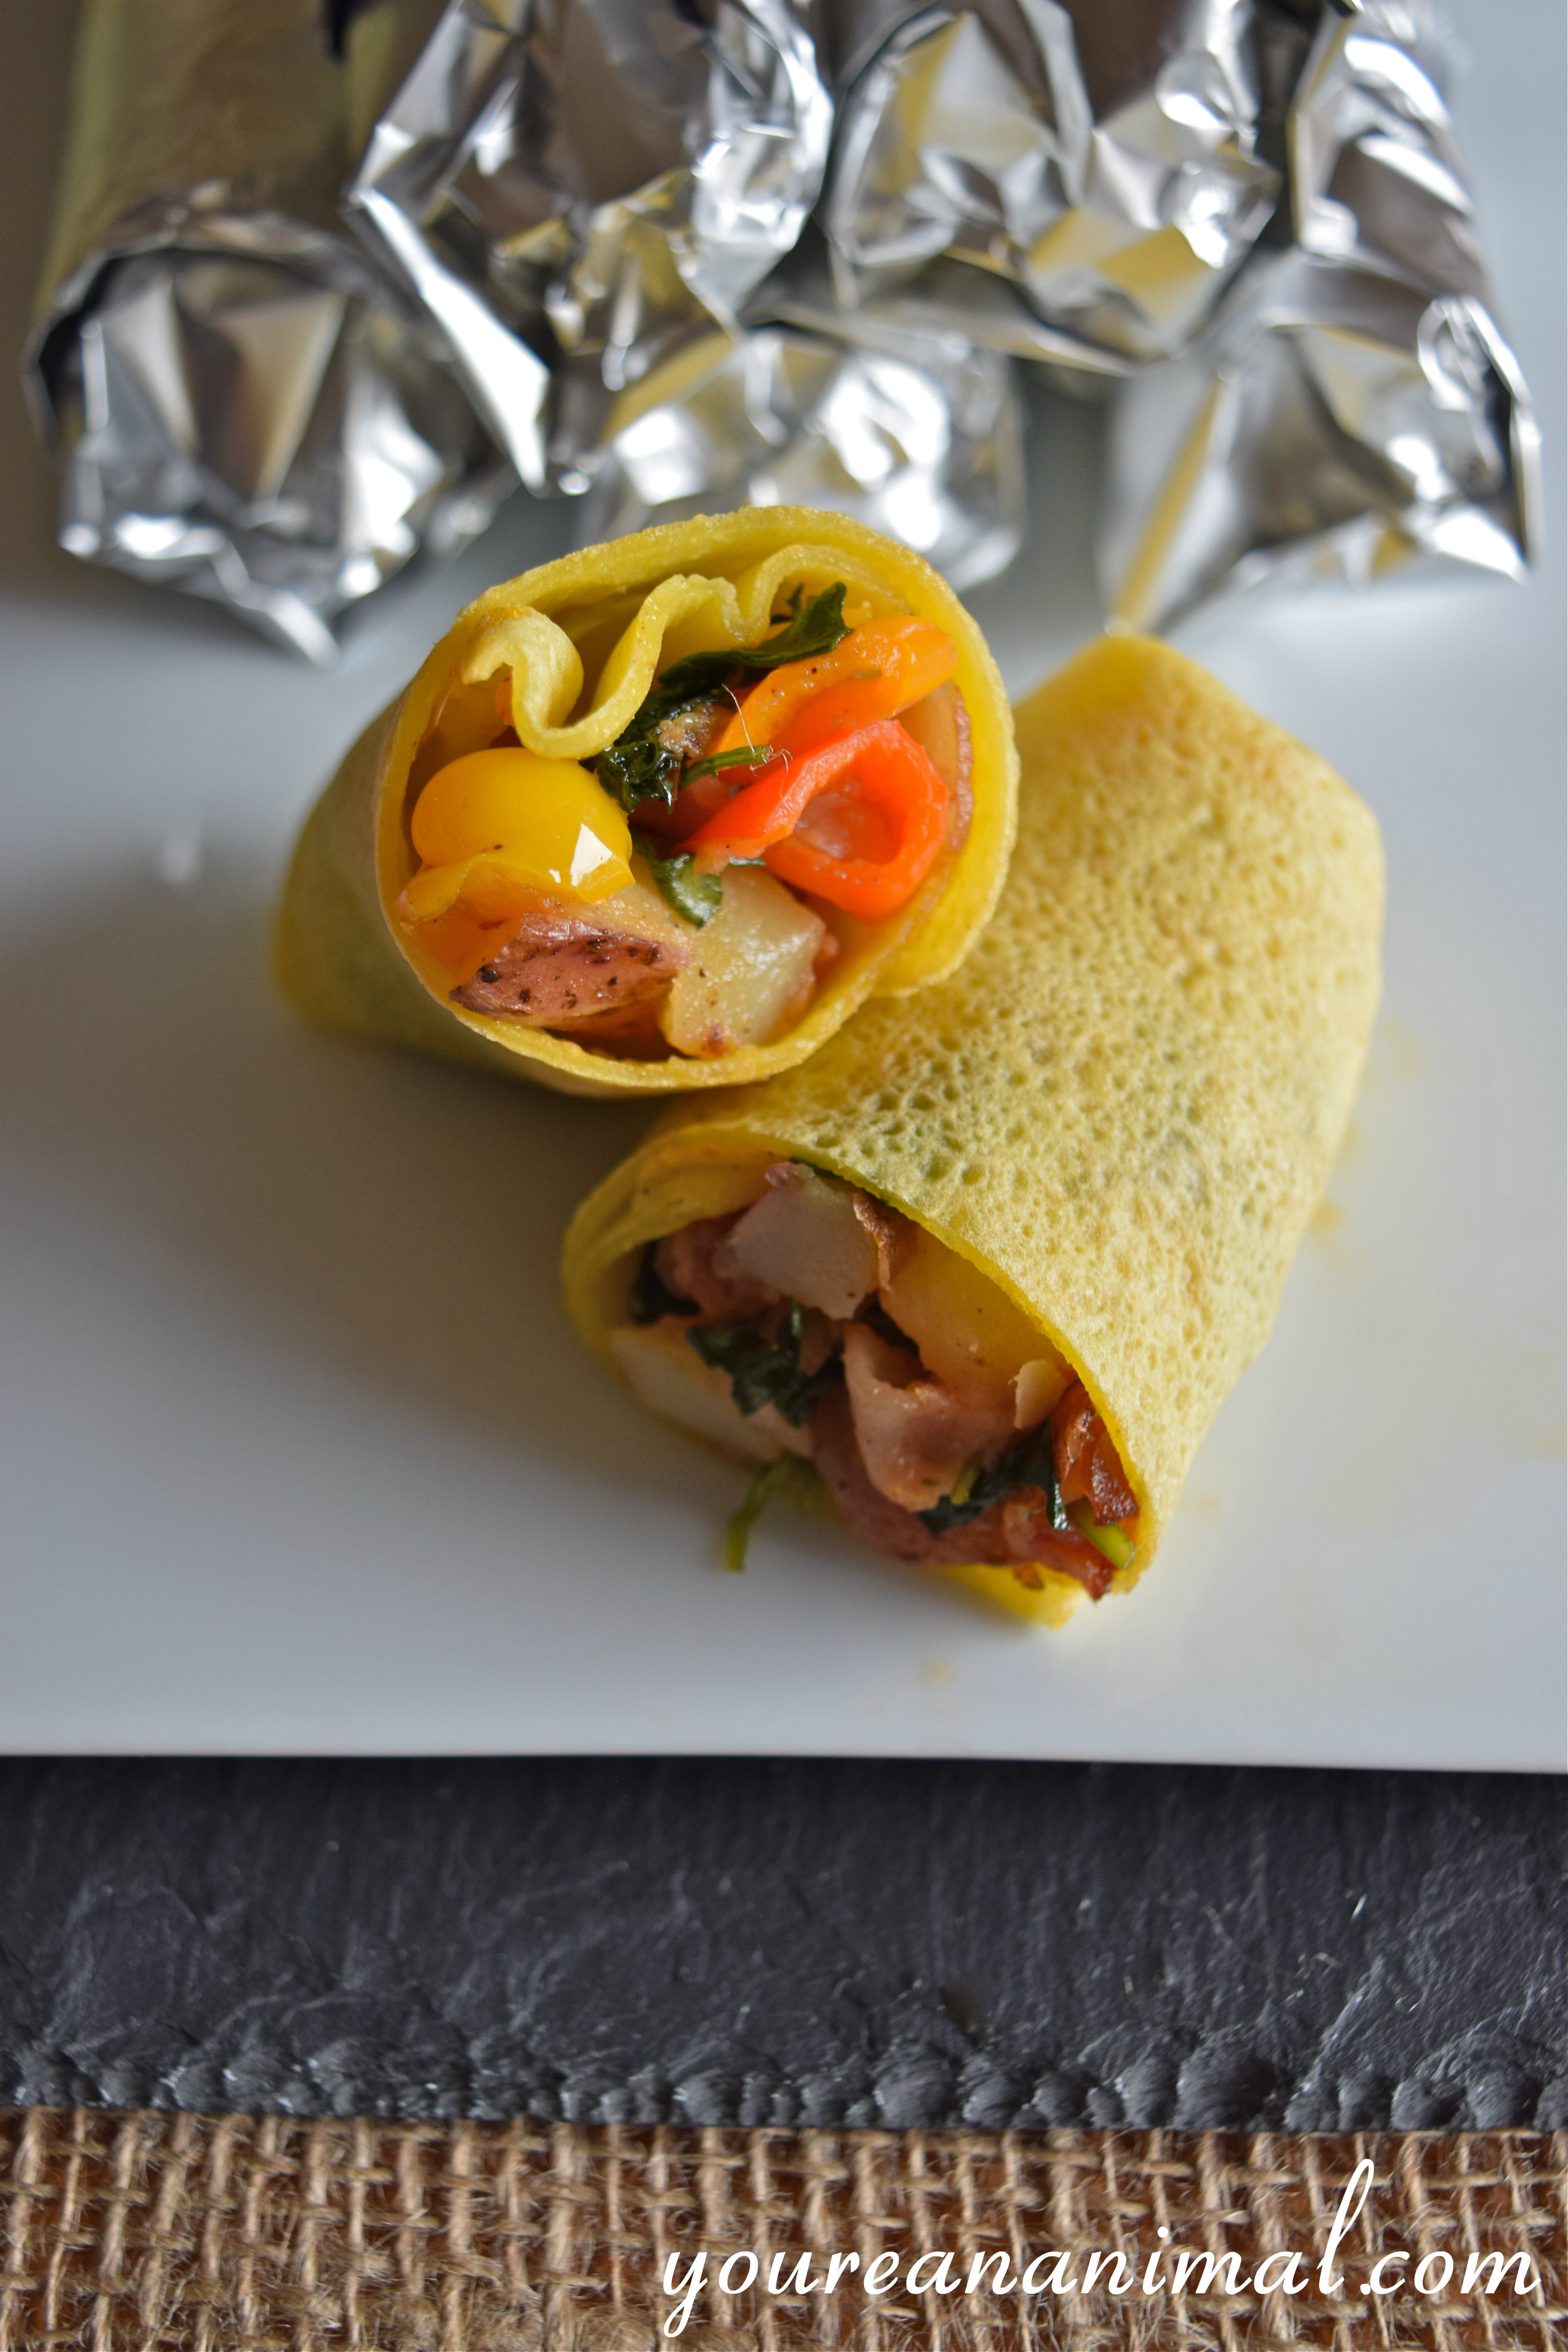
Wrap these guys up in foil, stick them in the freezer, and then the night before you want to eat one (or two), put it in the fridge overnight to thaw. This will save you precious reheat time in the morning. Ten minutes of reheat time before you head out the door (or if you’re like me, once you get to work) and voila, you’re good to go to start your day!

Freezer Meal Breakfast Burritos. Perfect for Sunday Meal Prep! Grain-free, gluten-free

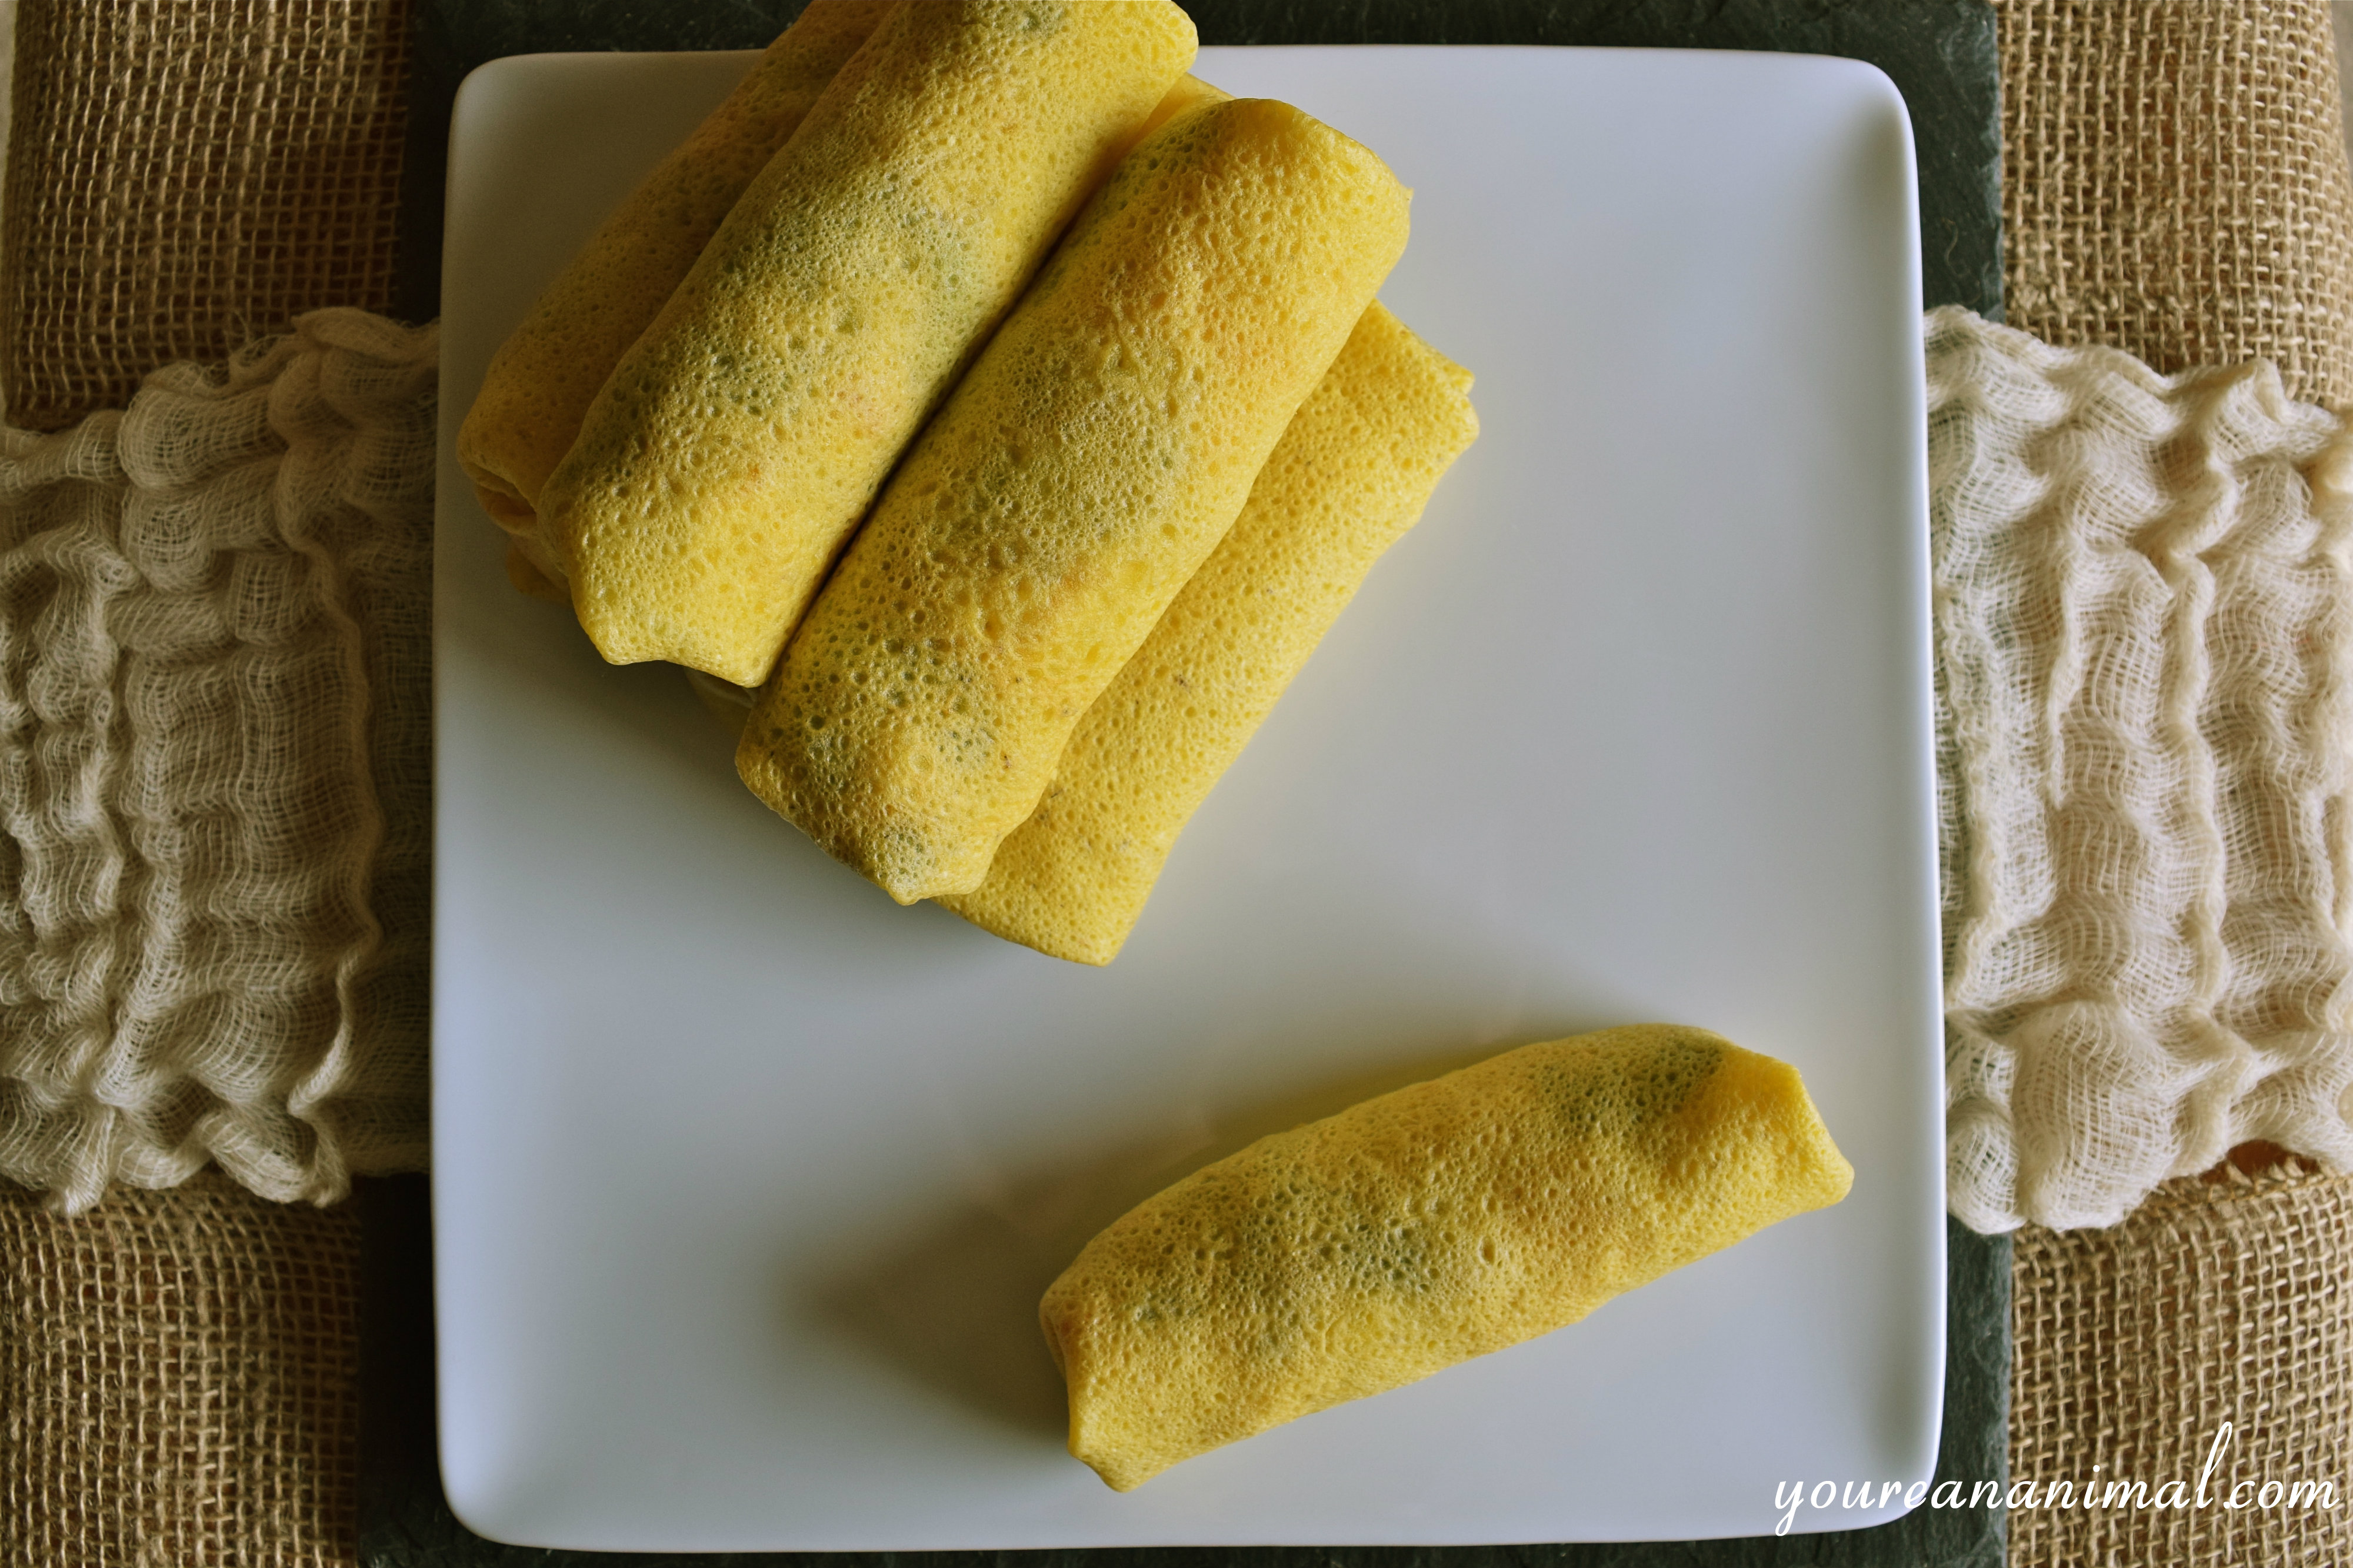
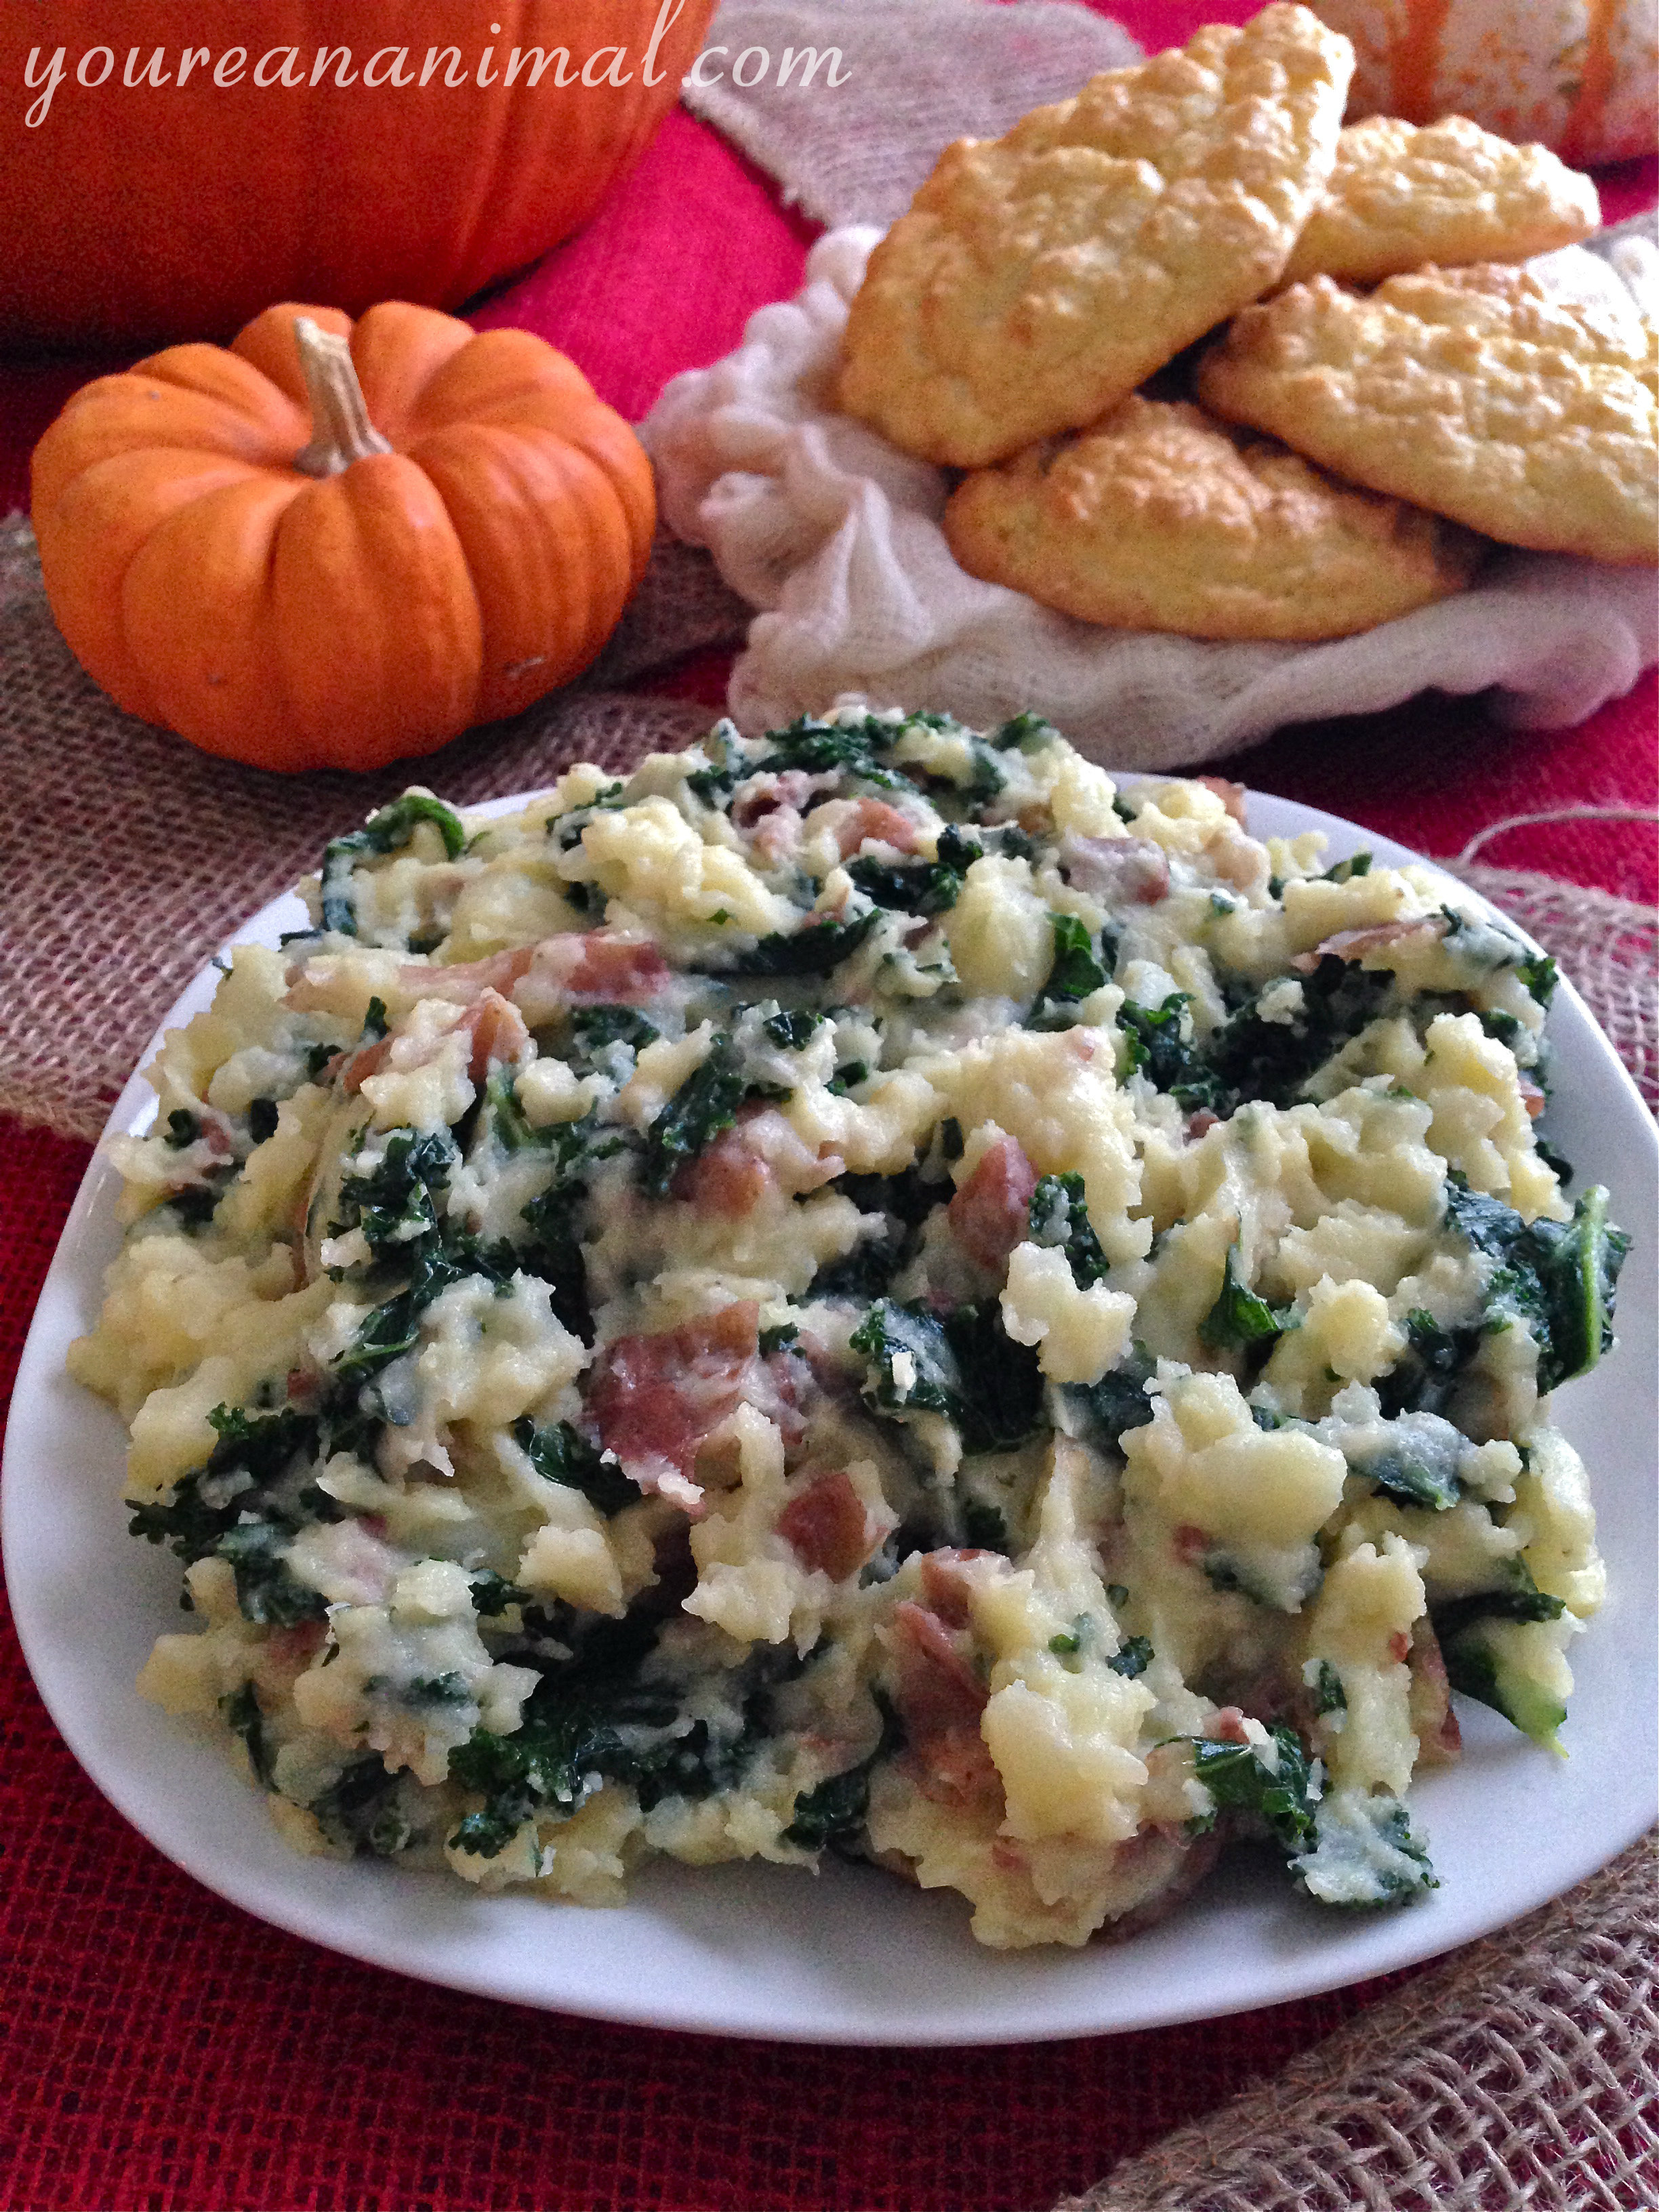
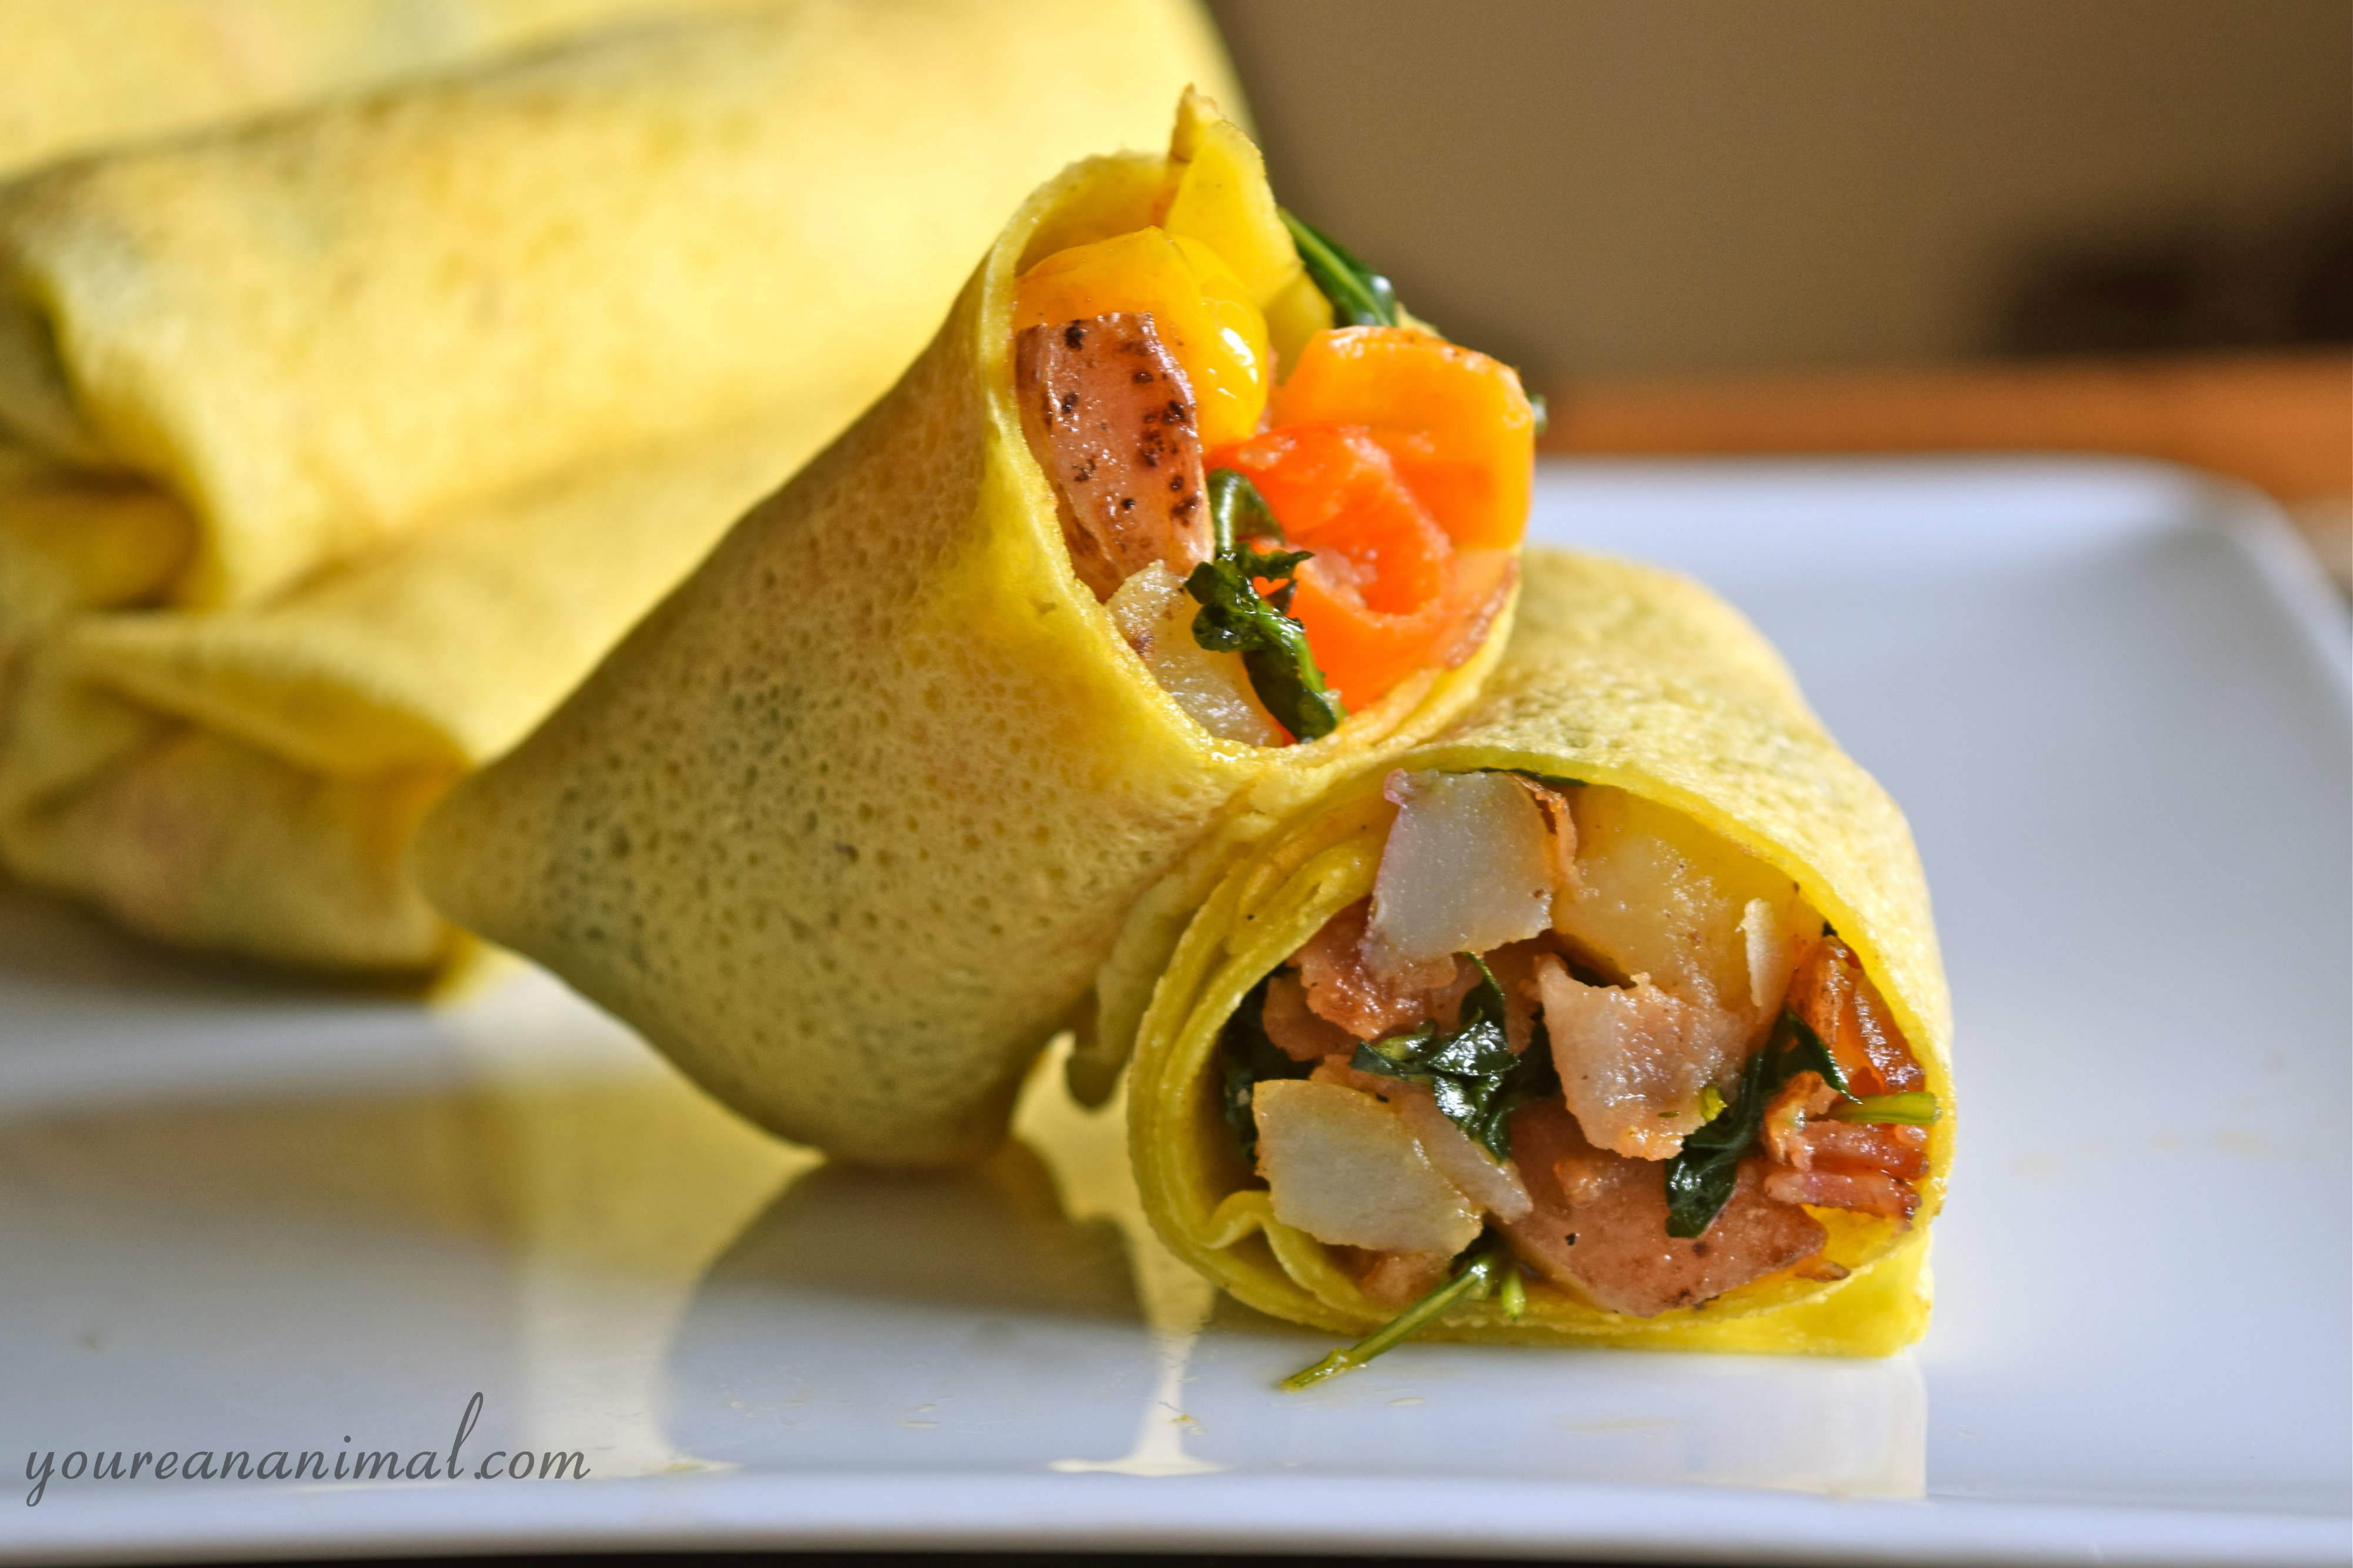
Tell me that doesn’t look like something you want to eat in the morning sun. Peppers, bacon (!), potatoes, and kale all wrapped up in the grain-free, egg-based tortilla. I think that’s also spelled b-r-e-a-k-f-a-s-t.

Freezer Meal Breakfast Burritos. Perfect for Sunday Meal Prep! Grain-free, gluten-free

Breakfast Burritos

  • Grain-Free Tortillas (from Stupid Easy Paleo):
    • 4 eggs
    • 1/2 cup of your choice of starch (arrowroot, tapioca or potato… I use potato because it has a mild flavor)
    • 2 tsp of coconut flour
    • 3 Tbsp water
    • 1 Tbsp olive oil
    • 1/4 tsp each of garlic powder, onion powder, salt, and black pepper
  • 2 cups of diced white potatoes (diced into about 1/2 inch chunks)
  • 6 slices of nitrate-free bacon (sliced into about 1/2 inch pieces)
  • 6 mini sweet peppers sliced into 1/4-1/2 inch pieces (or 1 large green, yellow, orange, or red bell pepper)
  • 2 handfuls of baby kale
  • hot sauce to taste (I used about 2 tsp) (I use Frank’s Hot Sauce)
  • 1/4 tsp each garlic powder, onion powder, salt, and black pepper
  • Avocado oil or olive oil to coat pan
  1. Heat a large skillet with your avocado or olive oil over medium-high heat. Add your diced potatoes to the skillet, and allow them to start to cook.
  2. Next, work on the tortillas. In a large mixing bowl, combine all of your tortilla ingredients. Use an electric mixer to combine the ingredients, in order to most effectively eliminate the lumps from your mixture, until very smooth but not to the point of frothing the eggs.
  3. Use a 10-inch, non-stick skillet to make the tortillas. Heat the skillet on medium heat. Once heated, pour about 1/4 cup of the tortilla batter onto the skillet, and roll the batter around in the skillet so it is evenly coated (like making a french crepe). Cook about 1 minute on each side, until lightly browned. The edges will curl away from the pan. If you have any issues with this process, you can refer to the original recipe and instructions for these tortillas here. This will make 6 tortillas.
  4. As you are working on the tortillas, check on the potatoes. As they are starting to brown and soften slightly (about 5-10 minutes into the cooking process), add your sliced peppers and sliced bacon. Allow these to cook, letting the peppers soften and the bacon crisp, stirring occasionally.
  5. Once your potatoes, peppers, and bacon have cooked to desired texture, add the hot sauce, garlic powder, onion powder, salt, pepper, and kale to your mixture. Stir to combine, until the kale wilts into your mixture.
  6. Evenly divide your potato/pepper/bacon/kale mixture onto your tortillas. Roll into burritos (they will be relatively small in size).
  7. To make it a freezer meal: Wrap your burritos in tin foil, and store in the freezer. The night before you want to eat one, place your burrito in the refrigerator and allow to thaw overnight. In the morning, set your oven or toaster oven to 400 degrees F. Place your foil-wrapped burrito in the oven for 10 minutes. Now run off to whatever you’re (almost) late for!

Makes 6 burritos

Freezer Breakfast Burritos. Perfect for Sunday Meal Prep! Grain-free, gluten-free


Chocolate Covered Peppermint Marshmallows (Made with Honey)

peppermint-marshmallow

This is a Christmas post, coming to you on December 30th. It was fully intended to be in perfect holiday timing, ready for you to make and take to your favorite host or hostess and share with your family and friends. However, last Tuesday, the 23rd, when I intended to create this post, I instead woke up with the flu and was completely derailed. No website, no last-minute Christmas errands, just me and my couch, my two blankets, my hoodie, and copious amount of Turmeric Tea. So now it is coming to you, in fully restored health, an entire week overdue. But, better late than never, right? It’s almost New Year’s Eve, and this would still make the perfect host/hostess gift. Use up the last of those candy canes, and indulge in one last sweet treat before the bewitching day of January 1st when the gyms are full of wide-eyed people looking to make a change, and healthy cookbook sales skyrocket.

peppermint-marshmallows2

Speaking of which, I should mention that this will be the last sugar-laden recipe I make for a little while. Sugar has always been my downfall, and I have tried and tried to give it up. However, the restrictive nature of a “detox” always makes me want it even more. So I’ve decided to take a different approach. Instead of telling myself that I am not making sugary treats, I have decided to see it as an opportunity to explore new recipes… you know, with actual veggies and meats and… stuff. I’ve always been a baker, but I want to try my hand at more actual “cooking.” And so, with the turn of the calendar, I start that adventure. Yay!

peppermint-marshmallows3

As for this recipe, making marshmallows probably sounds totally daunting and not worth it. But I can promise you, it is so much easier than you would think. And when you realize how much crappy HFCS and other who-knows-what ingredients go into your store-bought marshmallows, making your own, with just honey, water and gelatin, seems like the obvious choice. Homemade marshmallows, if you’ve never had them, are incredibly light and delicate. As trite as it may sound, they actually do just melt in your mouth. I love this version, because my favorite flavor combination is chocolate and peppermint. There is just something about that combo that says “holidays” for me. This is very reminiscent of chocolate bark, which is a beautiful holiday tradition in itself. Not to mention that all of your fellow guests will be totally impressed that you made your own candy. Who does that? You do, of course!

peppermint-marshmallows4

Chocolate Covered Peppermint Marshmallows

This recipe is adapted from this one by Urban Poser. If you have any issues, she has many trouble-shooting tips that can be very helpful.

  • 1 cup unfiltered honey
  • 1 cup water
  • 2.5 Tbsp powdered gelatin
  • 1 tsp vanilla extract
  • 1/2 tsp peppermint extract
  • 8 candy canes, crushed (I used TruJoy candy canes, which are organic, corn syrup free, and colored with fruit juice)
  • 1.5 cups of chocolate chips, finely chopped (I use Enjoy Life, allergy-free chocolate)
  • Note: you will need a candy thermometer for this recipe
  1. Line an 8×8 inch baking dish with parchment paper.
  2. In a large mixing bowl, add your gelatin, and 1/2 cup of water. Allow this to sit while you work with your sugar mixture. Also, have an electric hand mixer ready to go for when your sugar is ready.
  3. To a medium saucepan, add your other 1/2 cup of water, and all of your honey. Turn the heat up to medium-high, and bring to a boil. The mixture will foam up significantly, so be very careful to not let it boil over. If it starts to get to close to the top, remove from the heat briefly. Stir consistently.
  4. Using a candy thermometer (very important, you cannot do this without one. But good news is you can get one cheap at Walmart!), bring your sugar/water mixture up to the “soft ball” level, or 240 degrees F. This will take between 15-30 minutes. Continue stirring your mixture throughout the entire process, you do not want it to burn on the bottom. Watch your temperature very closely.
  5. As soon as the temperature is exactly at the “soft ball” mark, remove it from the heat. Immediately start to drizzle your sugar mixture over the gelatin, and mix the two together with your electric mixer on medium. This is a relatively delicate process, because this means you are pouring hot, liquid sugar with one hand, and are using the electric mixer to mix the ingredients with the other. Slowly pour in all of your sugar, in a thin stream, until it is all in your bowl.
  6. Now use your electric mixer, on high, to combine the gelatine and sugar. This process will take about 5-10 minutes, but as you continue to mix and incorporate, you will notice that the mixture will begin to froth up, slowly lighten in color, and then thicken into a fluff. Even if it seems like it isn’t doing anything in the beginning, just keep going!
  7. Continue to mix until you have a fluffy, marshmallow-like texture. There will be ripples in your fluff, and it will easily coat your finger. At this point, add the vanilla extract, and peppermint extract, and continue to mix until combined.
  8. Once you mixture is the consistency of marshmallow fluff, use a rubber spatula to transfer the mixture into your parchment-lined baking dish. Evenly distribute the fluff, and allow to sit for at least 2 hours, or until completely set. Note that this will be VERY sticky, even once set. Do not touch the top. (If you do, it will be like when Clark gets tree sap on his fingers in Christmas Vacation. Yep, I just went there.)
  9. Once your mixture is set, use a pizza cutter to cut the marshmallows into equal-sized squares (whatever size you prefer). Again, the marshmallows will still be VERY sticky, so it may be helpful to grease the pizza cutter, or your fingers. However, you want them to remain sticky so you can easily coat them, so try not to get the marshmallows too oily.
  10. Add the chopped candy canes and chocolate into a large bowl and combine. In small batches, add the marshmallows to the candy cane and chocolate mixture, and toss to coat. Repeat until all of the marshmallows are coated. Store in a jar or Tupperware container, and enjoy!

peppermint-marshmallows5

No-Bean Chili

no-bean-chili

Ah chili. The most soul-warming, hearty meal around. In college, I made chili often in the winter because it was cheap to make. I made it meatless with a store-bought packet of who-knows-what, a can of tomato sauce and a can of beans, and it was ready in 10 minutes after just throwing everything in a pot and heating it up. It got the job done, but little did I know the damage those kind of nutrient-lacking meals were doing to my body. Now, I’m cooking a tastier, healthier, heartier chili that is full of grass-fed meat and a bunch of veggies. The perfect meal to curl up next to the Christmas tree and snuggle up in a blanket with.

no-bean-chili

This is a completely customizable recipe. Change out the meat (turkey, chicken), add different veggies (squash, zucchini), make it spicier… whatever chili means for you! The reason we skipped out on the beans, however, is because beans are not that great for our intestinal system. You know what kind of reputation beans have, don’t you? Well, when a food creates an uncomfortable situation, it often is a signal that your body is having a hard time processing it. And for me, well, beans and I definitely do not get along. As we all know, all bodies are created differently, but if you’re interested in reading more about the potential harm of legumes, you can check out this write up, or do a google search about legumes and “leaky gut”!

No-Bean Chili

  • 1 lb grass-fed ground beef
  • 1 small onion, minced
  • 2 cloves of garlic, minced (check out how to prepare garlic to maximize the health benefits here)
  • 2 stalks of celery, chopped to your size preference
  • 2 carrot sticks, chopped to your size preference
  • 1 green pepper (or 5 mini sweet peppers), chopped to your size preference
  • 1 cup chicken stock, or bone broth
  • 1 16oz can of tomato sauce
  • 1 8oz can of tomato paste
  • 2 Tbsp dark chili powder
  • 1/2 Tbsp cocoa powder
  • 1/2 tsp each: paprika, cumin, ground yellow mustard
  • 1/4 tsp each: salt, cinnamon
  • cayenne to taste
  • 2 Tbsp grass fed butter
  • 2 Tbsp olive oil
  1. Heat the olive oil and butter in a large sauce pot (one that has a lid) at medium/high heat.
  2. Add all chopped veggies (celery, carrot, pepper, onion, garlic) to the heated oil. Saute for 2-4 minutes, or until they just start to soften.
  3. Add the meat and all of your spices to the veggies. Brown the meat through, chopping with a spoon or spatula as it cooks to break up the meat and allow it all to get cooked evenly, and to distribute the spices. Saute until the meat is crumbled, and no pink remains.
  4. Add the chicken stock, tomato sauce, and tomato paste. Stir until combined.
  5. Reduce the heat to low, cover the pot, and allow the flavors to meld for at least 10 minutes… but the longer it sits, the better the flavors combine.

Makes approximately 4 servings.

DSC_0048

Fluffy Banana Pancakes (Grain-Free, Nut/Seed-Free)

DSC_0020

Sunday morning meant a pancake breakfast for my entire childhood. My dad was up every Sunday, making pancakes for the whole family, even if it was before a soccer tournament or family event. So now, although I don’t do it every week, I often will make a Sunday pancake brunch. It’s been quite a journey over the past year or so, trying to cut out grains and then also realizing I needed to cut out nuts and eventually seeds as well. I have one recipe, my 3 Ingredient Protein Pancakes, which was good for a while and is still a great recipe for those who can eat nuts or seeds. But unfortunately for us, it just isn’t a good choice anymore. Even using Sunbutter got to be too much for us, and Andrew was having a reaction on his tongue when he would eat too much. We think it was due to the high levels of phytic acid in sunflower seeds. But we still craved a pancake brunch, so I decided to go another direction that uses coconut flour and arrowroot starch instead.

DSC_0006

I know that some people still can’t have coconut, but for us it’s been okay– at least much better than almond flour or sunbutter. These pancakes did not disappoint! Fluffy, yet dense at the same time, these pancakes are filling and satisfy that brunch craving perfectly. I like to add cinnamon, chocolate chips, and a little pure maple syrup… I think it’s the perfect complement to the banana flavor. You know what else would go great with these though? Mimosas, that’s what.

DSC_0010

These also would make a great Christmas morning treat. Since I can’t stop thinking about Christmas. Falalala. Don’t you just want to demolish that stack?

DSC_0033

Fluffy Banana Pancakes

  • 4 pasture-raised eggs
  • 2 medium bananas
  • 3 Tbsp Coconut Flour
  • 1 Tbsp Arrowroot Starch
  • 1 tsp baking powder (Note that baking powder often has cornstarch in it. If this is an issue for you, use baking soda instead.)
  • pinch of salt
  • pinch of cinnamon
  • grass-fed (Kerrygold) butter to grease skillet
  1. Add all of the ingredients (except the butter) to a large mixing bowl. Mash the bananas roughly with a fork. Then use an electric hand mixer to thoroughly combine your ingredients into a smooth batter. The batter should be about the consistency of a muffin batter. You may have a few chunks of banana.
  2. Heat a small non-stick skillet over medium-low heat. Add a small slice of butter to your heated skillet, and allow it to melt.
  3. Once the butter is melted, add about 1/4 cup of batter to your skillet.
  4. Cook the first side of your pancake until the edges become dry looking, and the underside is golden brown. Flip with a spatula, and repeat on the second side until both sides are golden brown.
  5. Remove your first pancake and place on a plate to rest. In between pancakes, I like to wipe the skillet down so the excess butter will not burn, and remove the skillet from the eye to let the pan cool down for just a few seconds. This helps to not burn the next pancake.
  6. Repeat the process until the batter is gone. Add more butter with each new pancake.
  7. Top with your choice of add ons, and enjoy!

Makes 6-7, 5″ pancakes

DSC_0032


Please note that some of the links in the above post are affiliate links that will take you to an Amazon.com page. If you choose to purchase a product featured in this post using an affiliate link, you will be directly supporting You’re An Animal. Thanks!


Flourless (Pea)Nut Butter Blossom Cookies (White Sugar-Free)

DSC_0034

Tis the season for Christmas cookies! I love making Christmas cookies, and when I asked Andrew what his favorite Christmas cookie is, he said “the peanut butter ones with the Hershey kiss in the middle.” Aka Peanut Butter Blossoms. Well, to be honest I’ve never made those before, so I don’t even know what the “normal” recipe is. But I do know that they often use some kind of flour, and they have a big ol’ processed chunk of chocolate in the middle. So in keeping with tradition, I used peanut butter and then subbed in coconut palm sugar to create an updated Peanut Butter Blossom. Now, that being said, we rarely (and I mean pretty much never) eat peanut butter. The main reason for this is because peanuts are highly inflammatory. The omega-6 to omega-3 ratio is off the charts. Not to mention peanuts have a reputation for harboring all kinds of mold and fungi. Yuuuu-mmy. So if you’d rather not use peanuts, you can certainly use any other kind of nut butter. Almond butter would work perfectly, and so would Sunbutter. This is your cookie, eat it the way you want! Whatever you use though, get a kind with nothing added. If possible, go to a store like Whole Foods that has it’s own peanut/almond grinder, that way you know for sure that you’re only getting the ground nut in your butter.

Oh hey, by the way, we put up our Christmas decor! Gotta love Gnomie.

photo(3)

Image from Instagram. Follow us at youreananimal

And also, I got a snazzy new DSLR camera for my birthday! Thanks mom and dad! I have no idea how to use it properly yet, but check out that picture quality:

DSC_0058

Also, did I mention these cookies only have 5 ingredients? Because they do. Which makes them simple, yet scrumptious. Chewy, dense, and full of flavor. Everything you want from your Christmas cookie!

DSC_0016

Nomz. I know Santa wouldn’t mind a big plate of these waiting for him next to the stockings. He needs some protein for all of those toy deliveries, right?

DSC_0050

Flourless (Pea)Nut Butter Blossoms:

  • 1 cup nut butter of your choice
  • 1/2 cup Coconut Palm Sugar
  • 1 egg
  • 1/2 tsp baking soda
  • Enjoy Life Mega Chunk chocolate chips (at least enough for 1 per cookie)
  1. Preheat your oven to 350 degrees F and line a baking sheet with parchment paper.
  2. In a large mixing bowl, combine all of your ingredients until one consistent texture. The dough will be sticky.
  3. Form balls of cookie dough, about 2 teaspoons of dough each. You should get close to 20 dough balls.
  4. Place each ball of dough on your parchment-lined baking sheet, leaving at least 1-2 inches of space in between.
  5. Bake for 10-12 minutes, until golden brown and cracked.
  6. Immediately after removing them from the oven, press a chocolate chunk into the middle.
  7. Allow to cool, and enjoy!

Makes about 20 cookies.

DSC_0067


Please note that some of the links in the above post are affiliate links that will take you to an Amazon.com page. If you choose to purchase a product featured in this post using an affiliate link, you will be directly supporting You’re An Animal. Thanks!


Grain-Free Drop Biscuits: Thanksgiving Cleaned Up Part 4

thanksgiving43

Thanksgiving is such a wonderful day. No presents, no pressure, just an abundance of food and family. But Thanksgiving can be a minefield of gluten-filled carbs, and sugar-overload. So in this series of “Thanksgiving Cleaned Up,” I’ve taken some classic Thanksgiving staple foods and made them a little bit less detrimental. You can check out my other posts, Sweet Potato Casserole, Garlic Kale Mashed Potatoes, and Pinot Noir Cranberry Sauce and have yourself a slightly less guilty, but certain not less hearty, Thanksgiving feast! Wonderful additions to this series would be my Autumn Salad and my Grain-Free Pumpkin Bread!

thanksgiving6

These biscuits are super easy to make (although they do require a little bit of clean up), and I pretty much always have the ingredients on hand. For that reason, they have become a weekend brunch go-to in our house. But they also fit right in while traditional Thanksgiving fare! I adapted this recipe from this one by Paleo Comfort Foods. I tried the original recipe first, but they tasted too coconutty, and crumbled way too easily. So I changed the flour combo, and they turned out perfectly. Slightly flaky, insanely buttery, with pockets to hold your jelly 🙂 Or in this case, Pinot Noir Cranberry Sauce!

thanksgiving15

Grain-Free Drop Biscuits

  • 4 eggs, yolks and whites divided (place your egg white in a large mixing bowl, and your yolks in a small bowl off to the side)
  • 1/4 cup coconut flour
  • 2 Tbsp arrowroot starch
  • 2 Tbsp potato starch
  • 1/2 tsp cream of tartar
  • 1/2 tsp baking soda
  • 4 Tbsp cold butter
  1. Preheat oven to 400 degrees F and line a baking sheet with parchment paper.
  2. In a medium sized mixing bowl, combine your dry ingredients (coconut flour, arrowroot, potato starch, cream of tartar and baking soda)
  3. To your dry ingredients, cut in your cold butter. This is like making a pastry or pie crust. You can use a pastry cutter, but I just quickly use my hands to combine the butter with the dry ingredients, until the butter is in pea-sized bits. Place this flour/butter combo in the fridge so it stays cold.
  4. Using an electric mixer, beat the egg whites until they become a foam. Continue to beat until soft peaks form at the end of your beaters when you remove it from the mixture.
  5. Carefully fold your egg yolks into your egg white mixture using a rubber spatula, until no streaks remain and the mixture is a solid, light yellow color. The whites will lose a little volume, but should still be pretty fluffy.
  6. Fold in your flour and butter mixture with your rubber spatula, again being careful to mix thoroughly without losing too much volume in the egg whites. The batter will be runny, like a cake batter.
  7. Spoon the batter onto the parchment paper into 4 equal drops. Give each biscuit space, as they will expand while baking. Do not flatten them out, just leave them in the shape in which they drop on the parchment.
  8. Bake the biscuits for 12-17 minutes, or until they have risen and are golden brown on top.
  9. Serve hot.

Makes 4 large biscuits.

thanksgiving73


Pinot Noir Cranberry Sauce: Thanksgiving Cleaned Up Part 3

thanksgiving47

Thanksgiving is such a wonderful day. No presents, no pressure, just an abundance of food and family. But Thanksgiving can be a minefield of gluten-filled carbs, and sugar-overload. So in this series of “Thanksgiving Cleaned Up,” I’ve taken some classic Thanksgiving staple foods and made them a little bit less detrimental. You can check out my other posts, Sweet Potato Casserole, Garlic Kale Mashed Potatoes, and Grain-Free Drop Biscuits and have yourself a slightly less guilty, but certain not less hearty, Thanksgiving feast! Wonderful additions to this series would be my Autumn Salad and my Grain-Free Pumpkin Bread!

thanksgiving6

Cranberry sauce is not something I’ve ever really been able to get into. Don’t get me wrong, we always had it on the table, but something about it’s square/canned jelly shape really turned me away. But I know it’s a traditional staple, and it’s a fruit sauce, so I knew I had to be able to figure out a recipe that I would actually enjoy. From what I understand (I’ve never eaten it, remember?) people put this on whatever they want… meat, biscuits, spoons, anything. Same goes for this sauce. It’s more on the tart side, so it would go well on meat, but it’s sweet enough to eat on a biscuit which is exactly what I did. The wine gives it such a wonderfully rich flavor, this stuff is hard to pass up.

thanksgiving66

Pinot Noir Cranberry Sauce

  • 6 oz of fresh, organic cranberries
  • 1/2 cup of Pinot Noir
  • 1/2 cup of orange juice
  • 1/2 cup maple syrup or unfiltered honey
  • 1 Tbsp lemon juice
  1. Add all your ingredients to a medium sauce pan, and heat over medium to medium-high heat, until the mixture just starts to boil.
  2. Continue to stir over heat, until the cranberries start to burst.
  3. Using the back of a spoon, or a potato masher, smash the cranberries into a paste, continuing to stir.
  4. Allow the mixture to sit over heat, bubbling slightly, and the sauce will start to thicken.
  5. Stir occasionally, and continue to allow the sauce to thicken until it is a thick, syrupy consistency.
  6. Transfer to a serving vessel and serve.

Makes about 1 cup of sauce.

thanksgiving73


Garlic Kale Mashed Potatoes: Thanksgiving Cleaned Up Part 2

thanksgiving63

Thanksgiving is such a wonderful day. No presents, no pressure, just an abundance of food and family. But Thanksgiving can be a minefield of gluten-filled carbs, and sugar-overload. So in this series of “Thanksgiving Cleaned Up,” I’ve taken some classic Thanksgiving staple foods and made them a little bit less detrimental. You can check out my other posts, Sweet Potato Casserole, Pinot Noir Cranberry Sauce, and Grain-Free Drop Biscuits and have yourself a slightly less guilty, but certain not less hearty, Thanksgiving feast! Wonderful additions to this series would be my Autumn Salad and my Grain-Free Pumpkin Bread!

thanksgiving6

This is my favorite part of Thanksgiving: mashed potatoes. But sometimes it’s hard to feel like it’s okay eating an entire plateful (just me?). That is, until you add kale. Add kale and you can eat the entire pot. Those are my rules, and I’m sticking to them. These mashed potatoes are probably some of the best I’ve ever had. As I was mashing them up, I kept sneaking bites. Before I even took pictures of it, I’d probably eaten a few spoonfuls. Oh and they were gone by the end of the day. And like I said, totally not even feeling guilty because that means I ate a bunch of green goodness as well. These potatoes are everything you want from your comfort food friend, and then some. Bring this one to your Thanksgiving potluck and tell people to eat freely because it’s healthy (healthier…)!

Garlic Kale Mashed Potatoes

  • 2 lbs of red potatoes, chopped into 1 inch chunks
  • 2 large leaves of kale, chopped (about 4 cups)
  • 2 cloves of garlic, minced (Hey, learn how to prepare and maximize the benefits of garlic here!)
  • 2 Tbsp olive oil
  • 3 Tbsp grass-fed butter (I use Kerrygold)
  • 1/4 cup Parmesan cheese
  • salt, pepper, and red pepper flakes to taste
  1. In 3-4 quarts of water, boil your chopped potatoes until fork tender (about 20 minutes)
  2. While the potatoes are boiling, add your olive oil, minced garlic, salt, pepper, and red pepper flakes to a saute pan over medium heat. Allow the garlic to cook and flavor the oil until just slightly golden.
  3. To the oil mixture, add the chopped kale to the saute pan. Allow the kale to wilt and cook down, until it is completely shrunk down in size and wilted.
  4. Drain the potatoes, and add them back to the now empty pot that they cooked in. Add the kale and flavored oil to the potatoes. Using a fork or potatoes masher, mash the potatoes until smooth and combined the kale and flavored oil into the potatoes.
  5. Add the butter and Parmesan to the mashed potato mixture. Again, mix until melted and combined.
  6. Serve hot.

Makes about 4-6 servings of potatoes.


Sweet Potato Casserole: Thanksgiving Cleaned Up Part 1

thanksgiving93

Thanksgiving is such a wonderful day. No presents, no pressure, just an abundance of food and family. But Thanksgiving can be a minefield of gluten-filled carbs, and sugar-overload. So in this series of “Thanksgiving Cleaned Up,” I’ve taken some classic Thanksgiving staple foods and made them a little bit less detrimental. You can check out my other posts, Garlic Kale Mashed Potatoes, Pinot Noir Cranberry Sauce, and Grain-Free Drop Biscuits and have yourself a slightly less guilty, but certain not less hearty, Thanksgiving feast! Wonderful additions to this series would be my Autumn Salad and my Grain-Free Pumpkin Bread!

thanksgiving6

I’m starting this series off with dessert. Gotta eat dessert first ;). I know the classic dessert for Thanksgiving is pumpkin pie, but I don’t actually particularly like pie (except Key Lime… I know, apparently there’s something wrong with me.) So this “dessert” substitute is something we always had on our Thanksgiving table growing up: Sweet Potato Casserole. Complete with the toasted marshmallows, because that’s a must-have element. I also added some bacon, because everything is better with bacon and this is no exception. No added sugar to the potatoes because sweet potatoes are just that: sweet. And the marshmallows already add that little extra sugar. The sweet, spicy and salty combo is perfect to round out your Thanksgiving table for dessert, with your meal, or as a pre-feast snack… I won’t tell!

Sweet Potato Casserole

  • 2 lbs of sweet potatoes, roasted and mashed
  • 1/2 cup coconut milk (from a can)
  • 1/2 tsp each of ground clove, ground nutmeg and ground ginger
  • 2 tsp of ground cinnamon
  • 2 Tbsp grass-fed butter (I use Kerrygold)
  • Homemade Marshmallows (about 1 cup)
  • 4 strips of bacon, cooked and crumbled
  1. Roast and mash your sweet potatoes. Transfer into a large mixing bowl.
  2. Add the butter, coconut milk, clove, nutmeg, ginger, and cinnamon to your sweet potatoes.
  3. Use an electric mixer to combine the ingredients, and whip until smooth.
  4. Transfer your potato mix to oven-safe bake ware (I used an 8×8 Pyrex dish)
  5. Dig out a hole in the middle of your potatoes. Add a handful of marshmallows in the hole.
  6. Place your potatoes with the marshmallows in the oven under broil, and allow the marshmallows to toast until golden brown.
  7. Remove from the oven, and sprinkle the crumbled bacon around the edges, around the marshmallow middle.
  8. Serve hot.

Makes about 4-6 servings of potatoes.


Anti-Inflammatory Turmeric Tea

turmerictea5

This tea has gotten me through some hard times recently. And by hard times I mean this cold front that has taken the entire country in its icy grip and refused to let go. Luckily, here in RVA we have yet to see snow, but the cold and I don’t get along too well. On top of that, I’ve been fighting hard against a cold that has been trying to turn into a sinus infection (and so far I’m winning… huzzah!) and this tea (plus my handy dandy netti pot) has been one of my closest fraaaands. Not to mention this tea is a combination of things that will do a body good. I mean GOOD. Let me break it down for you:

Turmeric: This spice is a member of the ginger root family, and is known for its anti-inflammatory effects. In fact, in India, it is widely used for arthritis and joint pain relief. A main compound of turmeric, curcumin, has been shown in at least 30 different studies to have anti-tumor/anticancer and antioxidant effects. This spice has also been shown to be a wonderful detoxing agent for the liver.

Ginger: A classic for settling an upset stomach, this root too has anti-inflammatory effects. Ginger has also been shown to improve circulation, and has been used in Asian cultures for hundreds of years to treat cold hands and feet.

Cinnamon: Cinnamon has been shown to lower blood sugar by increasing glucose metabolism, and also to improve capillary function. This spice also has antimicrobial and anti-inflammatory effects.

Source for spice information:

Aside from all of these amazing benefits, personally I think this tea tastes amazing. And I am not a tea drinker. My idea of tea used to be McDonald’s Sweet Tea… yeah, I’ve moved on to bigger an better things these days. turmerictea2

Ready to learn more about how to nourish your body with basic nutrition principles? We have an eBook for that!

The Groundwork Guide is the best place to start if you’re looking for the “hows” and “whys” of healthy living, particularly from a scientific perspective. This guide will arm you with the very basics of human health, and help you be able to navigate the often muddy waters and mixed signals we are given every day about our bodies. Perfect for those who want to understand the most foundational levels of nutrition and movement, you can learn more about what is included in this very special manual here.

Groundwork Guide Cover


Anti-Inflammatory Turmeric Tea

  • 1 cup of water
  • 1/4 tsp ground turmeric
  • 1/4 tsp ground cinnamon
  • 1/4 tsp ground ginger
  • 1/2-1 tsp unfiltered honey (depending on your preferred sweetness)
  • 1 Tbsp lemon juice
  1. In a small saucepan, bring the water to a steam (not quite to a boil, the hotter it gets, the longer you have to wait for it to cool.)
  2. Add the spices, honey and lemon juice, and stir to combine.
  3. Remove the saucepan from heat, and cover with a lid.
  4. Allow the mixture to steam and combine for 10 minutes.
  5. Drink once cooled. This tea will settle as you drink it, so you will need a spoon to redistribute the spices.