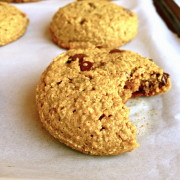
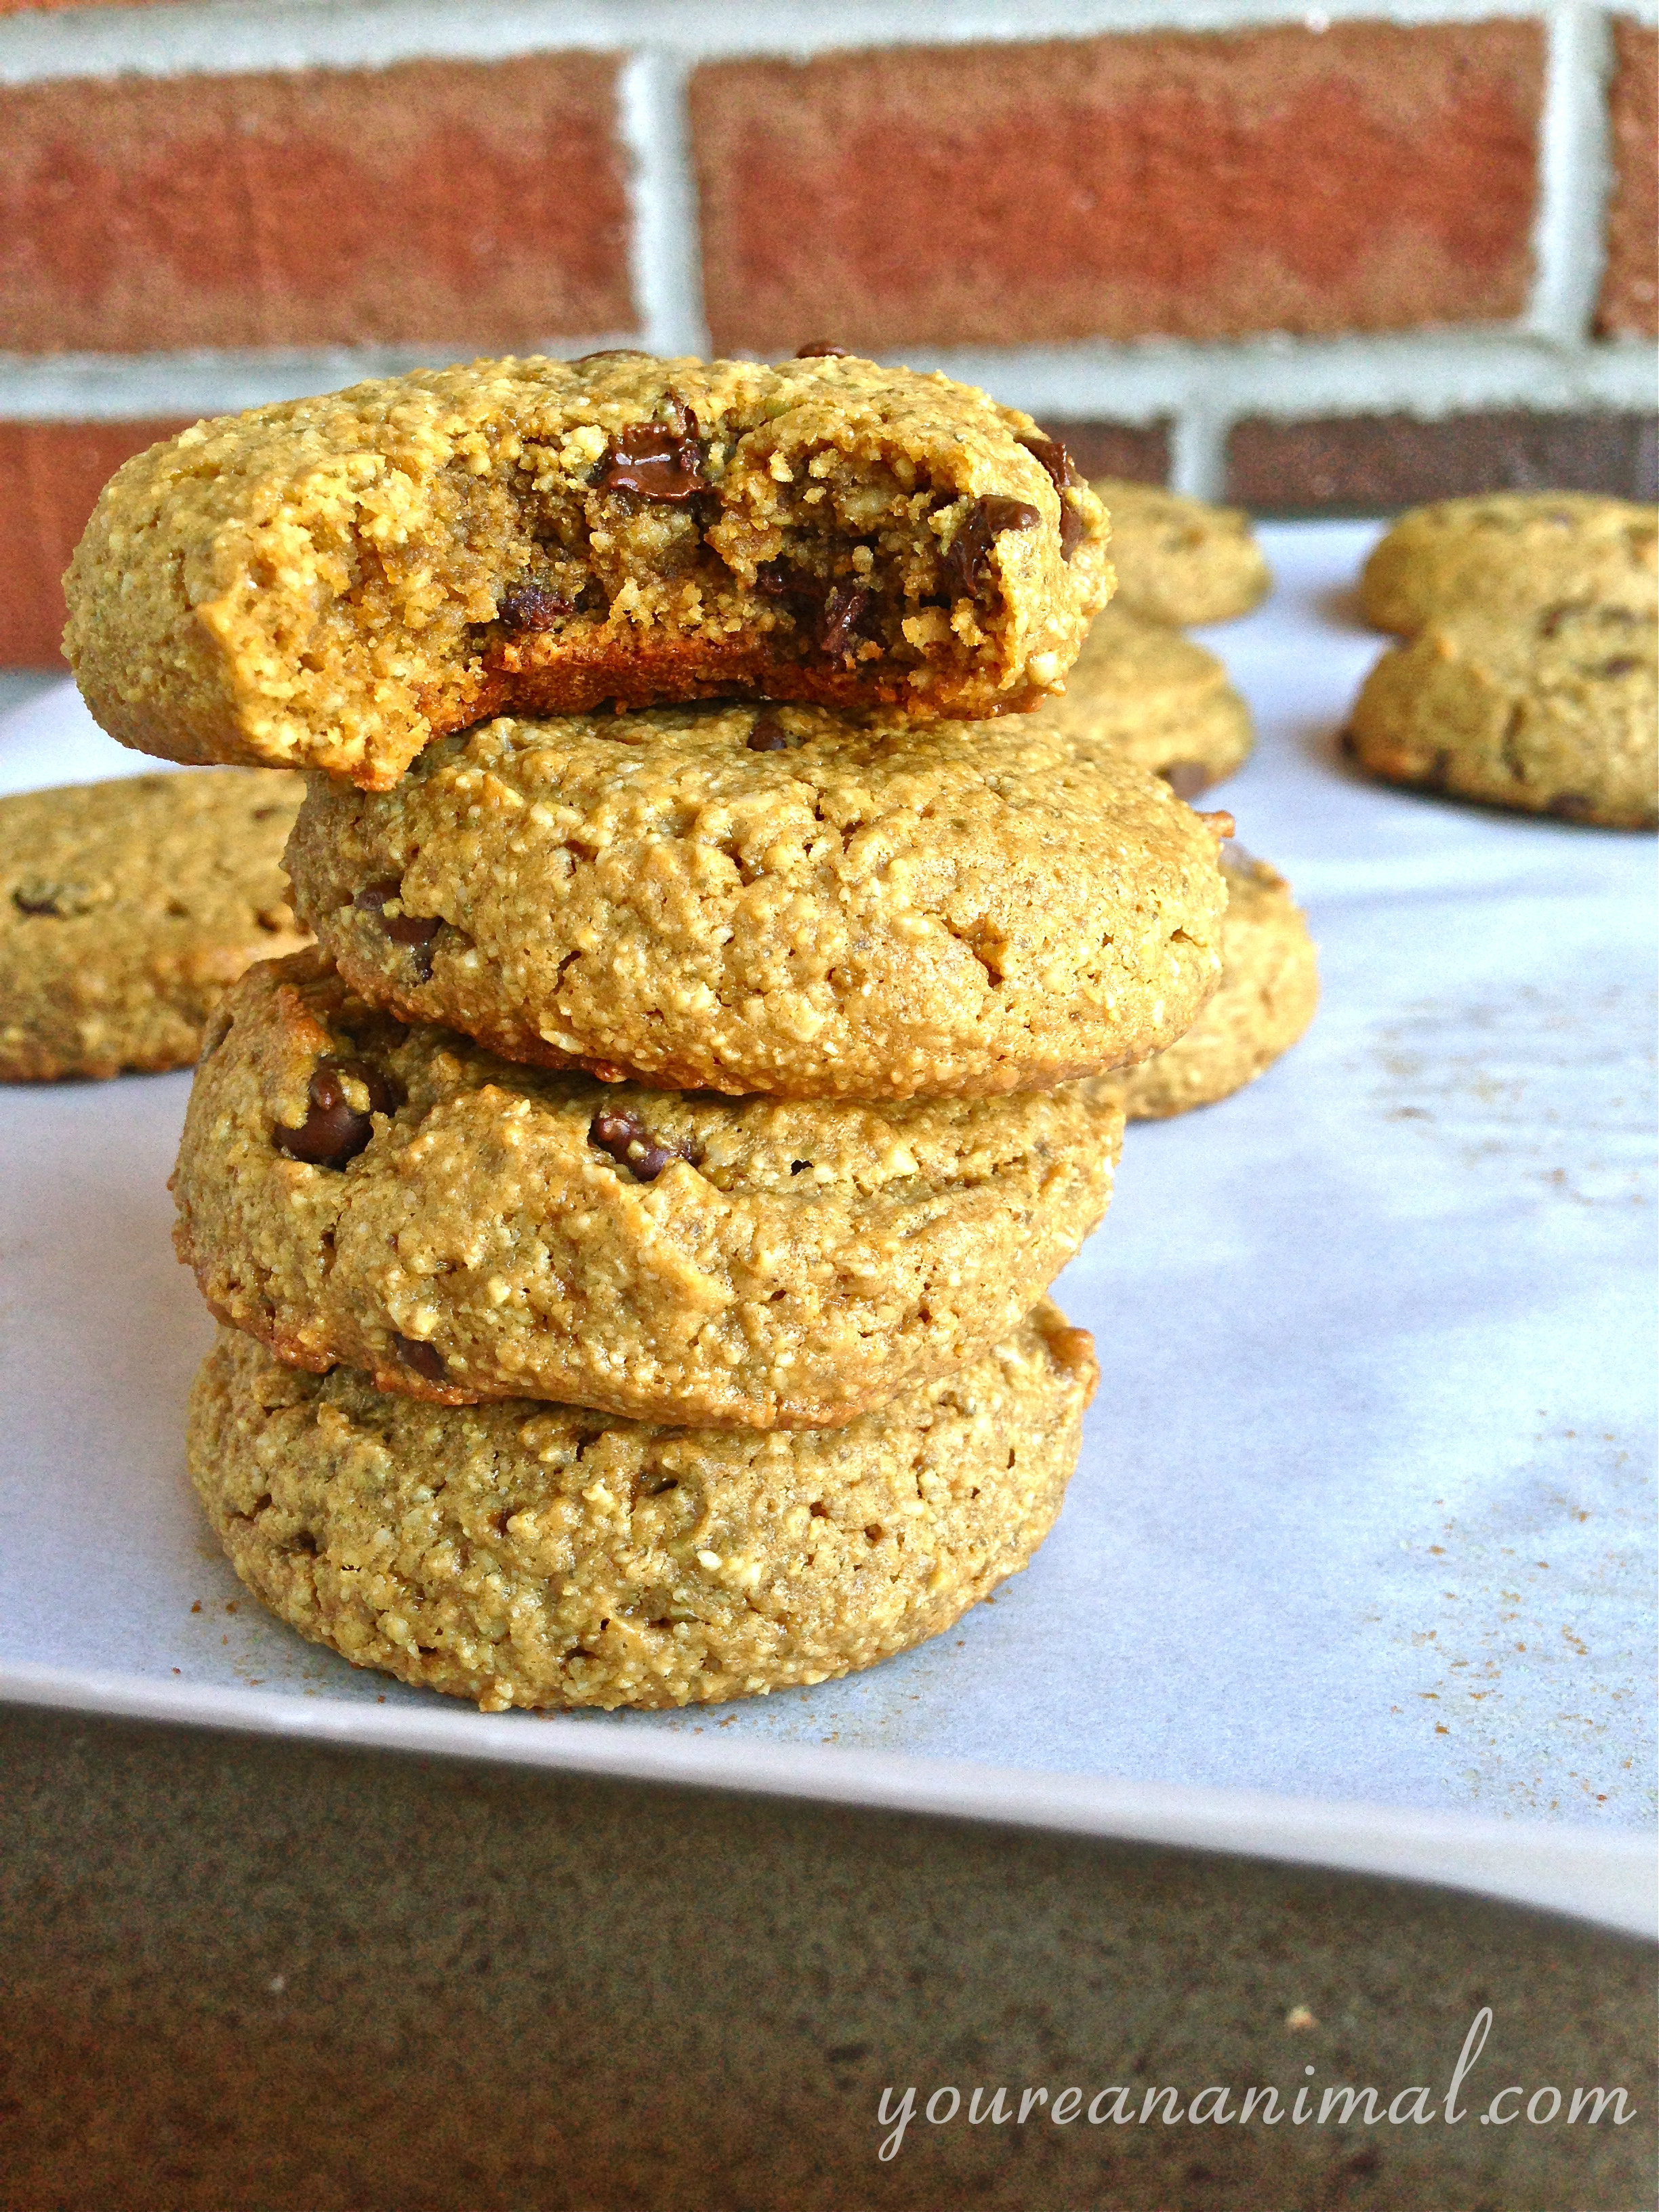
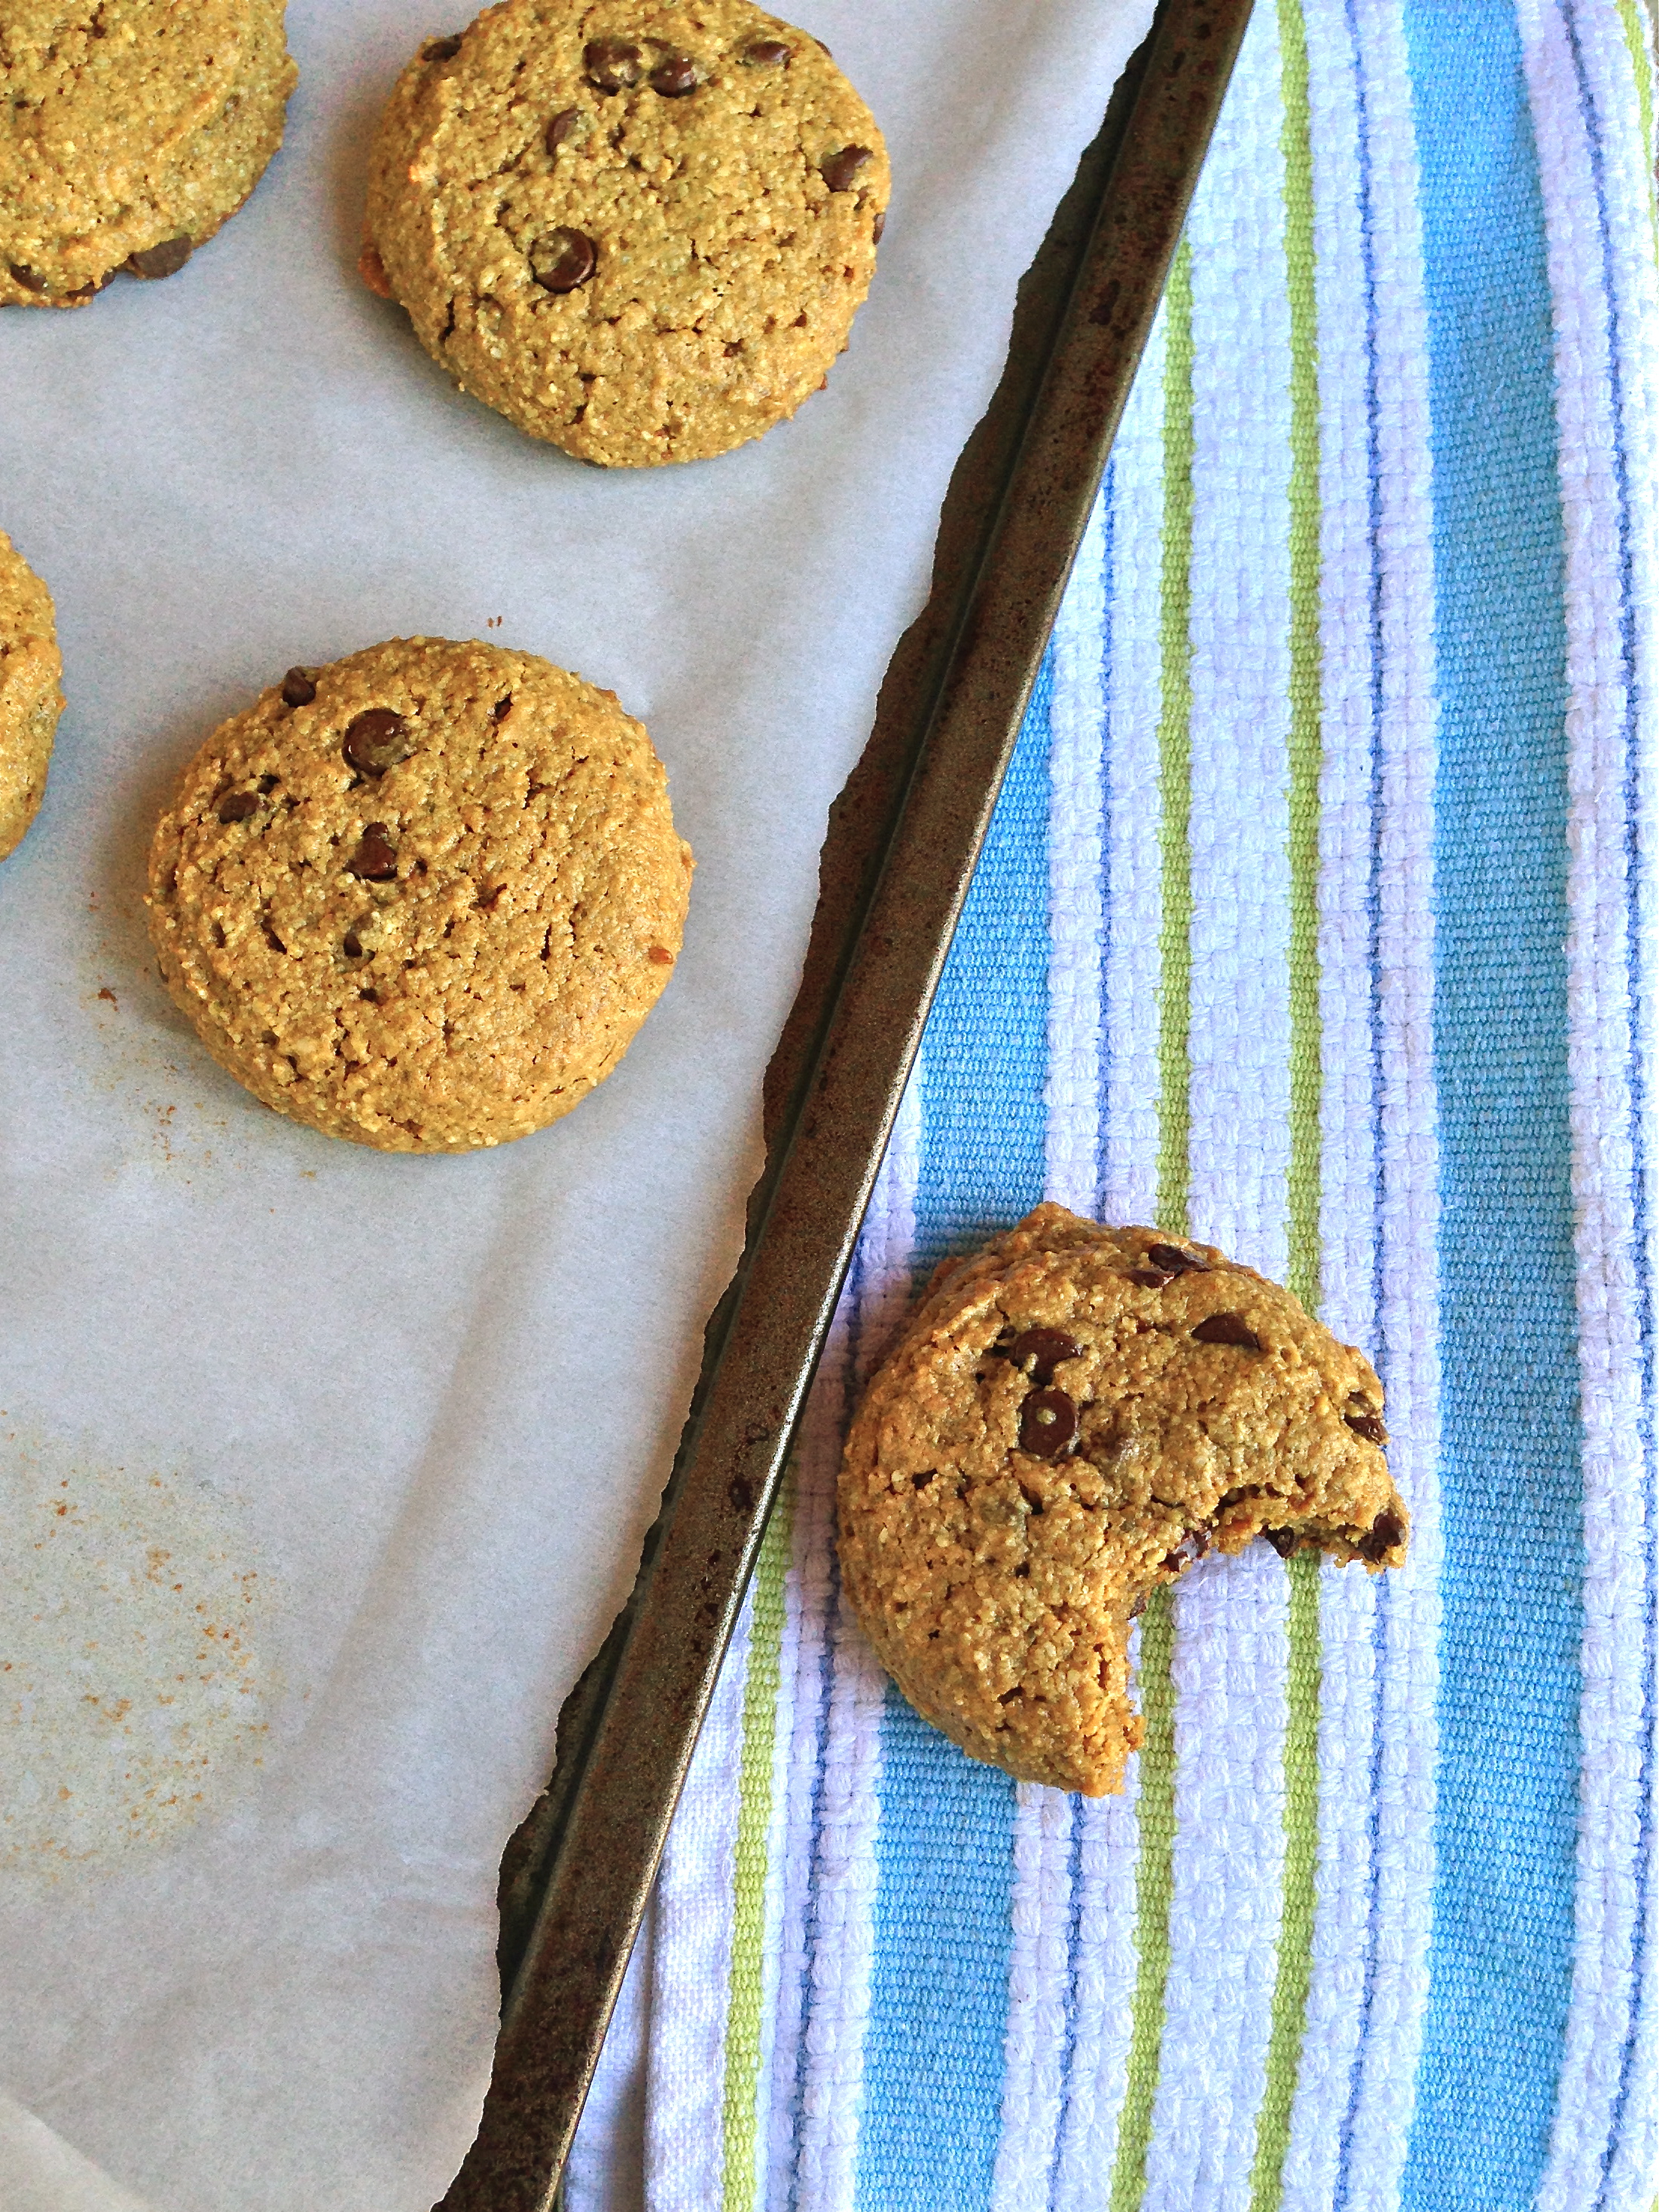
Pumpkin Bread (Grain-Free, Nut-Free)

pumpkinbread4

Welcome to Part 2 of my Pumpkin Everything obsession! I expressed my love for pumpkin season (aka I’m addicted to cinnamon) in my Dairy-Free Pumpkin Ice Cream post here, and am continuing the trend with a glorious grain-free, gluten-free, nut-free, white sugar-free, paleo (ish) pumpkin bread. Well what the heck is even in it? Coconut flour and starch, my dears! Andrew and I have decided to go without nuts and seeds, at least for a little while, after realizing how much phytic acid we were eating with our nut and seed intake. I had already cut out nuts last fall after getting rashes on my legs and face, but Andrew was having a weird reaction on his tongue (almost like a Geographic Tongue), and after a lot of research we decided that it might be worth a try to cut out the nuts and seeds. And guess what… so far so good! We both feel better without the nuts and seeds, so we’re sticking with it for now. However, that makes grain-free baking increasingly more difficult, since most grain-free baking uses almond meal or sunflower seed meal as a replacement. So I began experimenting with something different: starch. Specifically potato starch and arrowroot starch. I have come to prefer potato starch for baking, as I think arrowroot starch is a little too chewy and has a stronger taste when used in larger quantities. Now, I know there are mixed feelings about potatoes (helllllo carbs… and this is also why I dubbed this “paleo-ish” since for many paleo people white potatoes are a no-no) and therefore potato starch may throw up a red flag for a lot of people, but when we went to Portland we were introduced to an interesting concept. That concept is called Resistant Starch. I’m not going to go into the details here because it is still very new to me and I am no expert, but basically resistant starch can be found in cooled starches such as white potatoes and white rice, and is very beneficial for gut flora and essentially acts as a pro-biotic. You can read more about resistant starch in this article, and this article, but I also recommend you doing your own research. It’s been very fascinating to learn about.

On another note, our little blog here hit over 100 unique visitors for the first time yesterday! Thanks to foodgawker.com for sending people our way. I’m excited to hopefully continue to see this website grow and start reaching more people! I’m really enjoying this new hobby and creative outlet, plus I love working on it with my guy 🙂

photo

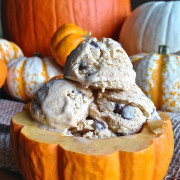
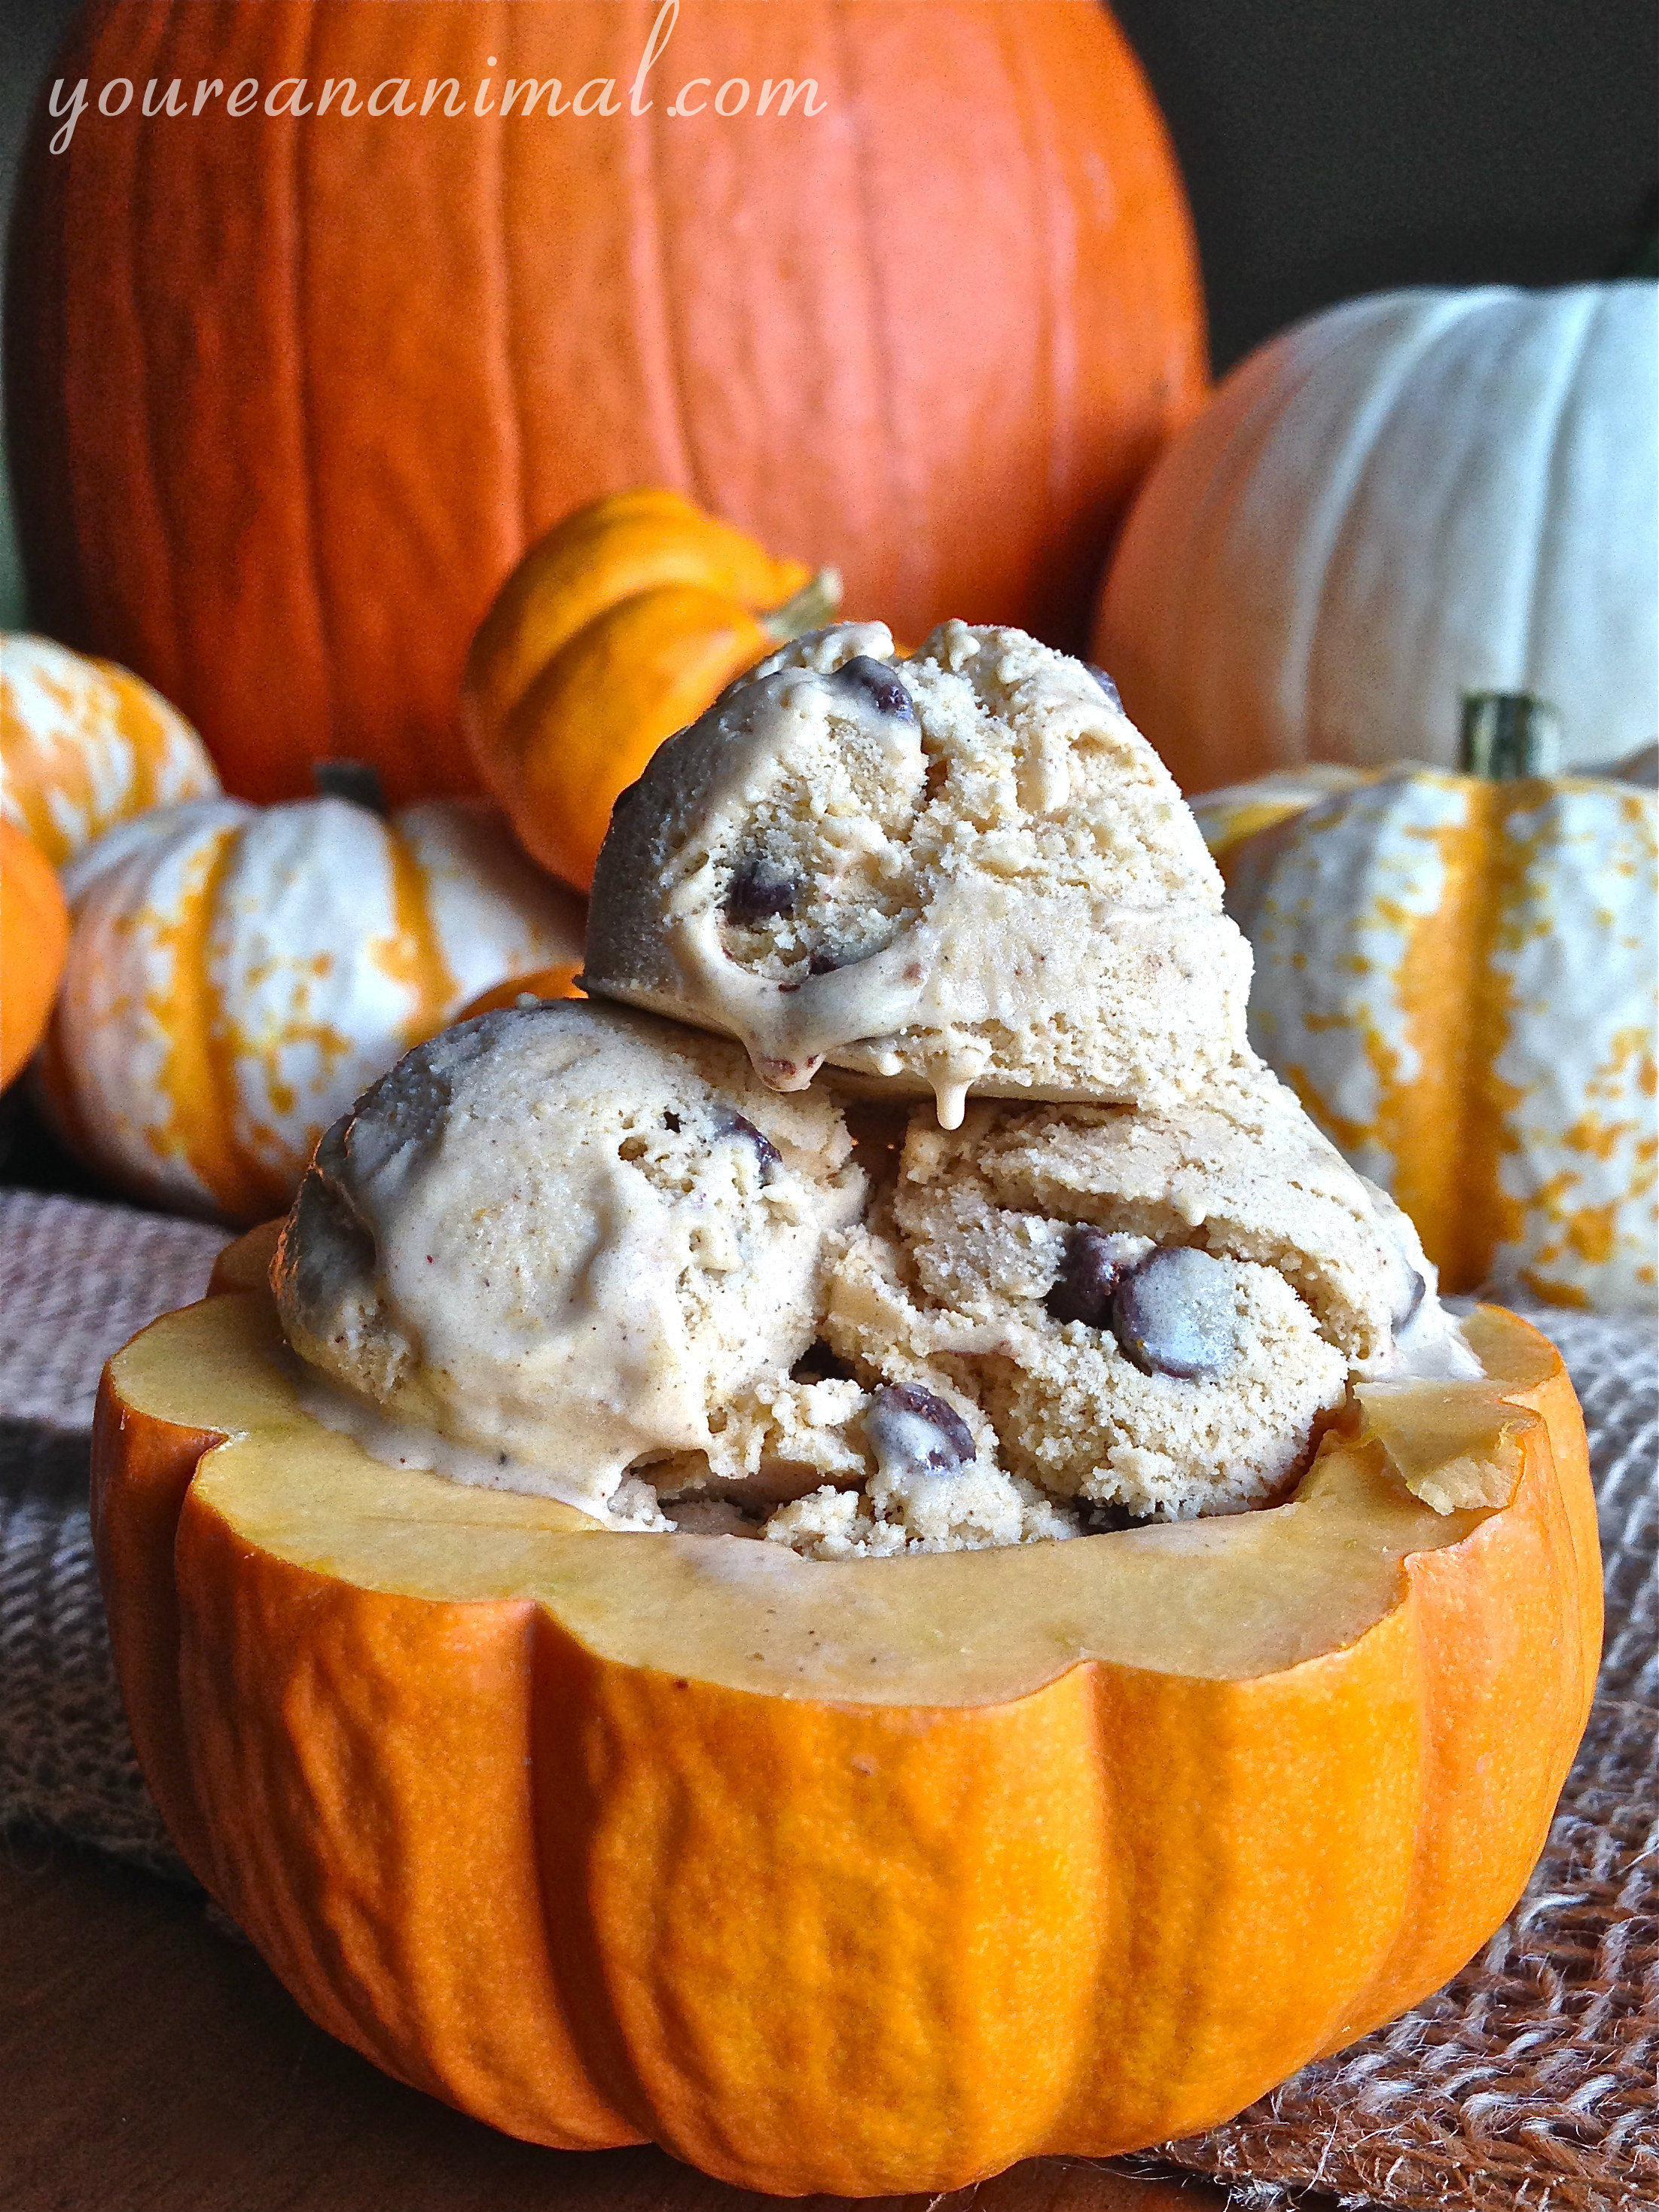
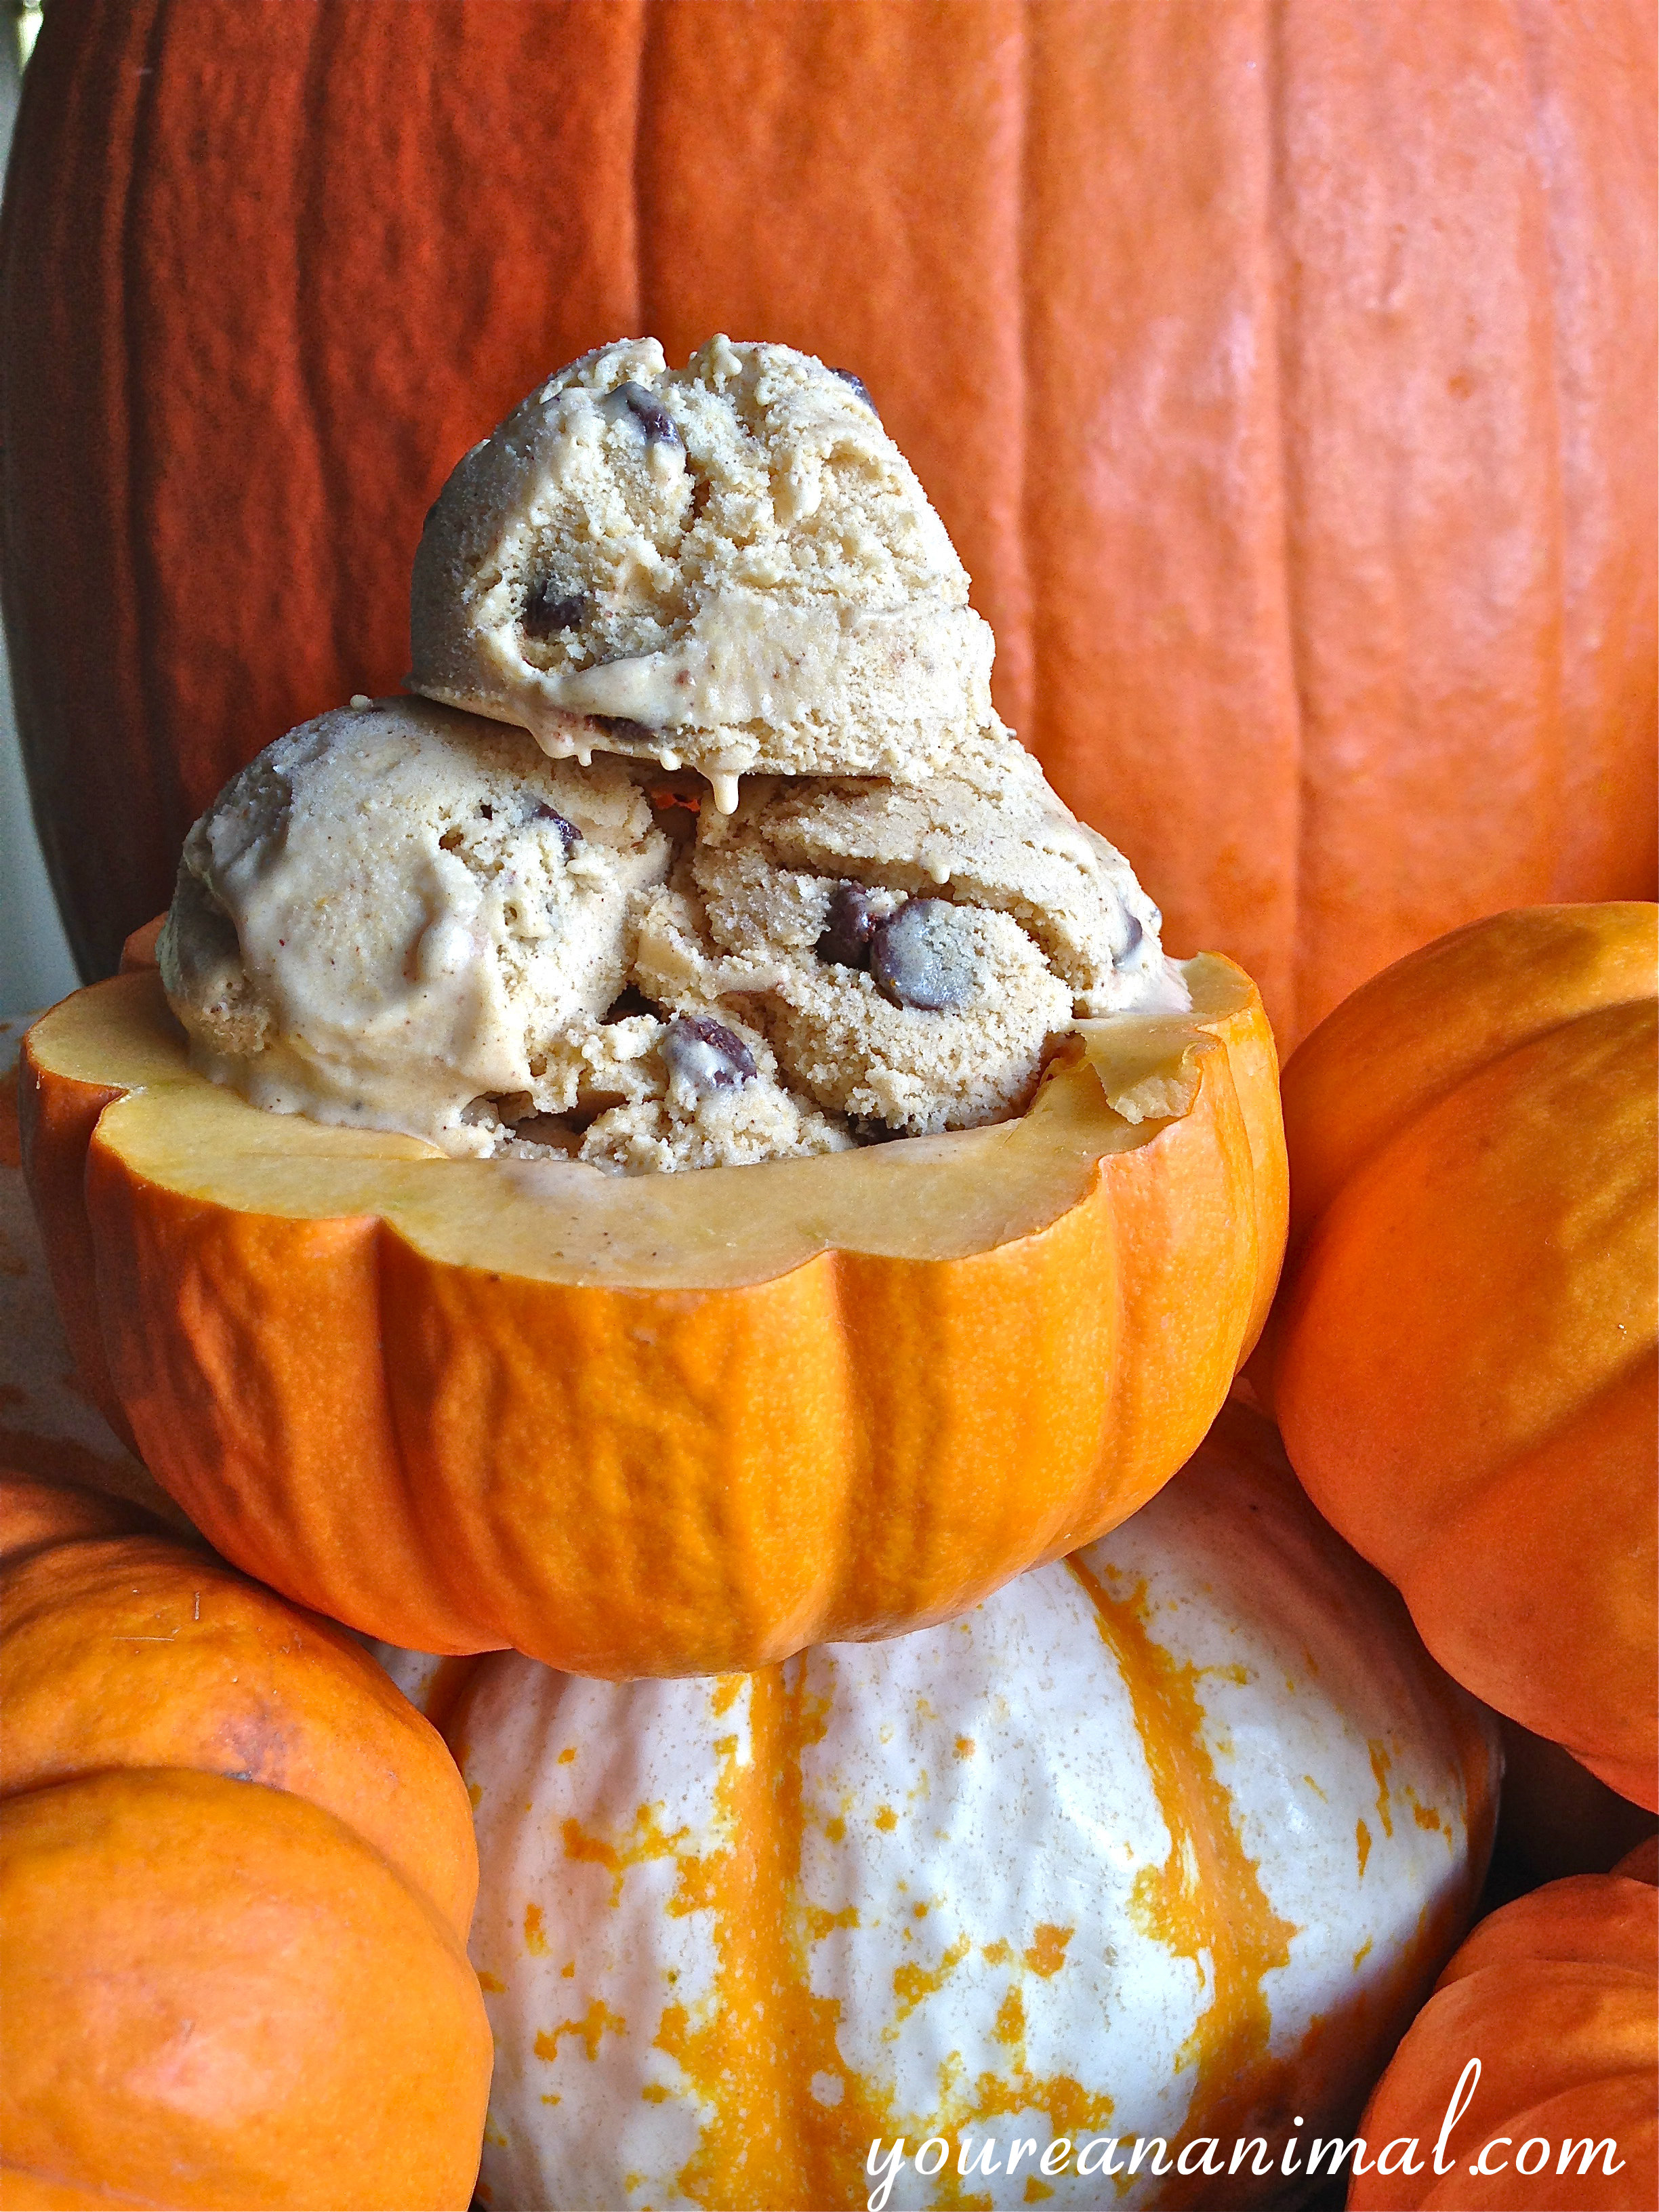
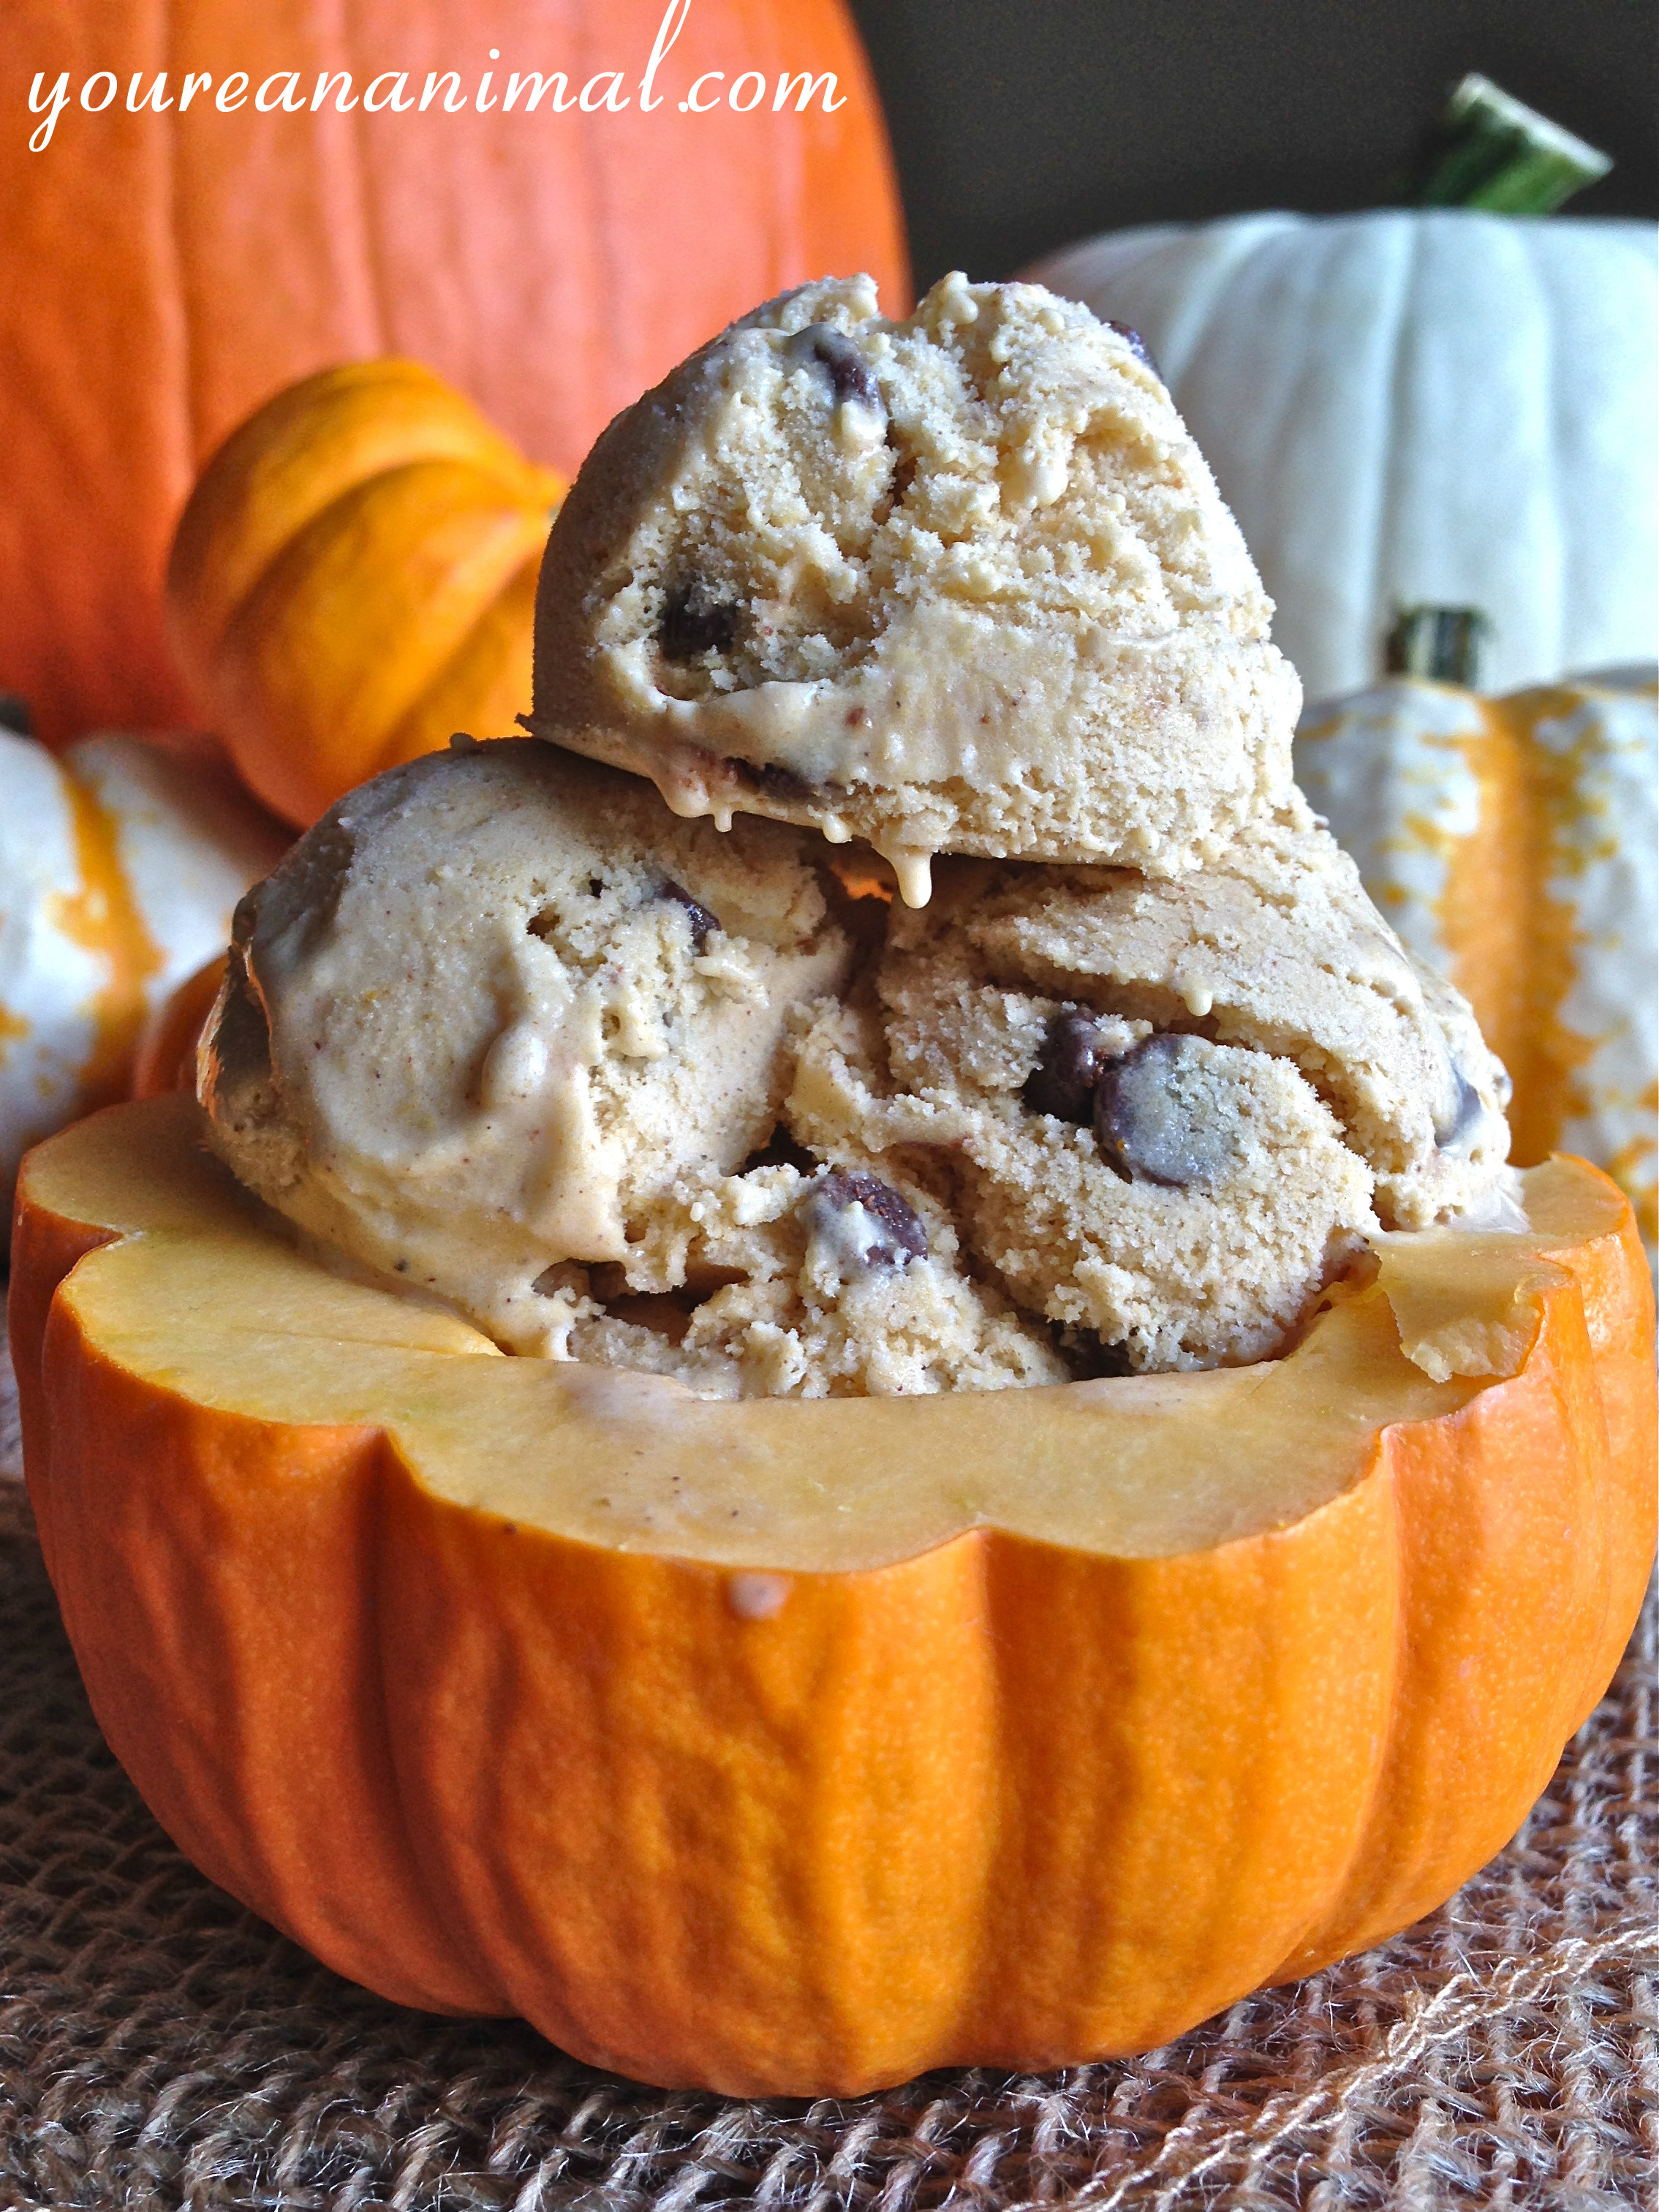
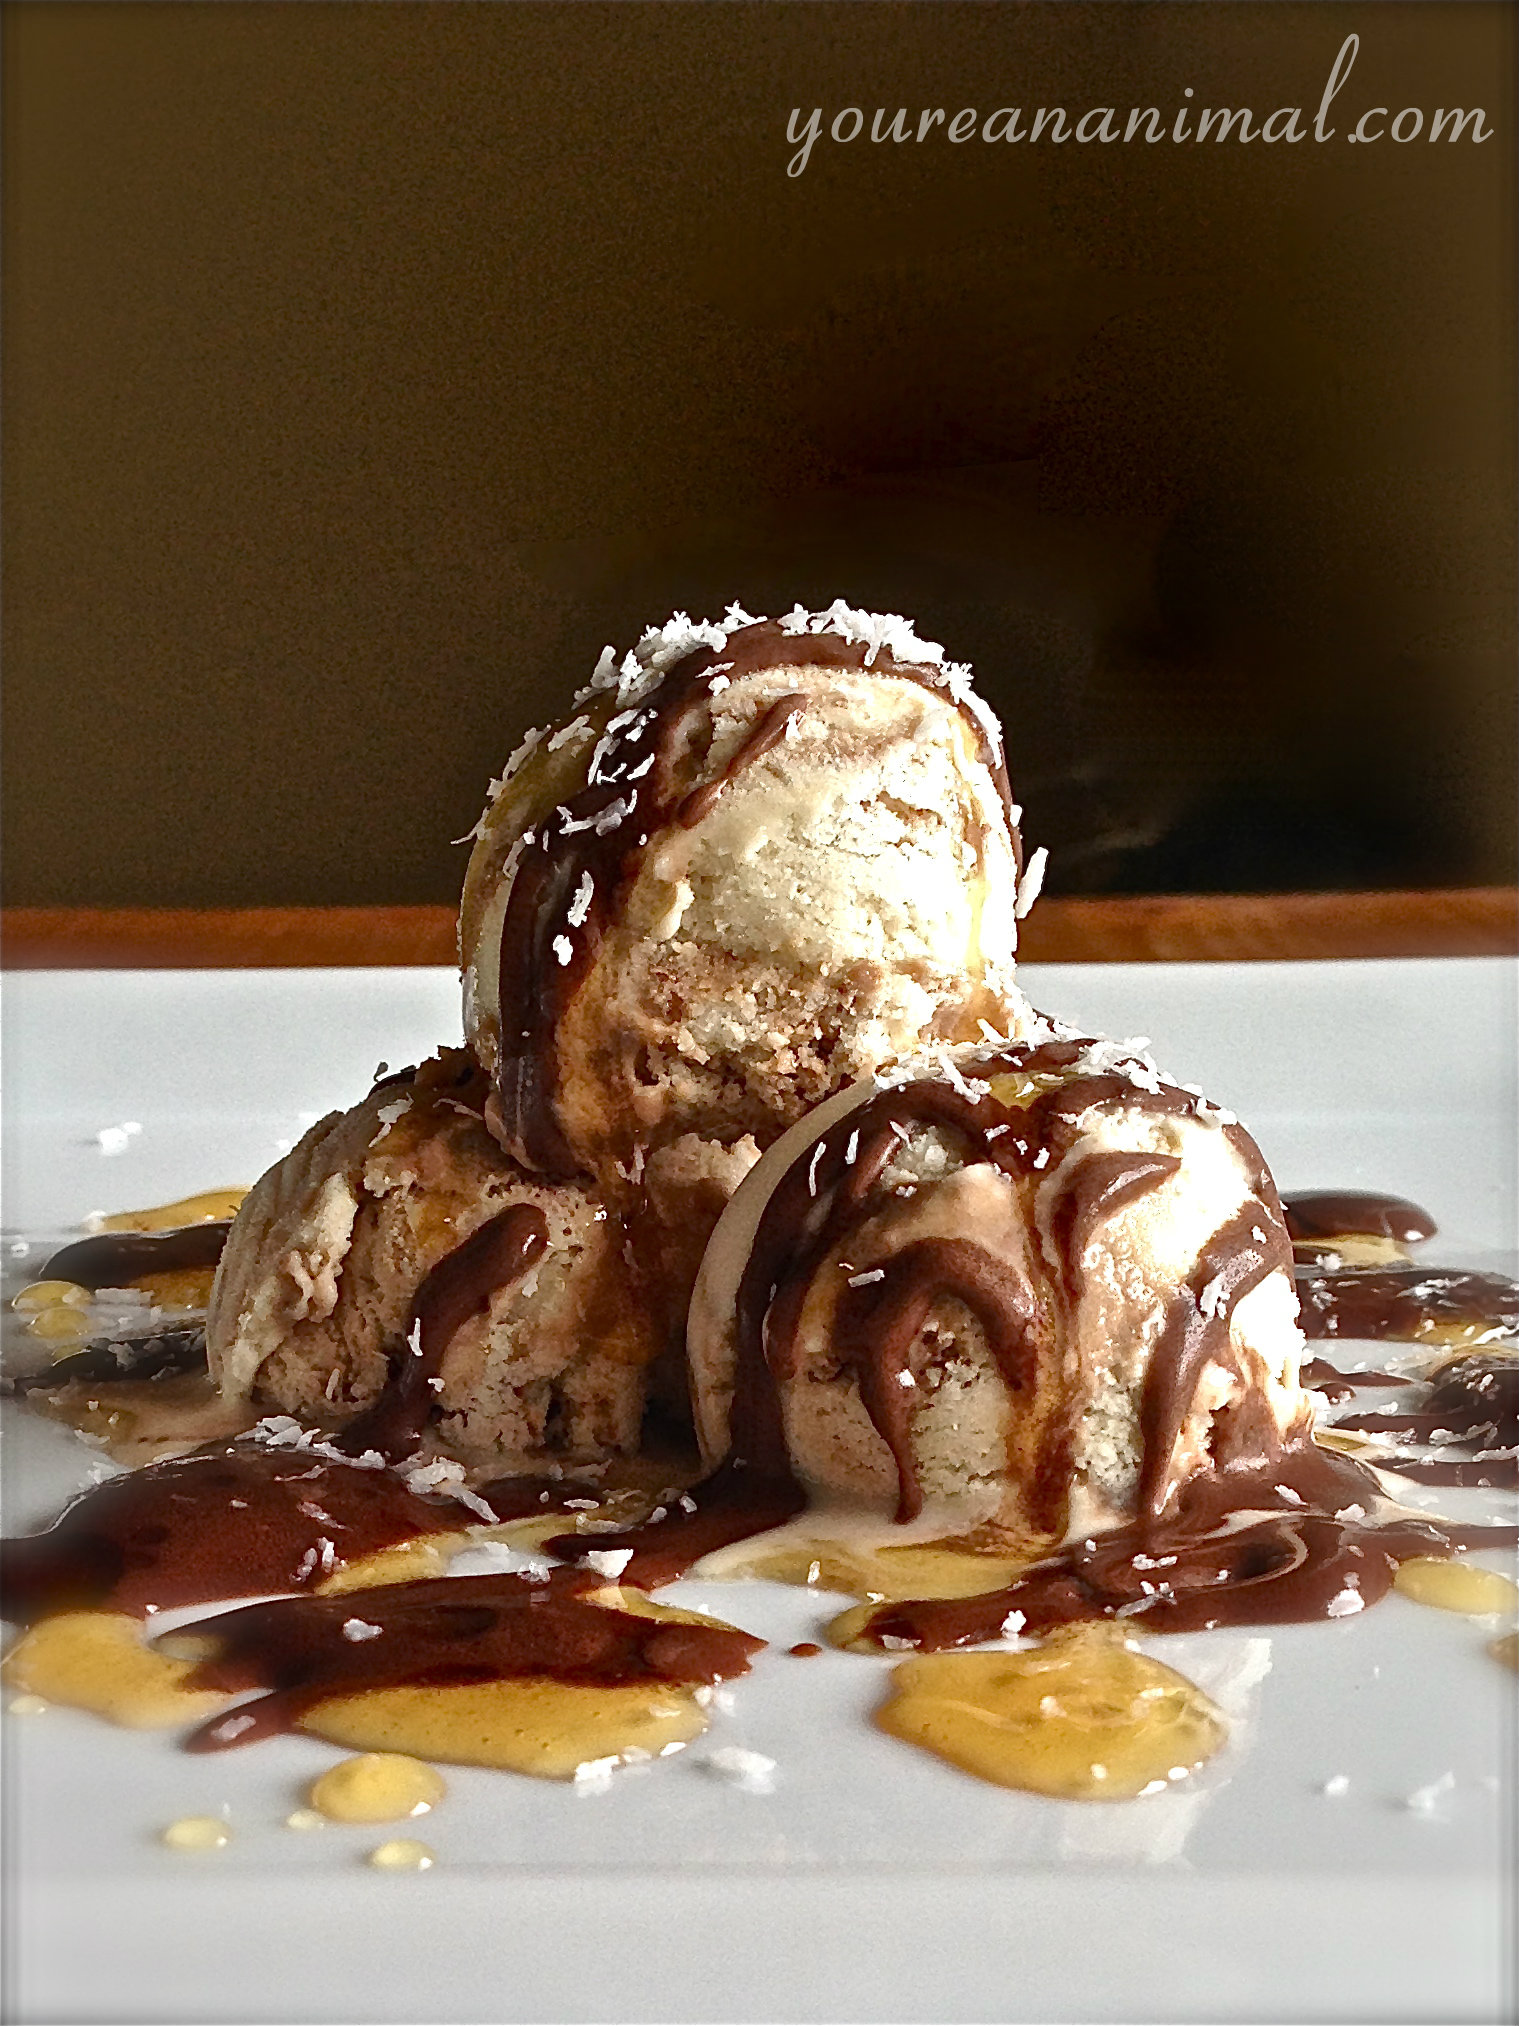
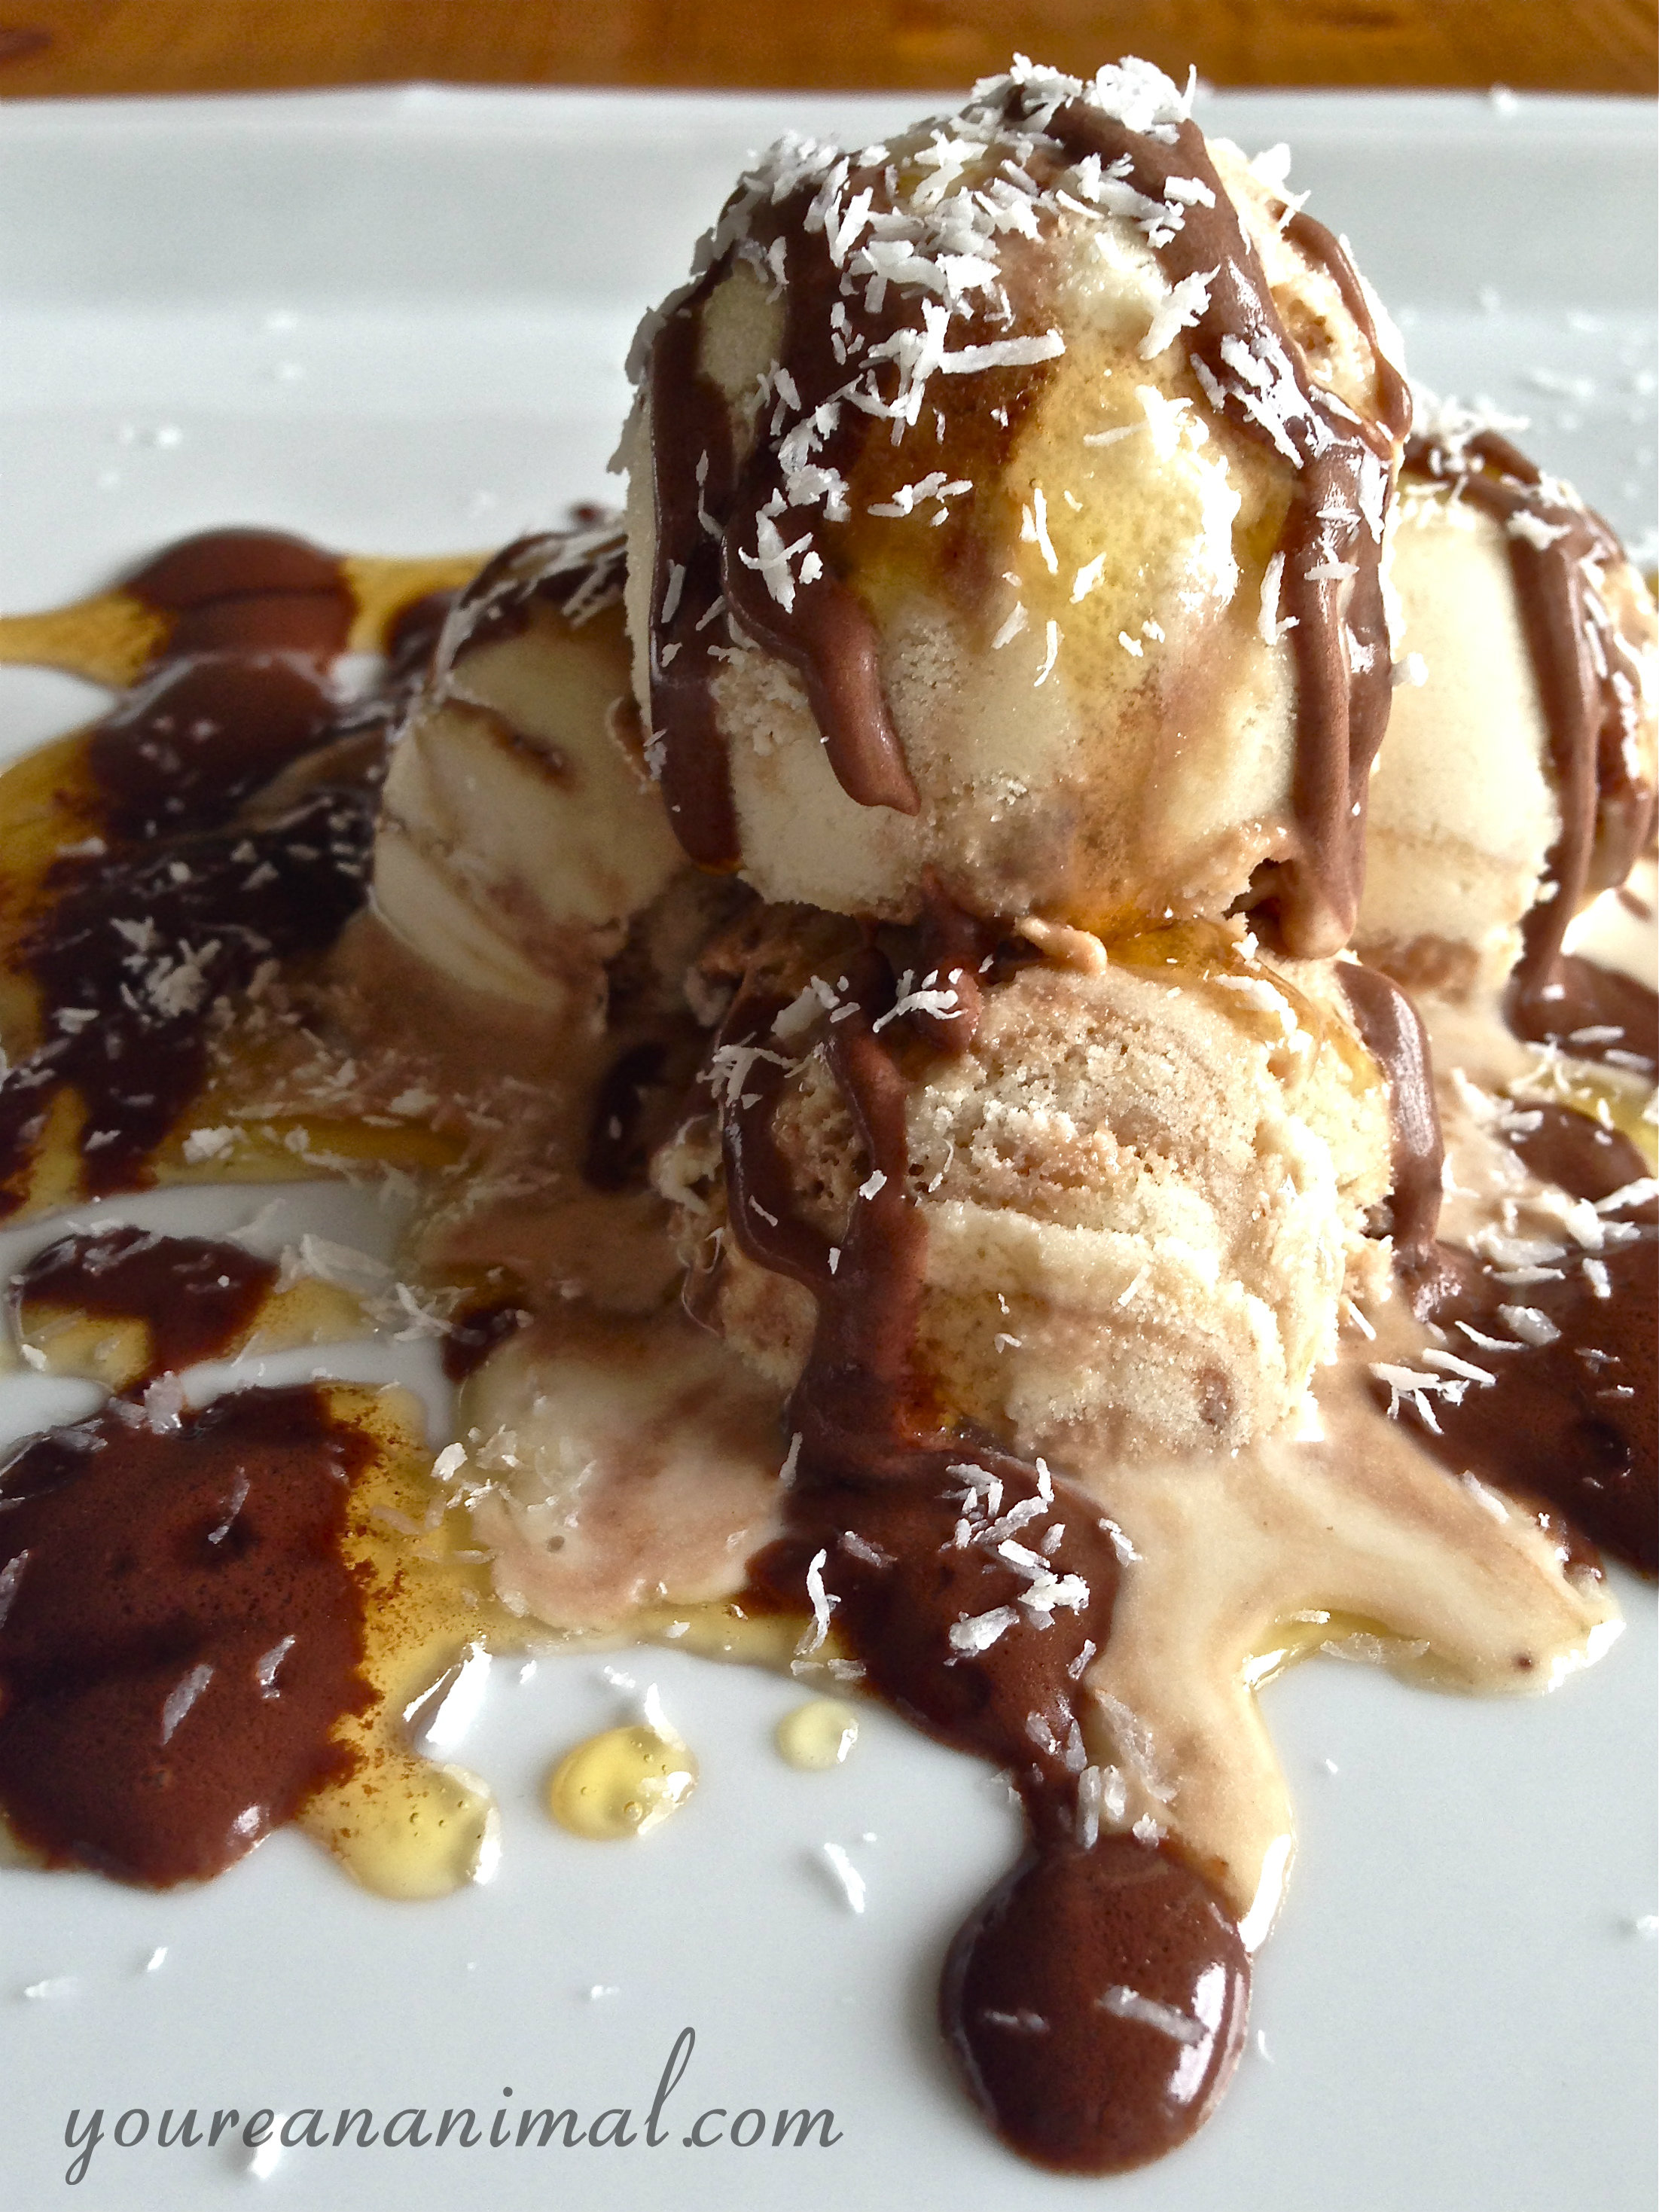
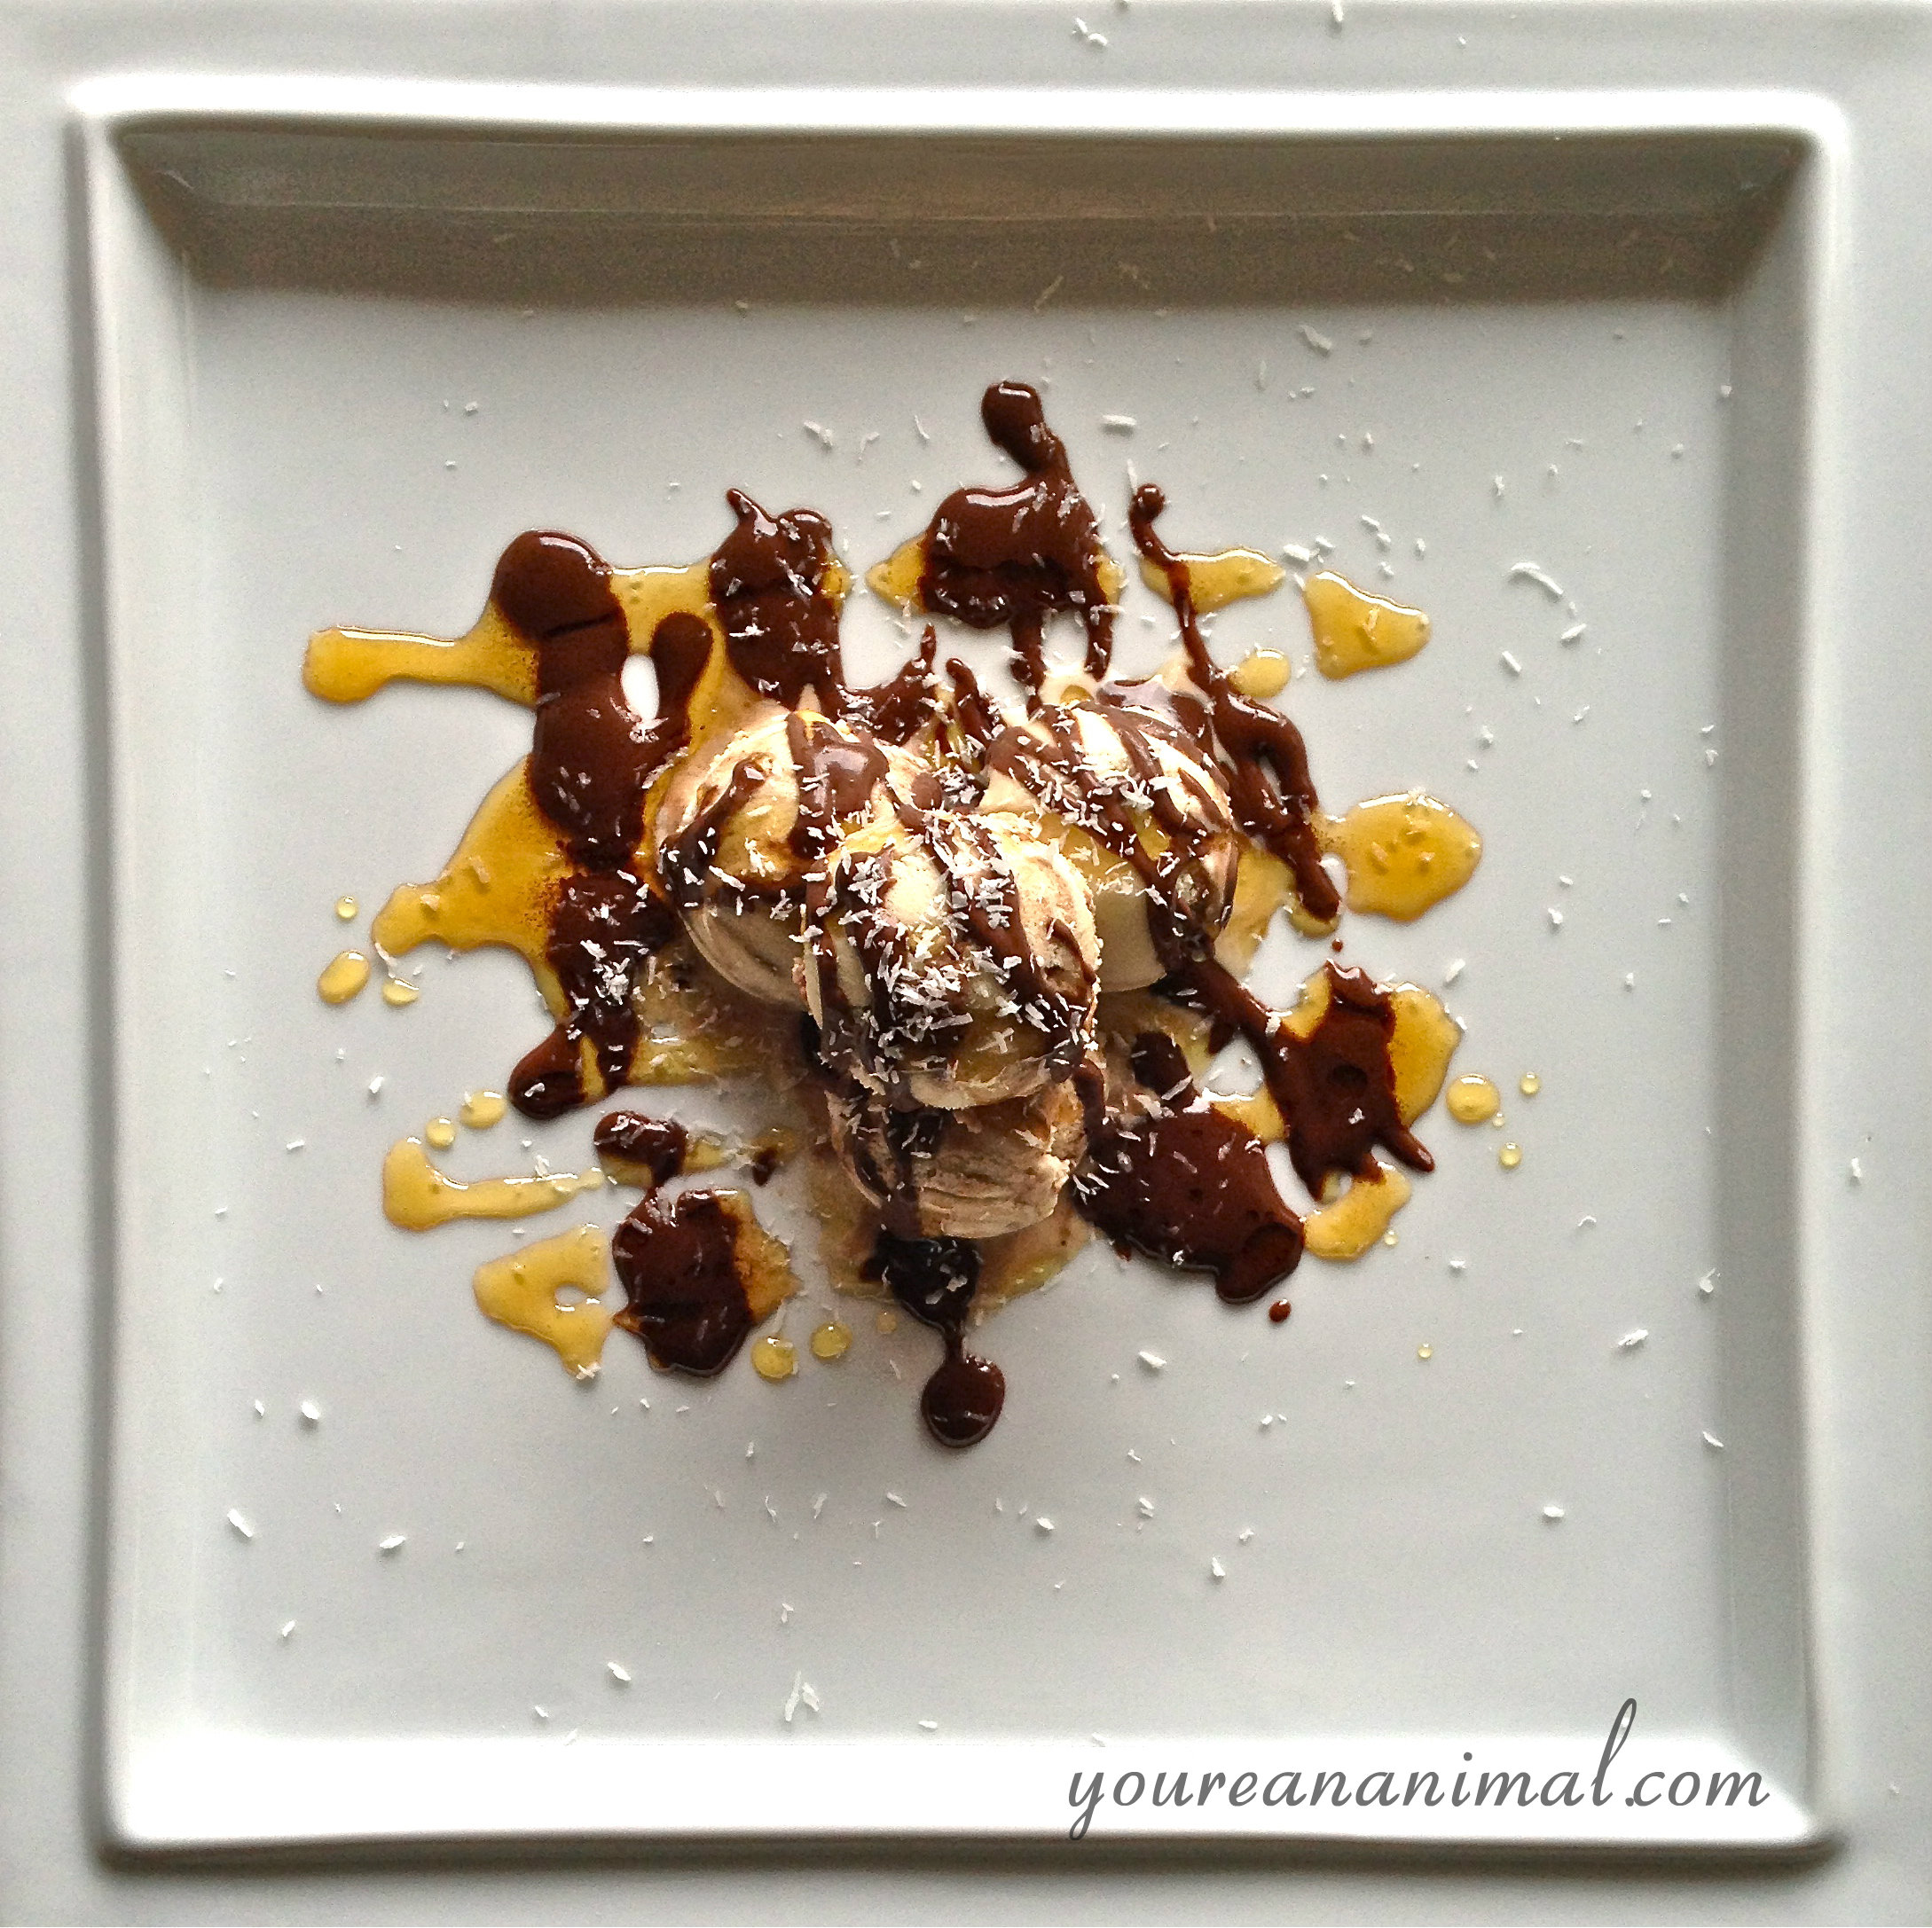
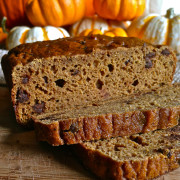
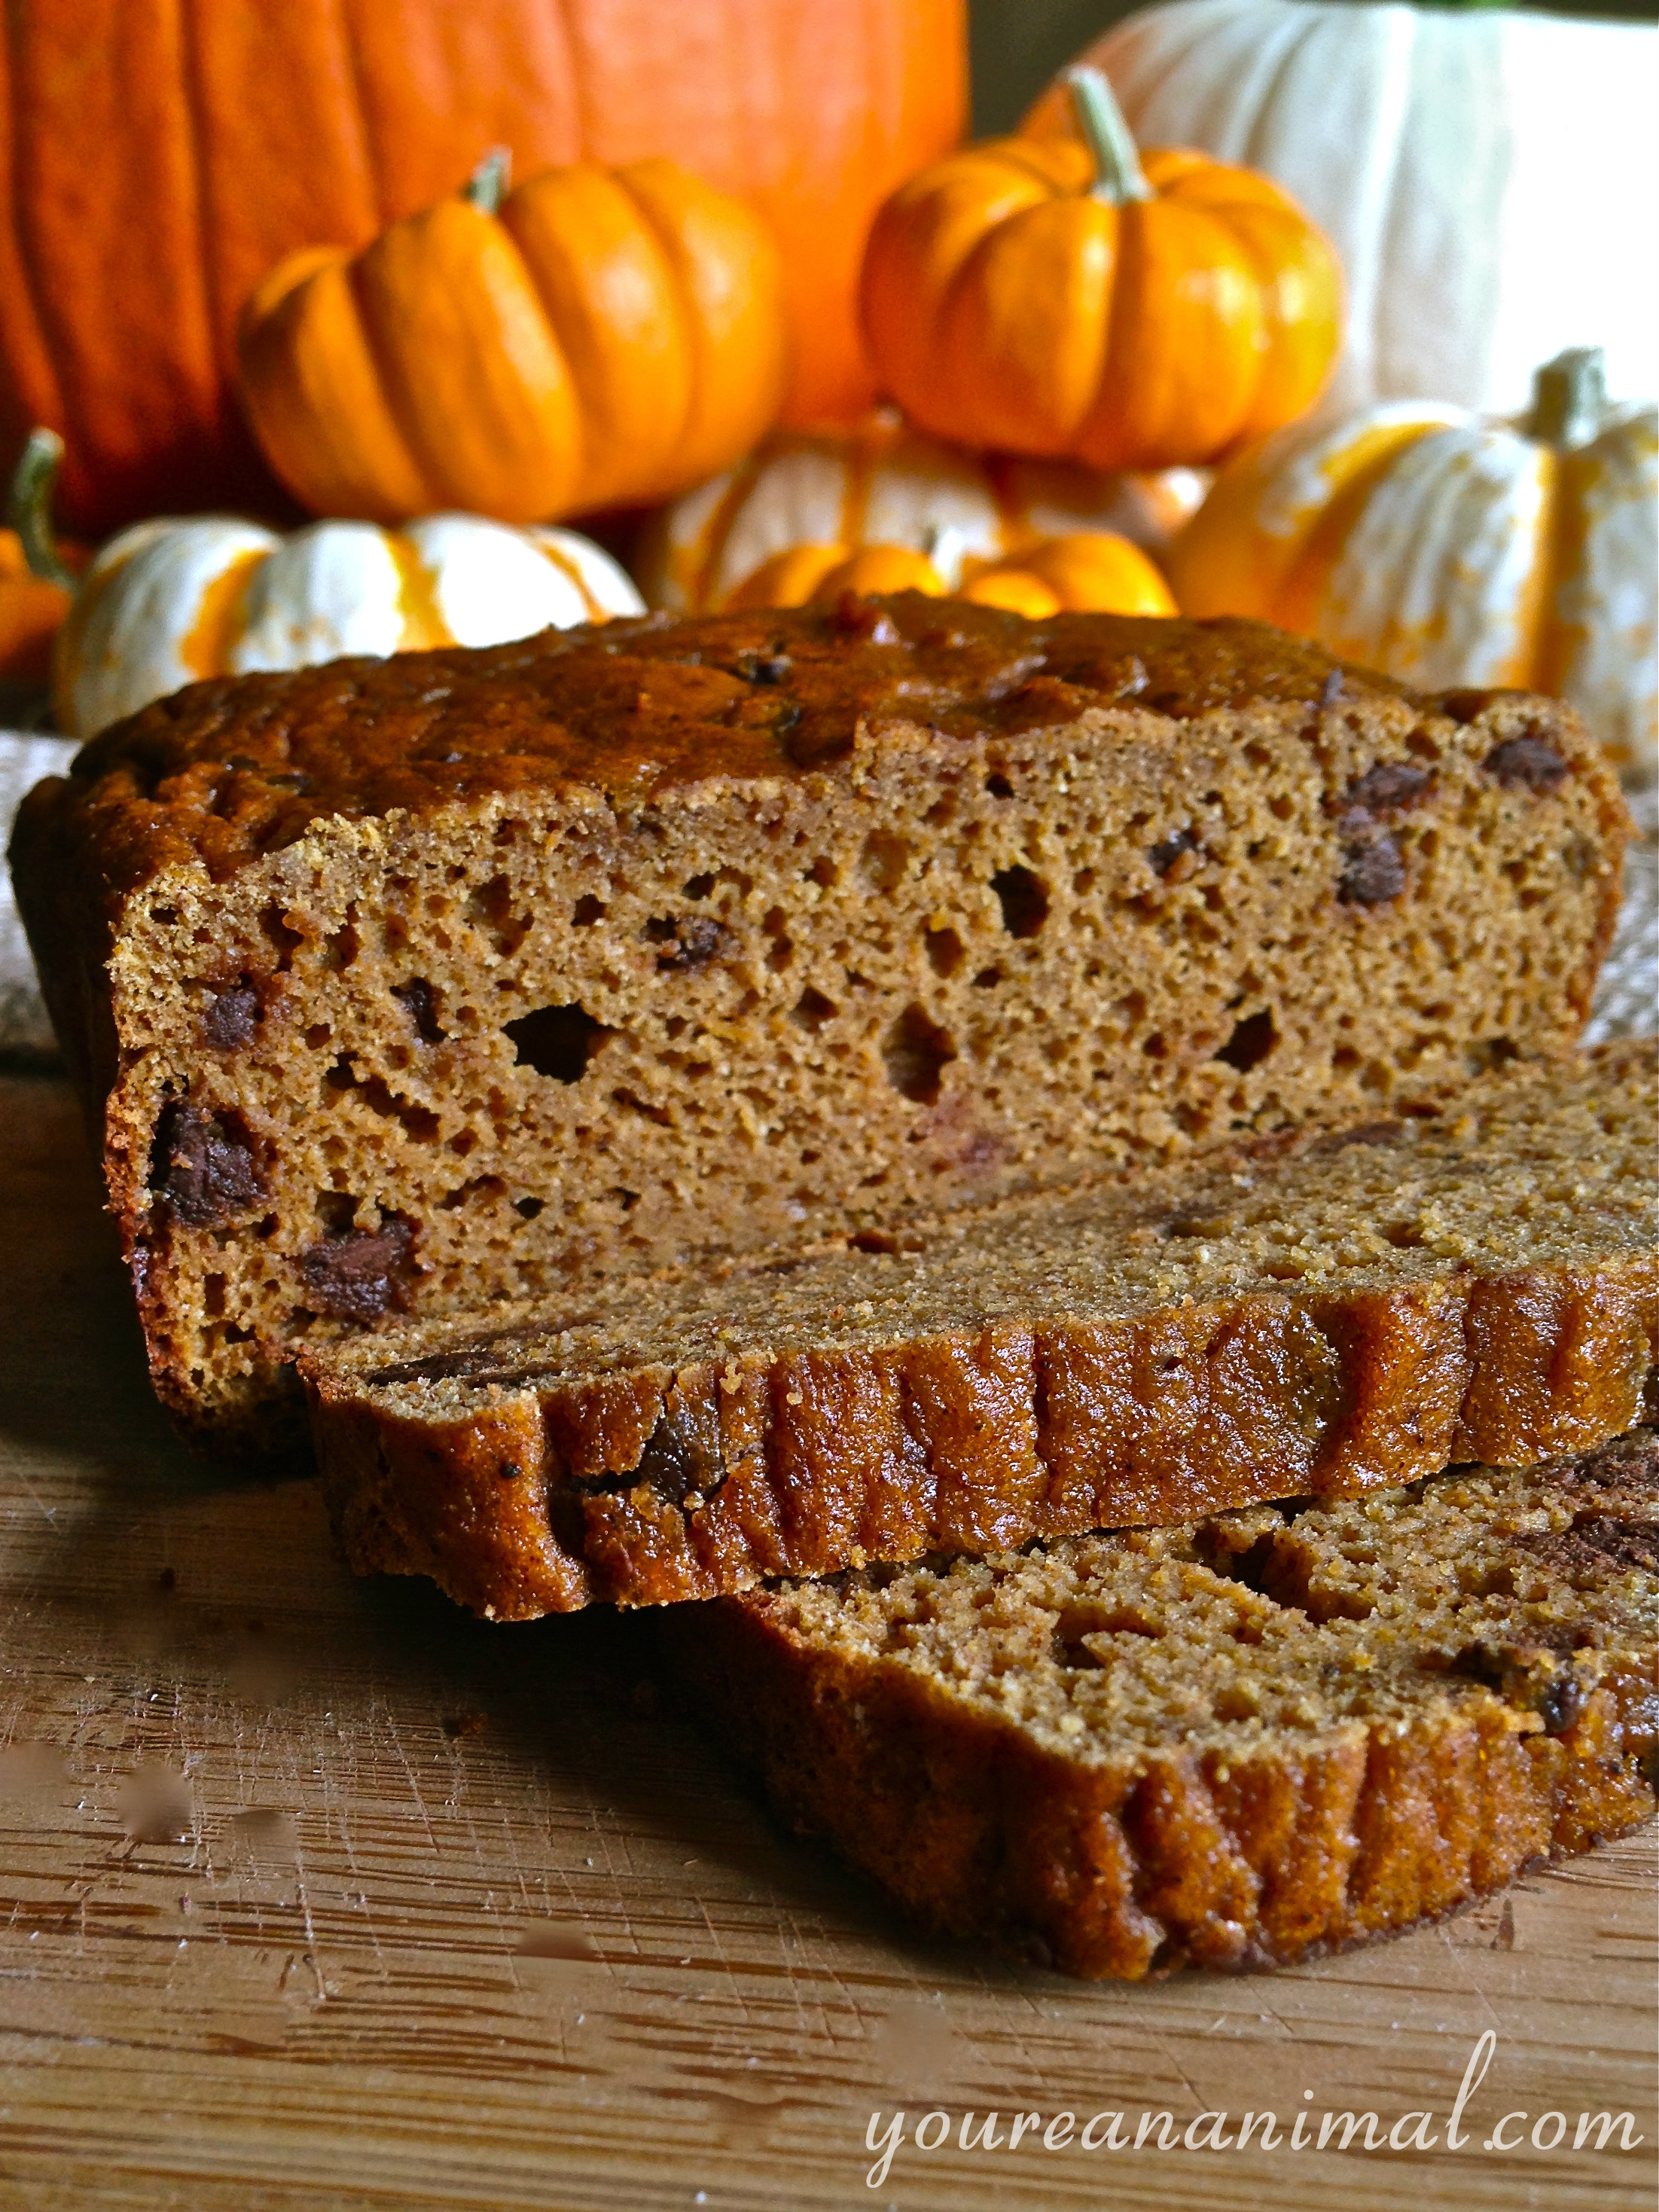
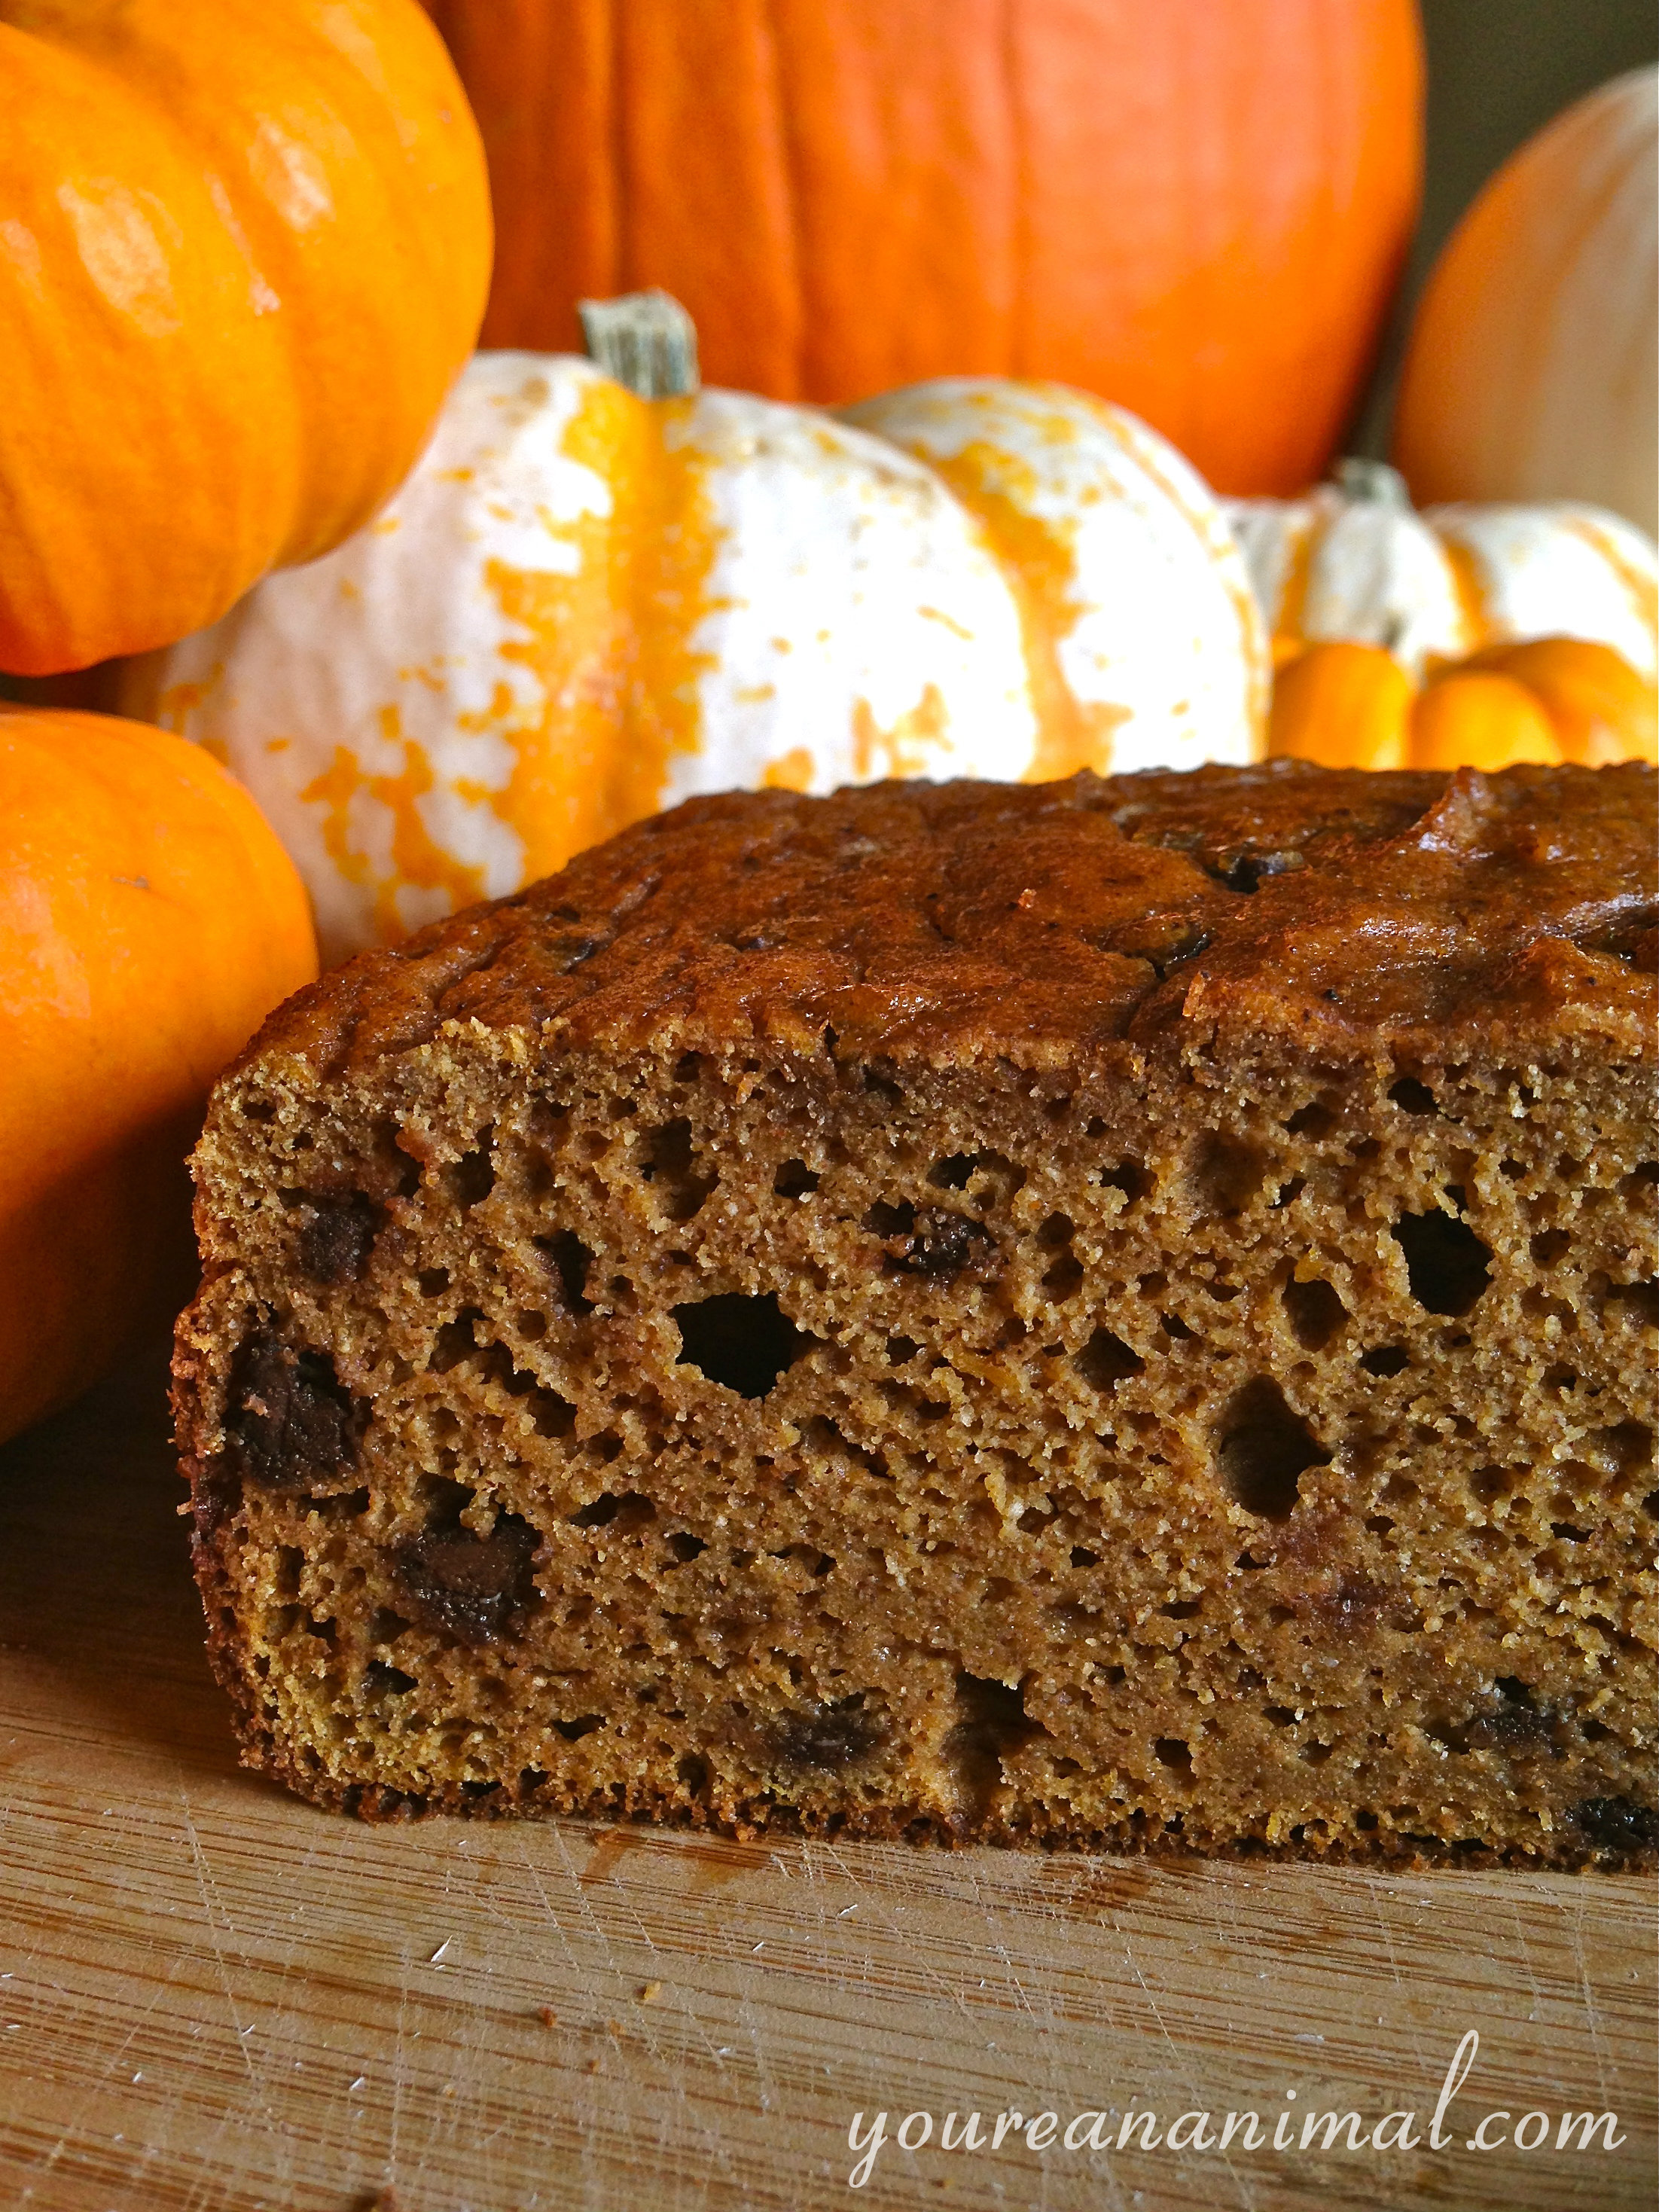
Okay, let’s go back to this pumpkin bread. It’s everything you expect from this classic seasonal treat: moist, springy, dense, and spicy. But luckily it’s got none of the bad, guilt-driving stuff that the usual recipe contains. I added chocolate chips because chocolate makes everything better and I adore the combination of chocolate and cinnamon/spice, but that’s up to you! Last night we ate this pumpkin bread topped with my Pumpkin Ice Cream and, oh yes, it was the perfect way to welcome in Autumn. So here you go friends, pumpkin everything is in full swing!

pumpkinbread24

Pumpkin Bread

  • 4 eggs (pasture-raised)
  • 1 cup (or about 1/2 of a 15 oz can) pureed pumpkin
  • 1/4 cup + 2 Tbsp Coconut Flour
  • 1/4 cup Unmodified Potato Starch
  • 2 Tbsp Arrowroot Starch Flour
  • 1/3 cup Grade B Maple Syrup (or unfiltered honey)
  • 1/2 tsp baking powder (note that baking powder often uses corn starch, so eliminate if this is an issue for you)
  • 1/2 tsp baking soda
  • 1/2 tsp apple cider vinegar
  • 2 tsp cinnamon
  • 1/2 tsp each of powdered ginger, clove and nutmeg
  • 1 tsp vanilla extract
  • optional: about 1/2 cup of chocolate chips (I use Enjoy Life)
  1. Preheat the oven to 350 degrees F.
  2. Whisk together the wet ingredients (pumpkin, eggs, maple syrup, vanilla, and apple cider vinegar) in a large mixing bowl.
  3. Sift the dry ingredients (coconut flour, potato starch, arrowroot starch, baking powder, baking soda, spices) into the wet ingredients. Sifting removes any lumps in the dry ingredients, and helps lighten up the batter.
  4. Use an electric mixer to thoroughly combine the mixture, until all ingredients are incorporated and the batter is completely smooth.
  5. Fold in the chocolate chips if desired.
  6. Pour the batter into a lined loaf pan (I line mine with parchment paper to ensure easy removal).
  7. Place in preheated oven, and bake for 45-50 minutes, or until the top is cracked and an inserted toothpick comes out clean.

Please note that some of the links in the above post are affiliate links that will take you to an Amazon.com page. If you choose to purchase a product featured in this post using an affiliate link, you will be directly supporting You’re An Animal. Thanks!


Dairy-Free Pumpkin Ice Cream (White Sugar-Free)

pumpkinicecream25

IT’S TIME FOR PUMPKIN EVERYTHING! This trend has grown more and more prevalent in the last couple of years, and I ain’t complainin’. I don’t know why we are all so obsessed with pumpkin season, but I know for me it’s the pumpkin spice combo. Cinnamon, in particular. I love me some cinny-mon. Cinnamon on everything pretty please! I can promise you that while this is the first pumpkin recipe I’ve posted, it most certainly won’t be the last. It’s here, people, it’s here.

Let’s talk about this ice cream. As I mentioned in my Dairy-Free Coconut Ice Cream with Salted Caramel and Chocolate Ganache post, we got this ice cream maker recently and I’m loving it. We haven’t been without ice cream since. I’m sadly (but not so sadly) completely serious. Obviously I had to make my pumpkin recipe debut somehow, and since it’s still currently almost 90 degrees here in VA, ice cream seemed like the way to go. Oh and it was the way to go, my friends, it definitely was. Not to mention allergies are running wild this week (again, darn you VA) so we needed something to sooth our poor wittle scratchy throats. Pumpkin ice cream to the rescue! This stuff is pretty much pumpkin bread in a cold, semi-liquid form. Perfect for those late summer/early fall days when it’s cool at night but still gets toasty during the day. Pumpkin latte for the chilly mornings, then pumpkin ice cream as the day heats up. Sounds like a plan to me! Annnnd it’s dairy-free, so my fellow lactose intolerant (or simply avoiding dairy) people can enjoy freely. And by “freely’ I mean eating the entire quart. Alone. In one sitting. No no, let’s not take it too far. Bring it back in. I know you all have stocked up on pumpkin by now, so go buy some cans of coconut milk while you’re at it, and continue your pumpkin exploration. It’s a lovely, spicy adventure!

pumpkinicecream6

pumpkinicecream29

pumpkinicecream32

Dairy-Free Pumpkin Ice Cream

  1. Combine all of the ingredients in a medium saucepan.
  2. Heat the mixture over medium heat, stirring frequently, until the mixture is hot but before it boils.
  3. Place the mixture in the fridge (I find it easiest to just put the saucepan directly in the fridge) and let chill for at least 1-2 hours, or longer.
  4. Once completely chilled, strain the mixture through a sieve to remove any lumps and ensure a smooth ice cream. I find it easiest to strain the mixture directly into the ice cream maker.
  5. Process the ice cream in your ice cream maker according to manufacturer directions. If adding the chocolate chips, add them in about 5 minutes before the ice cream is done. Transfer into your storage container. Enjoy!

pumpkinicecream19


Please note that some of the links in the above post are affiliate links that will take you to an Amazon.com page. If you choose to purchase a product featured in this post using an affiliate link, you will be directly supporting You’re An Animal. Thanks!


Copper (Cu) (Small But Mighty)

Copper (Cu) (Small But Mighty)

Copper is one of my favorite minerals and honestly I can’t explain why. Maybe it’s the name, Copper. Or possibly it is because, from deep in my heart and soul, Copper’s element symbol is Cu and I did go to Clemson University… But as I said I can’t really explain why. It is also a pretty cool looking metal and is very much a necessity to the human body. Enough of me, let’s get to viewing Copper on a microscopic scale. Copper is not needed in significant amounts on a daily basis, but it is needed nevertheless. A few sources of copper are Brazil nuts, spinach, kale, chard, sunflower seeds, shiitake mushrooms and shrimp. Copper is kind of like the third wheel in the bone formation process. It is the less than 1% portion of our bone make up with the other two minerals calcium and phosphorus making up the greater than 99% portion. Without it though, you will literally fall apart. Bones won’t remain together because copper is needed as the core metal ion to an enzyme (lysyl oxidase) that allows for the mature production of collagen(1). Ah, collagen. Yes you probably know of that word. It is the fibrous protein that gives great tensile strength to our bones and tendons. So what I really just said is that it is the glue that keeps us standing upright and allows us to use our most primal self defense mechanism, mobility. Interesting metal huh? So how many of you either take statin drugs or know someone who takes them? There are quite a few people who do and it is pretty much for one reason, high cholesterol. Remember, cholesterol is a good thing so what the hell are you doing blocking the synthesis of it? I’ll bet there’s a good possibility it is from a copper deficiency. Here’s how this works. With a copper deficiency we have an increased rate of the cholesterol synthesizing enzyme HMG CoA reductase (hydroxymethylglutaryl Coenzyme A reductase)(1). Did I lose you yet? This enzyme basically regulates how much cholesterol gets produced. So at the end of the day when we have a copper deficiency, we then have increased cholesterol production, which causes us to freak out and go visit our doctor, who in turn prescribes us a statin drug to reduce cholesterol because his/her drug rep pushed it on them to prescribe so everyone can get paid. Wow, what a vicious cycle that is. Why not focus on increasing copper intake and absorption and solve your cholesterol problem? What a brilliant idea! Switching topics slightly now. Copper and Zinc both compete for the same absorption pathway to bind to enzymes. We need roughly a 1:8 ratio of copper to zinc in order for Vitamin A to work as a protective antioxidant. Remember, if we don’t have sufficient vitamin A then vitamin D can’t do its job very well (please refer to the Vitamin D post for more information). So if we have too much zinc, then we become deficient in copper and hop on that vicious cycle. Let’s not go down that road. Copper is also one of the key minerals working as a cofactor to the enzyme superoxide dismutase (SOD), which helps manage the by-product of oxidized subatrates. Without it, the excess oxygen by-products would severely damage our cell’s DNA. Lastly, copper is central to the absorption of iron and therefore paramount in the production of the hemoglobin and myoglobin proteins. Ultimately, as you can see, copper has its hand in many chemical reactions in the human body and must be treated with respect so make sure you eat all those healthy foods discussed not just in the nutrient spotlight sections, but most importantly in all of Morgan’s delicious recipes.

Sources Cited:

(1) Lippincott’s Illustrated Reviews: Biochemistry 5th edition. Richard Harvey, Denise Ferrier. 2011.


Steak Tacos with Grain-Free Tortillas & Guacamole Broccoli Slaw

tacos15

Remember that trip to Portland, Oregon that I keep raving about? Well here’s another recipe inspired by that trip! This one comes from our amazing lunch at Cultured Cavemen, a Paleo restaurant in Portland. This meal is specifically inspired by my lunch of carnitas, complete with grain-free tortillas and slaw. I took a different spin with my recipe, however, and did steak tacos instead. Plus a guacamole broccoli slaw that is the easiest thing you will ever whip up (you’ll wonder why you never thought of it), and grain-free tortillas for an amazing Taco Tuesday (or Taco Errrryday). Every element of this recipe is a star in its own right. The steak tacos are seasoned to perfection, and made with grass-fed steak which makes it wholesome and nutritious on top of being delicioso. And not to mention a great way to get that Vitamin B12 in, a critical member of the Vitamin B complex family! No need for store-bought seasoning with the added sodium and preservatives. This seasoning combo is easy to throw together with spices you likely already have in the cabinet! Then we have the guacamole broccoli slaw. A spectacularly easy way to get in the veggies without even realizing it, in perfect combination with the must-have guac. Oh and then the tortillas. You know, just a grain-free, gluten-free tortilla that is pliable, roll-able, fold-able, hold-able, and delectable. Stupid Easy Paleo nailed it with this one, so I’ve just ever so slightly adapted her recipe to complete this taco night meal. So on that note, who’s bringing the margs? I’m ready to eat!

tacos2

tacos8

Steak Tacos with Grain-Free Tortillas & Guacamole Broccoli Slaw

  • Taco Meat:
    • Approximately 0.75-1 lb of grass-fed steak (I use Sirloin) cut into cubes that are about 0.5-0.75 of an inch
    • About 1 tsp each of dark chili powder, garlic powder, onion powder, paprika and cumin
    • Salt, black pepper, and cayenne to taste
    • Avocado oil to coat the pan
  • Grain-Free Tortillas (from Stupid Easy Paleo):
    • 4 eggs
    • 1/2 cup of your choice of starch (arrowroot, tapioca or potato)
    • 2 tsp of coconut flour
    • 2 Tbsp water
    • 2 tsp grass-fed butter, melted (I use Kerrygold)
    • 1/4 tsp each of garlic powder, onion powder, salt, and black pepper
  • Guacamole Broccoli Slaw
    • about 2 cups of broccoli slaw (I get the pre-made bagged kind, with broccoli, carrots, and red cabbage)
    • about 0.5-0.75 cups of your favorite guacamole (if I don’t make my own, I love the one Whole Foods makes)
  1. Start with the tortillas. In a large mixing bowl, combine all of your tortilla ingredients. Use an electric mixer to combine the ingredients, in order to most effectively eliminate the lumps from your mixture, until very smooth but not to the point of frothing the eggs.
  2. Use an 8-inch, non-stick skillet to make the tortillas. Heat the skillet on medium heat. Once heated, pour about 1/4 cup of the tortilla batter onto the skillet, and roll the batter around in the skillet so it is evenly coated (like making a french crepe). Cook about 1 minute on each side, until lightly browned. The edges will curl away from the pan. If you have any issues with this process, you can refer to the original recipe and instructions for these tortillas here. This will make 6 tortillas. Allow the tortillas to cool, or keep them warm in a warm oven.
  3. Next, prepare your guacamole broccoli slaw by combining your broccoli slaw with your guacamole in a medium sized mixing bowl. That’s it!
  4. Now, prepare you taco meat. Coat a large skillet with avocado oil (1-2 Tbsp) and heat the skillet over medium-high heat. Once the skillet is heated, add your cubed meat. Stir the meat in the skillet, coating the meat with the oil. Add your taco seasoning spice mix, and stir until it coats the meat and combined with the oil to make a taco sauce. The meat will cook very quickly when cubed! You only need to saute for about 1-3 minutes total, in order to keep the meat nice and tender.
  5. Assemble your goodies, evenly distributing your meat and slaw over the tortillas. Eat up!

Makes 6 tacos.

tacos13


Vitamin B Complex (One Big Happy Family)


Vitamin B Complex (One Big Happy Family)

Unlike the other vitamins, Vitamin B is a complex in both senses of the word. It’s a complex complex. If that sounds funny, read it a few more times. The reason they call it Vitamin B complex is due to the numerous B vitamins that are contained within its family, most labeled with a subscript. Without one the rest don’t work, so it is very important not to EVER take a multivitamin that doesn’t contain the whole family. I dont suggest taking multivitamins at all though. Get them from whole foods produced by Nature. It’s kind of like a big Catholic family with 7 kids. My dad would appreciate the Catholic humor having grown up in a Catholic family of 6 kids. Every B vitamin is water soluble, which means the body does not store them. It also means you must be fully hydrated to absorb and utilize them. Better stay hydrated! Vitamin B1, known as Thiamine, is part of TPP (thiamine pyrophosphate) and is used in the metabolism of carbohydrates. It is critical in the production of energy as well as in the functioning of our nerve cells. With even the slightest deficiency you will start feeling fatigued and depressed. Severe deficiency of B1 is known as Beriberi, which can be prevented by eating most nuts and seeds. Vitamin B2, Riboflavin, is one that is harder to come by but just as important. I have personally had a troubled experience with severe Riboflavin deficiency. I can promise you it is not fun or pretty. In fact it’s extremely painful. Signs of it are a burning of the eyes, lips, mouth and tongue. An inflamed, sensitive left side of the tongue (beefy red appearance) and cracked corners of the mouth will lead to a life of misery because you feel like you can’t eat anything. It hurts to open your mouth to the point of you feeling depressed. And since it is involved in energy production there is a good chance of that occuring. This is the vitamin that gives urine it’s yellow-green appearance when it is in excess. It can be obtained in almonds, sunflower seeds, mushrooms, kale and broccoli to name a few sources. Vitamin B3, Niacin, can be made in the body provided there is enough protein in the diet. The amino acid Tryptophan is used to create Niacin, but you may want to be safe and consume some swordfish, eggs, sesame and sunflower seeds, or almonds to get enough of this important vitamin. It is the building block of the coenzymes NAD and NADP. Nicotinamide Adenine Dinucleotide and Nicotinamide Adenine Dinucleotide Phosphate respectively. These two are involved in many different chemical reactions on a daily basis. This vitamin is also used in the production of energy as well as in fat and carbohydrate metabolism. Vitamin B5, or Pantothenic Acid, plays an important role in energy production along with its brothers B1, B2, and B3. It is also a component of Coenzyme A (CoA), which is involved with the utilization of fats and carbohydrates. The most important role for B5 though is probably it’s use in the manufacturing of erythrocytes, or red blood cells. This vitamin can be obtained from animal livers if your up for that, or from more reasonable sources such as mushrooms, pecans, sunflower seeds, cashews, avocados, broccoli, kale and cauliflower. The next family member goes by the name Pyridoxine, or Vitamin B6. This brother is extremely important for a few reasons so please don’t mistreat him. B6 is crucial in maintaining immune function and hormone balance as well as being used in the production of proteins, including DNA, chemical transmitters and red blood cells. To earn this guy’s respect, you must consume some bananas, kale, spinach, sweet potatoes, cauliflower, walnuts, sunflower seeds, or avocados. Vitamin B9, known as folate or folic acid, works side by side with Vitamin B12 in the synthesis of DNA. I’d say that’s pretty critical! It is needed for cell division especially for the red blood cells and cells of the gastrointestinal tract. It got its name from the word “foliage” because it is found in high concentration in most dark green leaves like spinach, kale, and swiss chard. It can also be found in cabbage, broccoli, Brussels sprouts, almonds, pecans, and avocados. Last of the immediate family is Vitamin B12, cobalamin. The center piece of B12 comes from the metal Cobalt, which has a bright blue tint to it. B12 is used to activate its brother B9 so they can team up for their use in cell division and the production of DNA. This vitamin creates havoc for vegans and vegetarians because it is only found in animal products such as eggs, salmon, tuna, sardines, trout, beef, oysters and clams. At the end of the day, this huge family is needed everyday if you want to live a healthy and happy life.

Biotin

Sometimes it is referred to as vitamin H and I have heard others relate it to the vitamin B complex so I will give it it’s own small write up. Biotin helps the body to manufacture and utilize both fats and amino acids. It also aids in fatty acid formation and can promote normal functioning and development of the nervous system, sweat glands, skin and hair. It can be synthesized from our own healthy intestinal bacteria so it’s not often talked about, but you can find it in cooked eggs, walnuts, pecans, almonds, cauliflower and mushrooms.

Choline

Choline to some could be part of the vitamin B complex, but it deserves its own write up because it is a reach to include it in the vitamin B family. Choline can be formed from either of the amino acids methionine or serine. It works together with some of the B vitamins in the metabolism of fat which is why some people would potentially include it as part of the big vitamin B complex. A deficiency can cause problems in the liver known as fatty liver disease. It is the precursor to the neurotransmitter Acetylcholine, which is released in the synaptic gap between two nerve cells to make sure nerve impulses get fired correctly. It is also a major component of cell membranes so that many nutrients can permeate into and out of our cells during proper transmission. Sources of choline are egg yolks, preferably in a liquid and not solid state, red meat. It can also be obtained in much smaller amounts from potatoes, cauliflower, kale, cabbage and oranges. This is why foods should be consumed in a variety rather than eating the same foods on a routine basis.


Vitamin C (More Than Just An Immune System Boost)

Vitamin C (More Than Just An Immune System Boost)

If I say Vitamin C, what is the first thing that comes to mind? Fruit? Antioxidant? If you ask a nutritionist, dietitian, or biochemist the answer might be Ascorbic Acid, the science name of Vitamin C, or possibly Scurvy. OK what the heck is Scurvy? I will get to that in a bit. Regardless of your answer, there are many benefits from this wonderful vitamin. First, let’s go through the long list of sources where this vitamin can be obtained. Most fruits you will find at any grocery store contain at least a small amount, but the citrus fruits will contain large amounts such as pineapple, lime, lemon, orange and grapefruit. Many vegetables also contain significant amounts like watercress, broccoli, cauliflower, Brussels sprouts and peppers just to name a few. A few of the berries have a decent amount as well. Berries are my favorite! Some of the benefits from C are aiding in the absorption of iron. Once again, you cannot single out any one mineral or vitamin – they all work as a team. One weak link throws off the sensitive balance of the whole system. In reviewing that chain, if you don’t have enough vitamin C you won’t have enough iron. Without enough iron, oxygen won’t get utilized properly which ultimately means your oxidation of nutrients won’t work thoroughly and then you’ll end up sick. Vitamin C is considered an antioxidant however, so it does help protect the body from too much oxidation on the other hand. Kind of like a checks and balance system. A third major benefit and a crucial one at a minimum is Vitamin C’s role in the production of collagen, proteins that help keep bones from breaking, keep muscles looking tone, and keep strength in the ligaments and tendons. Clearly Vitamin C is important. A few hundred years ago the British Navy learned this lesson the hard way. Being on a ship for long periods of time limited what the sailors could eat. In turn, many developed a deficiency and ended up with Scurvy. One of the men had a few limes with him and after eating one, he realized Scurvy quickly vanished. From then on, the development of this disease has generally been a funny story to tell with an all too important lesson. In order to get the most Vitamin C it is best to consume foods in their whole state rather than slicing vegetables or fruits and storing them in the refrigerator uncovered. C itself will oxidize too, so your best bet is just to eat the grapefruit as soon as you cut into it. Plus it will taste fresher! Because it is a water soluble vitamin, you need to make sure you’re not dehydrated (another reason to drink lots of water) and to obtain enough of it every day. A quick mind altering statistic for you to wrap this one up – something close to 90% of all humans in today’s world live in a chronically dehydrated state ranging from mild to severe. That’s scary! That should partially explain why we need roughly 64 ounces of water (dependent on body size) on a daily basis. It comes in, you utilize it, and it goes out. Very simple process that is way too often neglected. Lesson learned? Drink water and get your Vitamin C.


Dairy-Free Coconut Ice Cream with Salted Caramel and Chocolate Ganache Swirl (White Sugar-Free): Inspired by Salt & Straw

CCCicecream8

First of all, let me express my excitement about us purchasing an ice cream maker: EEEEHHEEEEEEYEAH! This is the one we got, and we love it! Ice cream is definitely, for sure, abso-posi-lutely my favorite dessert. I don’t know what it is, but I have always been an ice cream addict. Which is kind of odd for a lactose-intolerant girl, but I have found dairy-free heaven. Admittedly, my favorite flavor is mint chocolate chip (which, by the way, I have a recipe for that too… we’ve made it at least 5 times already. Stay tuned :)). But we just got back from our vacation in Portland, Oregon, and in my post about our trip I talked about Salt & Straw and how we both fell hopelessly in love with their dairy-free ice cream. So as soon as we got back, I started working on an ice cream flavor inspired by their Coconut with Petunia’s Salted Caramel Bars flavor. Their ice cream had pieces of a vegan/gluten-free caramel cookie, with ribbons of salted caramel and chocolate ganache. While I haven’t had the opportunity to explore the idea of a vegan/gluten-free caramel cookie, I was able to throw together a pretty awesomely delicious (toot toot) dairy-free, white sugar-free coconut ice cream with salted caramel and chocolate ganache swirled in ever so lovingly. And seriously, I can’t believe how good this stuff is. This is a situation where the whole is certainly greater than the sum of its parts (in my opinion). The ice cream, caramel, or chocolate each alone is good, but together they are fantastic. While I’ve never had a Samoa Girl Scout cookie (weird, I know… and I was even a Girl Scout. I have no excuses.) I imagine the flavor profile is the same. In fact, I almost named this “Dairy-Free Samoa Ice Cream,” except I think they’re called “Caramel Delights” now? All updated and modern… I can’t keep up. I can’t say enough about this ice cream (or its Salt & Straw inspiration), but I think I’m going to let the pictures speak for themselves…

CCCicecream1

CCCicecream16

CCCicecream12

Dairy-Free Coconut Ice Cream with Salted Caramel and Chocolate Ganache Swirl

  1. Start with making the ice cream base. In a medium-sized sauce pan, add 2 cans of the coconut milk, the arrowroot starch (this starch helps keep the ice cream creamy and scoopable, even after being in the freezer), the eggs, 1/4 cup of honey or maple syrup, and 1 Tbsp of vanilla extract. Stir to combine, trying to get as many lumps out as you can, and making sure the eggs are broken up and thoroughly mixed in.
  2. Heat this mixture on low, stirring continuously, until it is warm/hot to the touch, but not boiling (you do not want scrambled egg ice cream).
  3. Once the mixture is warm, put the mixture in the refrigerator (I usually just put the whole pot into the fridge so as to not dirty up another bowl) and allow the mixture to completely cool (at least 2-4 hours).
  4. While your ice cream base is chilling, make your caramel and chocolate ganache.
  5. Start with your caramel sauce. I got this caramel recipe from An Edible Mosaic, so if you have any issues, you can also refer to her post.
  6. In a small/medium saucepan, add 1/2 of a can of coconut milk, 2 Tbsp of honey/maple syrup and 2 Tbsp of coconut palm sugar. Bring this mixture to a boil, then reduce to a simmer, and stir frequently for about 15 minutes, or until the mixture thickens and turns a nice, deep amber brown. Remove the mixture from the heat, and add 1 Tbsp of grass-fed butter (or coconut oil for dairy-free), 1/2 tsp of sea salt, and 1/4 tsp of vanilla extract. Stir to incorporate, then pour your caramel into a separate bowl to allow it to cool.
  7. Next, make your chocolate ganache. Again, in a small/medium sauce pan, add the remaining 1/2 can of coconut milk, 1/4 cup of dark chocolate/chocolate chips, 2 Tbsp of coconut oil (this will help the ganache set up and become firm, but not crunchy, when frozen), and 2 Tbsp of cocoa powder. Heat this mixture over medium/medium-high heat to melt all of the ingredient together, and allow it to thicken. I let mine simmer, stirring constantly, until it was the consistency of a thick, hot fudge sauce. Once thickened, strain the sauce into a separate bowl to eliminate any lumps of cocoa powder, and to allow the sauce to cool.
  8. Once your ice cream base is completely cooled, add your base to your ice cream maker, straining it with a sieve as your pour the mixture in in order to eliminate all lumps of arrowroot and egg, and process according to manufacturer instructions.
  9. Scoop about 1/3 of your ice cream into the container you will be storing your ice cream in, and then drizzle about 1/3 each of your caramel sauce and chocolate ganache over your ice cream. Use a butter knife to swirl/fold the caramel and chocolate into your ice cream. Repeat this process two more times, with the rest of your ice cream, caramel, and chocolate. Allow your ice cream to harden in the freezer, and serve when ready! Or eat it as soft serve right away, if you’re like me and can’t resist :).

CCCicecream4

Items featured in this post:


Please note that some of the links in the above post are affiliate links that will take you to an Amazon.com page. If you choose to purchase a product featured in this post using an affiliate link, you will be directly supporting You’re An Animal. Thanks!


Cod Jambalaya

jambalaya1

Oh my my. I could eat this for every meal for a week, no joke. This recipe came from our need to stretch our budget a little bit farther, as money has been a little bit tight. So instead of housing $20 worth of cod in one sitting, we decided to draw it out by putting it in this oh-so-yummy-in-my-tummy jambalaya-esque stew. Now hear me out, you Nawlins die-hards. I say jambalaya-esque because I know it is not a tried and true jambalaya recipe, and I am sure there are rules and regulations that I know nothing about when it comes to cooking a traditional jambalaya. But that being said, the flavors and composition are definitely a solid nod to the Louisiana specialty, so I will leave it at that. This stew though is one of those comfort foods that makes you want to curl up on the couch with a big ol’ bowl and watch a movie with wine and a blanket. Now if that isn’t a cozy thought, I don’t know what is. Warm, hearty, filling, and flavorful. Plus it makes a lot of food, so perfect for a family meal or for leftovers! Both Andrew and I get two full meals out of this recipe. And bonus! This is absolutely one of those meals that actually tastes even better the next day. You can easily substitute any protein in this recipe, or add sausage, chicken and shrimp for that more traditional jambalaya mix, but if you’re like us and want to get some quality seafood and make it last, I would definitely suggest sticking with the cod!

This whole week was devoted to preparing for a little obstacle race we like to call the Spartan Race. And by “little obstacle race” I mean actually one of the most physically grueling events I have ever put my body through. So in an effort to bulk up a little before the race, we ate way more carbs/grains than usual, including rice in this jambalaya. However, we found a sprouted rice trio (link in recipe below) that we loved with this meal, didn’t make our tum-tums ache, and filled us up to the brim, so it turned out well.

So… let’s talk about this Spartan Race. For those who have never heard of such a thing, maybe you should keep it that way. Just kidding, kind of. Yesterday we did the Virginia Super Spartan, which is the middle level of their 3 race options in terms of distance. The catch, however, is that this particular race happened to be at Wintergreen, which is a ski resort here in Virginia. And the race took place on the double black diamond mountains. Which means we spent 5 hours hiking/slipping up and down a muddy (it rained) 7.2 miles of mountains, with challenging obstacles strategically placed throughout. We heard several people saying this race was harder than many of the “Beast” level Spartan races, because while those races are longer in distance, they aren’t usually on mountain sides. Oh and also NBC filmed it. Which to me says it was “something special.” Yeehaw. We made it over the finish line, but just barely. Needless to say, I’m spending most of today on the couch.

10472166_10154544645955113_3890479363221306881_n

Cod Jambalaya

  • about 1 lb of wild cod
  • 1 small yellow onion, chopped
  • 1 green pepper, chopped
  • 2 stalks of celery, chopped (make sure the pepper and celery are chopped to approximately the same sized pieces)
  • 1.5 cups of Truroots Organic Accents Sprouted Rice Trio or rice of your choice
  • 8 oz of chicken stock
  • 2 cups of water
  • 16 oz of tomato sauce
  • approximately 1 tsp each of celery salt, paprika, chili powder, garlic powder and onion powder
  • approximately 1/2 tsp each of salt, black pepper, and italian seasoning
  • cayenne pepper to taste (I only use a couple dashes, but I’m not a fan of spicy foods)
  1. Preheat the oven to 400 degrees. Sprinkle the cod with a pinch of the spice mix.
  2. Cook the cod in the oven for approximately 15 minutes, or until the cod has split open. Let rest once cooked.
  3. In a large pot with a lid, saute the onion until soft and translucent.
  4. To the pot, add the water, chicken stock, and rice. Bring the mixture to a boil, then reduce to simmer.
  5. Cover and cook the rice for about half of the designated time on the package (about 15 minutes for the Truroots Sprouted Rice Trio).
  6. Half way through cooking the rice, add the peppers, celery, tomato sauce, and spice mix, and stir to incorporate.
  7. Replace the lid on the pot, and cook the rice mixture for the remaining time based on the package (for the Truroots trio, about 10 minutes).
  8. Turn off the heat, and add the cod, breaking it into large chunks, and folding it in.
  9. Replace the lid of the pot once again, and allow the mixture to steam, without added heat, for another 10 minutes.
  10. Most of the liquid should be absorbed by the rice, but some will remain for a thick, saucy mixture. Once done steaming, stir one last time to fluff the rice and incorporate all of the ingredients. Enjoy!

jambalaya4

jambalaya3


Please note that some of the links in the above post are affiliate links that will take you to an Amazon.com page. If you choose to purchase a product featured in this post using an affiliate link, you will be directly supporting You’re An Animal. Thanks!


Classic Chocolate Chip Cookies (Grain-Free, Nut-Free)

CCcookie2

In my opinion, Nestle Toll House chocolate chip cookies are the perfect chocolate chip cookie. Maybe it’s my history with tub-fulls of the dough (raw and baked), but to me, that is the ultimate comfort food. But now knowing what goes into making those cookies (particularly the mounds of white sugar and white flour), my decision to break up with the Toll House was inevitable. Oh but how I miss those cookies! So I was on a mission: Create the closest flavor profile that I can, while cleaning up the ingredients. And I’ll be honest, I think I’ve come preeetty darn close. The texture is certainly different, but that’s to be expected when you change the flour from a processed, gluteny white flour to a nutrient dense seed meal. But the flavor… yeah it’s gooood. That’s good with four O’s. And the texture is pretty awesome too. Crispy on the outside, soft and chewy on the inside. Butter, vanilla, and my own creation of brown sugar meets all of my criteria for the best minimally-processed chocolate chip cookies around. For the flour, I used a combination of sunflower, pumpkin, and watermelon seeds for a protein-filled, nut-free base. However, you can certainly use almond flour as a replacement. In fact, the first batch I made of these (way too much butter, which is interesting as I was following the Nestle Toll House original recipe for inspiration… goes to show how my taste buds have changed), I used almond flour. Unfortunately, the almonds proved to get the best of me. Apparently I still haven’t gotten over my sensitivity, because for the next few days after eating (too many) cookies, my legs had red, itchy spots on them. Wahhh, I really thought a year would be enough time to recover and my body would get over it. Guess not. Back to non-almond flour recipes. Which is actually just fine, as I have grown quite fond of my seed meal anyway. Take that, almonds! I don’t need you! Even while using more natural, minimally processed ingredients, these cookies should still be considered a treat rather than a staple. Fructose and saturated fat galore… which I am actually not against by any means, but it should be on the moderation side (as with most things). That being said, every so often you definitely need to indulge and enjoy without going completely overboard (ie. whole tub of Toll House cookie dough), and this is the perfect treat to do so!

CCcookies10

Chocolate Chip Cookies

  1. Preheat the oven to 350 degrees F and line a baking sheet with parchment paper.
  2. Allow the butter to soften, coming to room temperature.
  3. Combine the coconut palm sugar with the molasses in a small bowl to create your “brown sugar.” You can use a fork, but I found it most effective just to use my fingers to combine. Combine until the molasses is completely incorporated, and the mixture is the same texture as regular brown sugar. It should be packable, like wet sand.
  4. Once the butter is softened, use a hand mixer to combine the butter, egg and brown sugar until evenly mixed.
  5. Continually mixing with the hand mixer, slowly add in the nut/seed meal and coconut flour. Add the baking powder and vanilla. Continue to mix with the hand mixer until the mixture is completely uniform. The text of the dough will be slightly less solidified than a “regular” cookie dough, but should form balls when rolled in the palms of your hands.
  6. Fold in the chocolate chips.
  7. Chill the dough in the refrigerator for 5-10 minutes, to allow the butter to re-solidify slightly.
  8. Roll the dough into balls. I got about a dozen 1 Tbsp balls from this recipe.
  9. Place each dough ball on the parchment-lined baking sheet, about 1-2 inches apart. Flatten each ball slightly so they are more of a disk shape than a sphere.
  10. Place the baking sheet in the pre-heated oven, and bake for 13-15 minutes, or until the cookies are golden brown and cracked on top.

CCcookies13

Please note that some of the links in the above post are affiliate links that will take you to an Amazon.com page. If you choose to purchase a product featured in this post using an affiliate link, you will be directly supporting You’re An Animal. Thanks!

Magnesium (Mg) (Keep It Movin’)

Magnesium (Mg) (Keep It Movin’)

I really like this element partly because it’s fun to say, but primarily because it keeps the poops coming out rather than storing them and creating a state of constipation. OK, yes I said it, get out your laughs… now back to seriousness. On the other hand that word constipation, makes me cringe, literally. How many of you have ever labored over the toilet trying to squeeze one out? It’s not fun is it? In fact, it creates significant amounts of stress both physically and mentally and really throws you out of whack. So let’s get back to the fun part of this by first just saying the word. Magnesium. This element, known as Nature’s laxative, helps us to relax our nerves and digestive system so that we can think clearly and perform at our best. It makes sense that it’s Nature’s laxative too because it’s at the center of every chlorophyll molecule in every plant around the world. Plants take in the sun’s light and energy and produce a beautiful set of flower petals and green leaves due to the process of photosynthesis, which creates the green pigment you see. When humans consume green leaves or foliage, like in a salad, we are hence obtaining some magnesium and we all know that leaves, sometimes called “roughage”, contain lots of fiber therefore allowing for an easy bowel movement. Green leaves help with peristalsis, the contracting of the intestines to keep food particles moving through the system in a timely fashion. Without going too much on a tangent though, let’s return to the discussion of magnesium, yet another Earth metal. This element is involved with hundreds of chemical reactions within the human body. One of which is in the promotion of new cells. Without it or with a deficiency of magnesium, new cells at some point in your lifespan will more than likely turn out slightly mutated, which can cause cancerous cells to develop. Eating dark green leaves in salads or meals also yields the vitamin B9, Folate. A few lines up I mentioned leaves being considered foliage. You can now probably draw the connection and realize there is no coincidence of why vitamin B9 is called Folate. Aside from green leaves being a good source, magnesium is also found in most tree nuts and seeds such as almonds, Brazil nuts, cashews, pistachios, sunflower seeds, and hemp seeds just to name a few. You can find magnesium in plenty of other sources too, but the ones just mentioned are generally pretty high in magnesium as well as many other much needed nutrients. After all, if there is one thing you get from this, please get lots of magnesium in your system so you can relax, sleep better, and live a happier life.