S’mores Bars (Gluten-Free, White Sugar-Free)
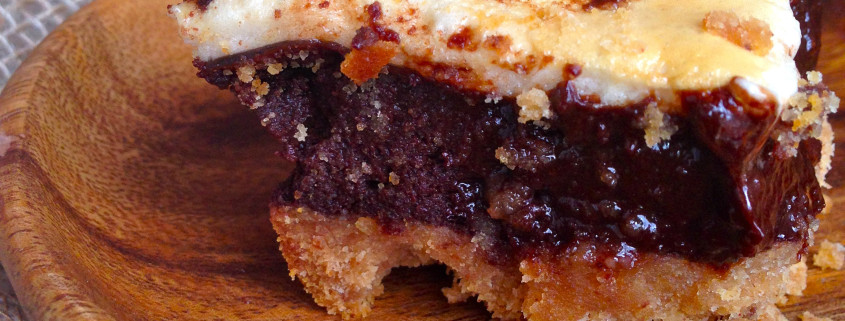
Happy official start to summer! What better way to get in the mood than with s’mores? Unfortunately the chemical-y, white sugar-y, gluten-y treats have started to sound more like a death trap than a happy summer evening. So why not make your own without the processed junk?! Okay so these are by no means the healthiest food on earth… they’ve got a ton of sugar, even if that sugar is much better quality than what you would buy in the store. So this is a once-every-so-often summertime treat made to share. By hey, I say if you’re going to do it, at least make it cleaner than it used to be! I can’t take too much credit for this recipe because I actually combined three different recipes from three different sources to create these sweet treats: Against All Grain, Lexi’s Clean Kitchen, and Urban Poser. The part that amazed me the most was being able to make my own marshmallow with honey. WHAAAT. And it came out perfectly. Until I caught it on fire. Yep, that actually happened. I put the bars under the broiler to get the marshmallow nice and toasty brown (I mean it’s a s’more, right?) and then got distracted by the World Cup annnnd there was a fire. Smoke detector went off. I had to peel off the top charred and maimed layer. And because of that, the marshmallow layer isn’t as thick as it started out. So when you make these, the marshmallow will probably be a little fluffier and taller. Just don’t make an oopsie like I did. BUT if you’re going to catch something on fire, marshmallow isn’t the worst thing because you can easily just remove it. That’s my story and I’m sticking to it. Happy summertime!
S’mores Bars
Graham Crust layer adapted from Against All Grain (original recipe here)
- 1/4 cup almond flour
- 1/2 cup plus 2 tablespoons coconut flour
- 1/4 teaspoon salt
- 1/4 teaspoon baking soda
- 1 teaspoon cinnamon
- 1/4 cup coconut oil, softened
- 1/4 cup honey
- 1 egg
- 1 teaspoon vanilla
Chocolate Fudge Cake layer adapted from Lexi’s Clean Kitchen (original recipe here)
- 6 oz. dark chocolate (I use Enjoy Life chocolate chips)
- 1/4 cup unsweetened apple sauce
- 1/4 cup coconut oil
- 1/2 cup good quality unsweetened cocoa powder
- 3 eggs
- 1/2 cup raw honey
- Pinch of himalayan sea salt
- 1 tsp vanilla
- 1/2 tsp cinnamon
Marshmallow Fluff layer adapted from Urban Poser (original recipe here)
– See more at: http://urbanposer.blogspot.com/2012/11/rustic-homemade-marshmallows-whoney.html#sthash.Cj3toeYb.dpuf
– See more at: http://urbanposer.blogspot.com/2012/11/rustic-homemade-marshmallows-whoney.html#sthash.Cj3toeYb.dpuf
- 1/2 cup filtered water
- 1 1/4 Tbsp gelatin (grass-fed if you can find it)
- 1/2 cup raw honey (or grade B maple syrup)
- 1 tsp vanilla
- Preheat the oven to 350 degrees F. Grease an 8×8 baking dish with coconut oil.
- Start with the graham layer. Combine all of the dry ingredients in a small bowl. Combine all of the wet ingredients and a separate bowl, using a mixer to blend. Slowly add your dry ingredients to the wet, using your mixer to combine until smooth. The dough should be in a moldable ball.
- Press your dough into the bottom of your baking dish in one even layer. No need to come up the sides. Use a fork to poke holes all over the dough to make sure it doesn’t rise.
- Par-bake the graham layer for 5 minutes, then remove from the oven and place in the freezer while you start making the chocolate layer.
- Start the chocolate fudge cake layer. Using a double boiler, melt the dark chocolate, honey and coconut oil, stirring frequently until combined and fully melted. Remove from heat.
- Add apple sauce and stir to combine. Add cocoa powder, cinnamon, salt and vanilla and mix thoroughly until there are no lumps. Making sure your mixture is cool enough, add the eggs. (If your mixture is too hot, it will start to cook the eggs and you will have scrambled eggs in your fudge… No good!)
- Remove your graham layer from the freezer, and pour your chocolate fudge layer on top of your graham layer in the baking dish. Bake for 25 minutes. I liked mine a little fudgey (read: undercooked), so when I took it out of the oven, the middle was still slightly liquidy. If you want yours to be fully cooked through, bake until the center is firm and an inserted toothpick comes out clean. I put mine in the fridge once cooked, and the center hardened right up anyway due to the chocolate and coconut oil solidifying in the cold temperature.
- Start your marshmallow fluff layer. Note: I used half the recipe indicated on Urban Poser’s blog. She does a much better job with the explanation and troubleshooting of this process than I ever could, so at this point I’m going to direct you to Urban Poser’s recipe (click here). Stop at step 5 and come back over here to finish up.
- Once you have made your fluff, immediately spread it over the top of your chocolate layer before it starts to set up. Make sure the sides of your baking dish are still greased well with coconut oil (you may need to re-grease). Allow the marshmallow time to set up before cutting or toasting (about 30 min to an hour at least). If you decide to toast and toast too soon, your marshmallow will not be as fluffy as it started out (mine deflated after toasting it).
- Store leftovers in the fridge.







Quick question here! What regarding bottles of spices? I love using curry yet it has more than 5 elements. and different mixed spices? Thanks!
Hi! In regards to curry spice, if you’re just asking about the use of curry in general, I say go for it! Spices don’t fall under our “minimal ingredients” rule, as they are usually natural herbs. However, if you’re referring to the use of curry in this specific s’mores recipe, that would definitely create a different flavor than intended.