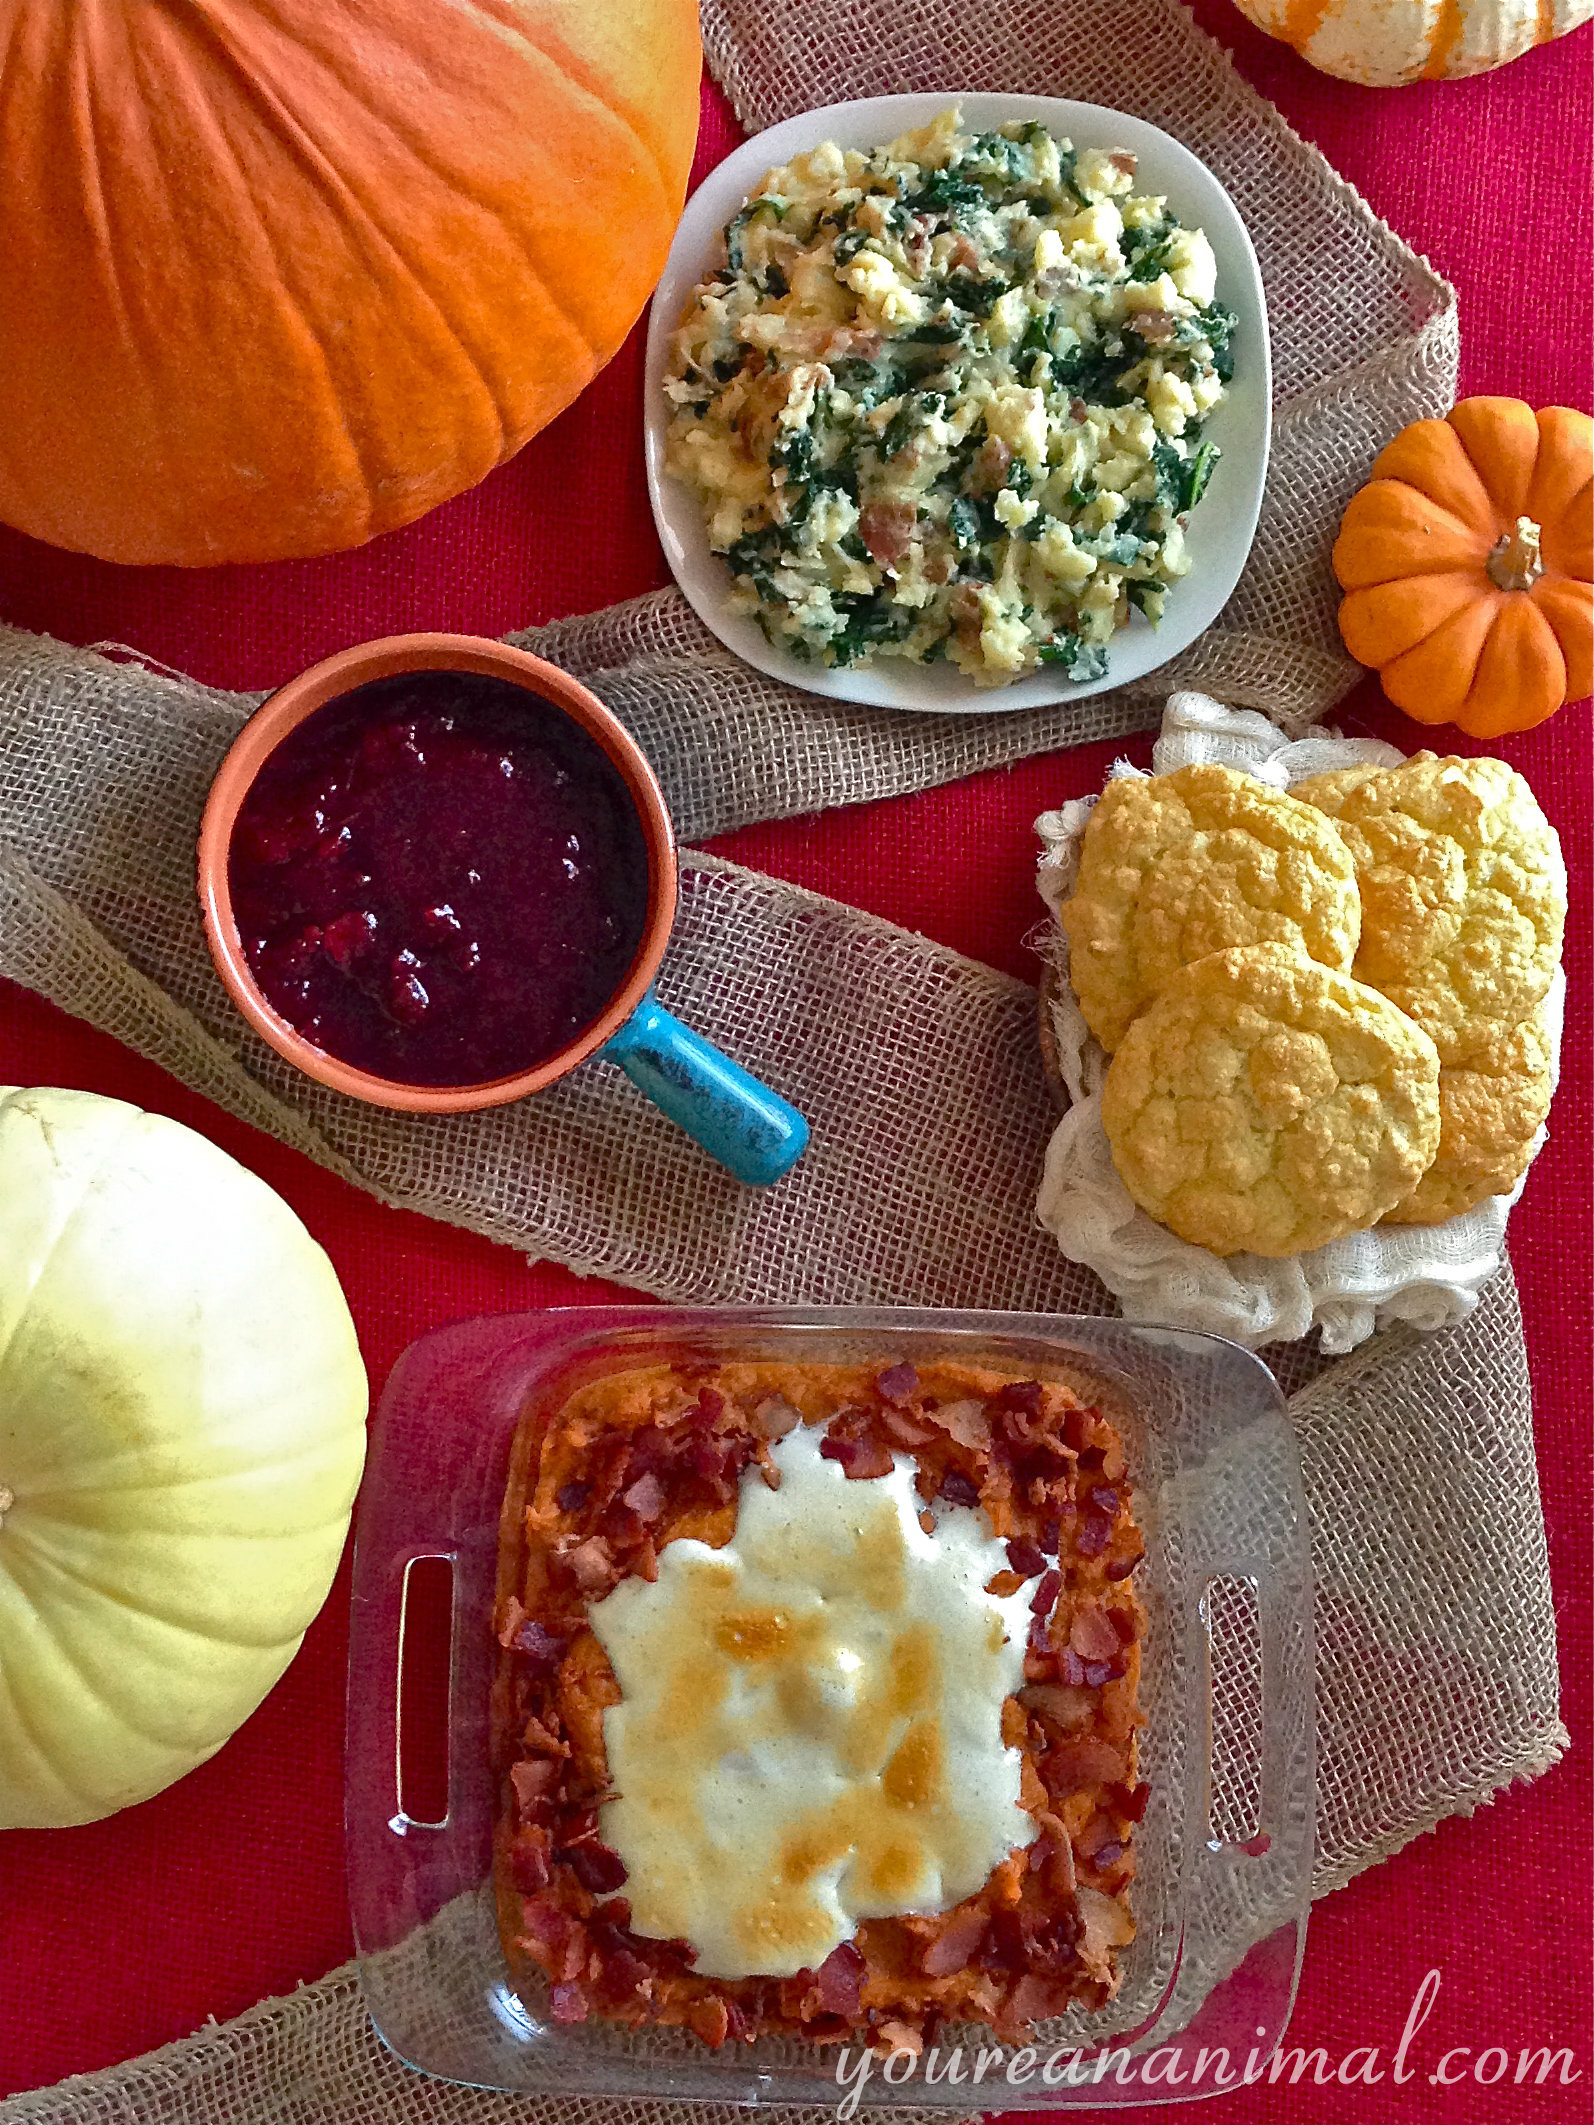
Thanksgiving is such a wonderful day. No presents, no pressure, just an abundance of food and family. But Thanksgiving can be a minefield of gluten-filled carbs, and sugar-overload. So in this series of “Thanksgiving Cleaned Up,” I’ve taken some classic Thanksgiving staple foods and made them a little bit less detrimental. You can check out my other posts, Sweet Potato Casserole, Garlic Kale Mashed Potatoes, and Grain-Free Drop Biscuits and have yourself a slightly less guilty, but certain not less hearty, Thanksgiving feast! Wonderful additions to this series would be my Autumn Salad and my Grain-Free Pumpkin Bread!
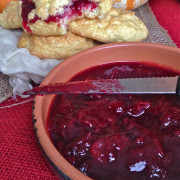
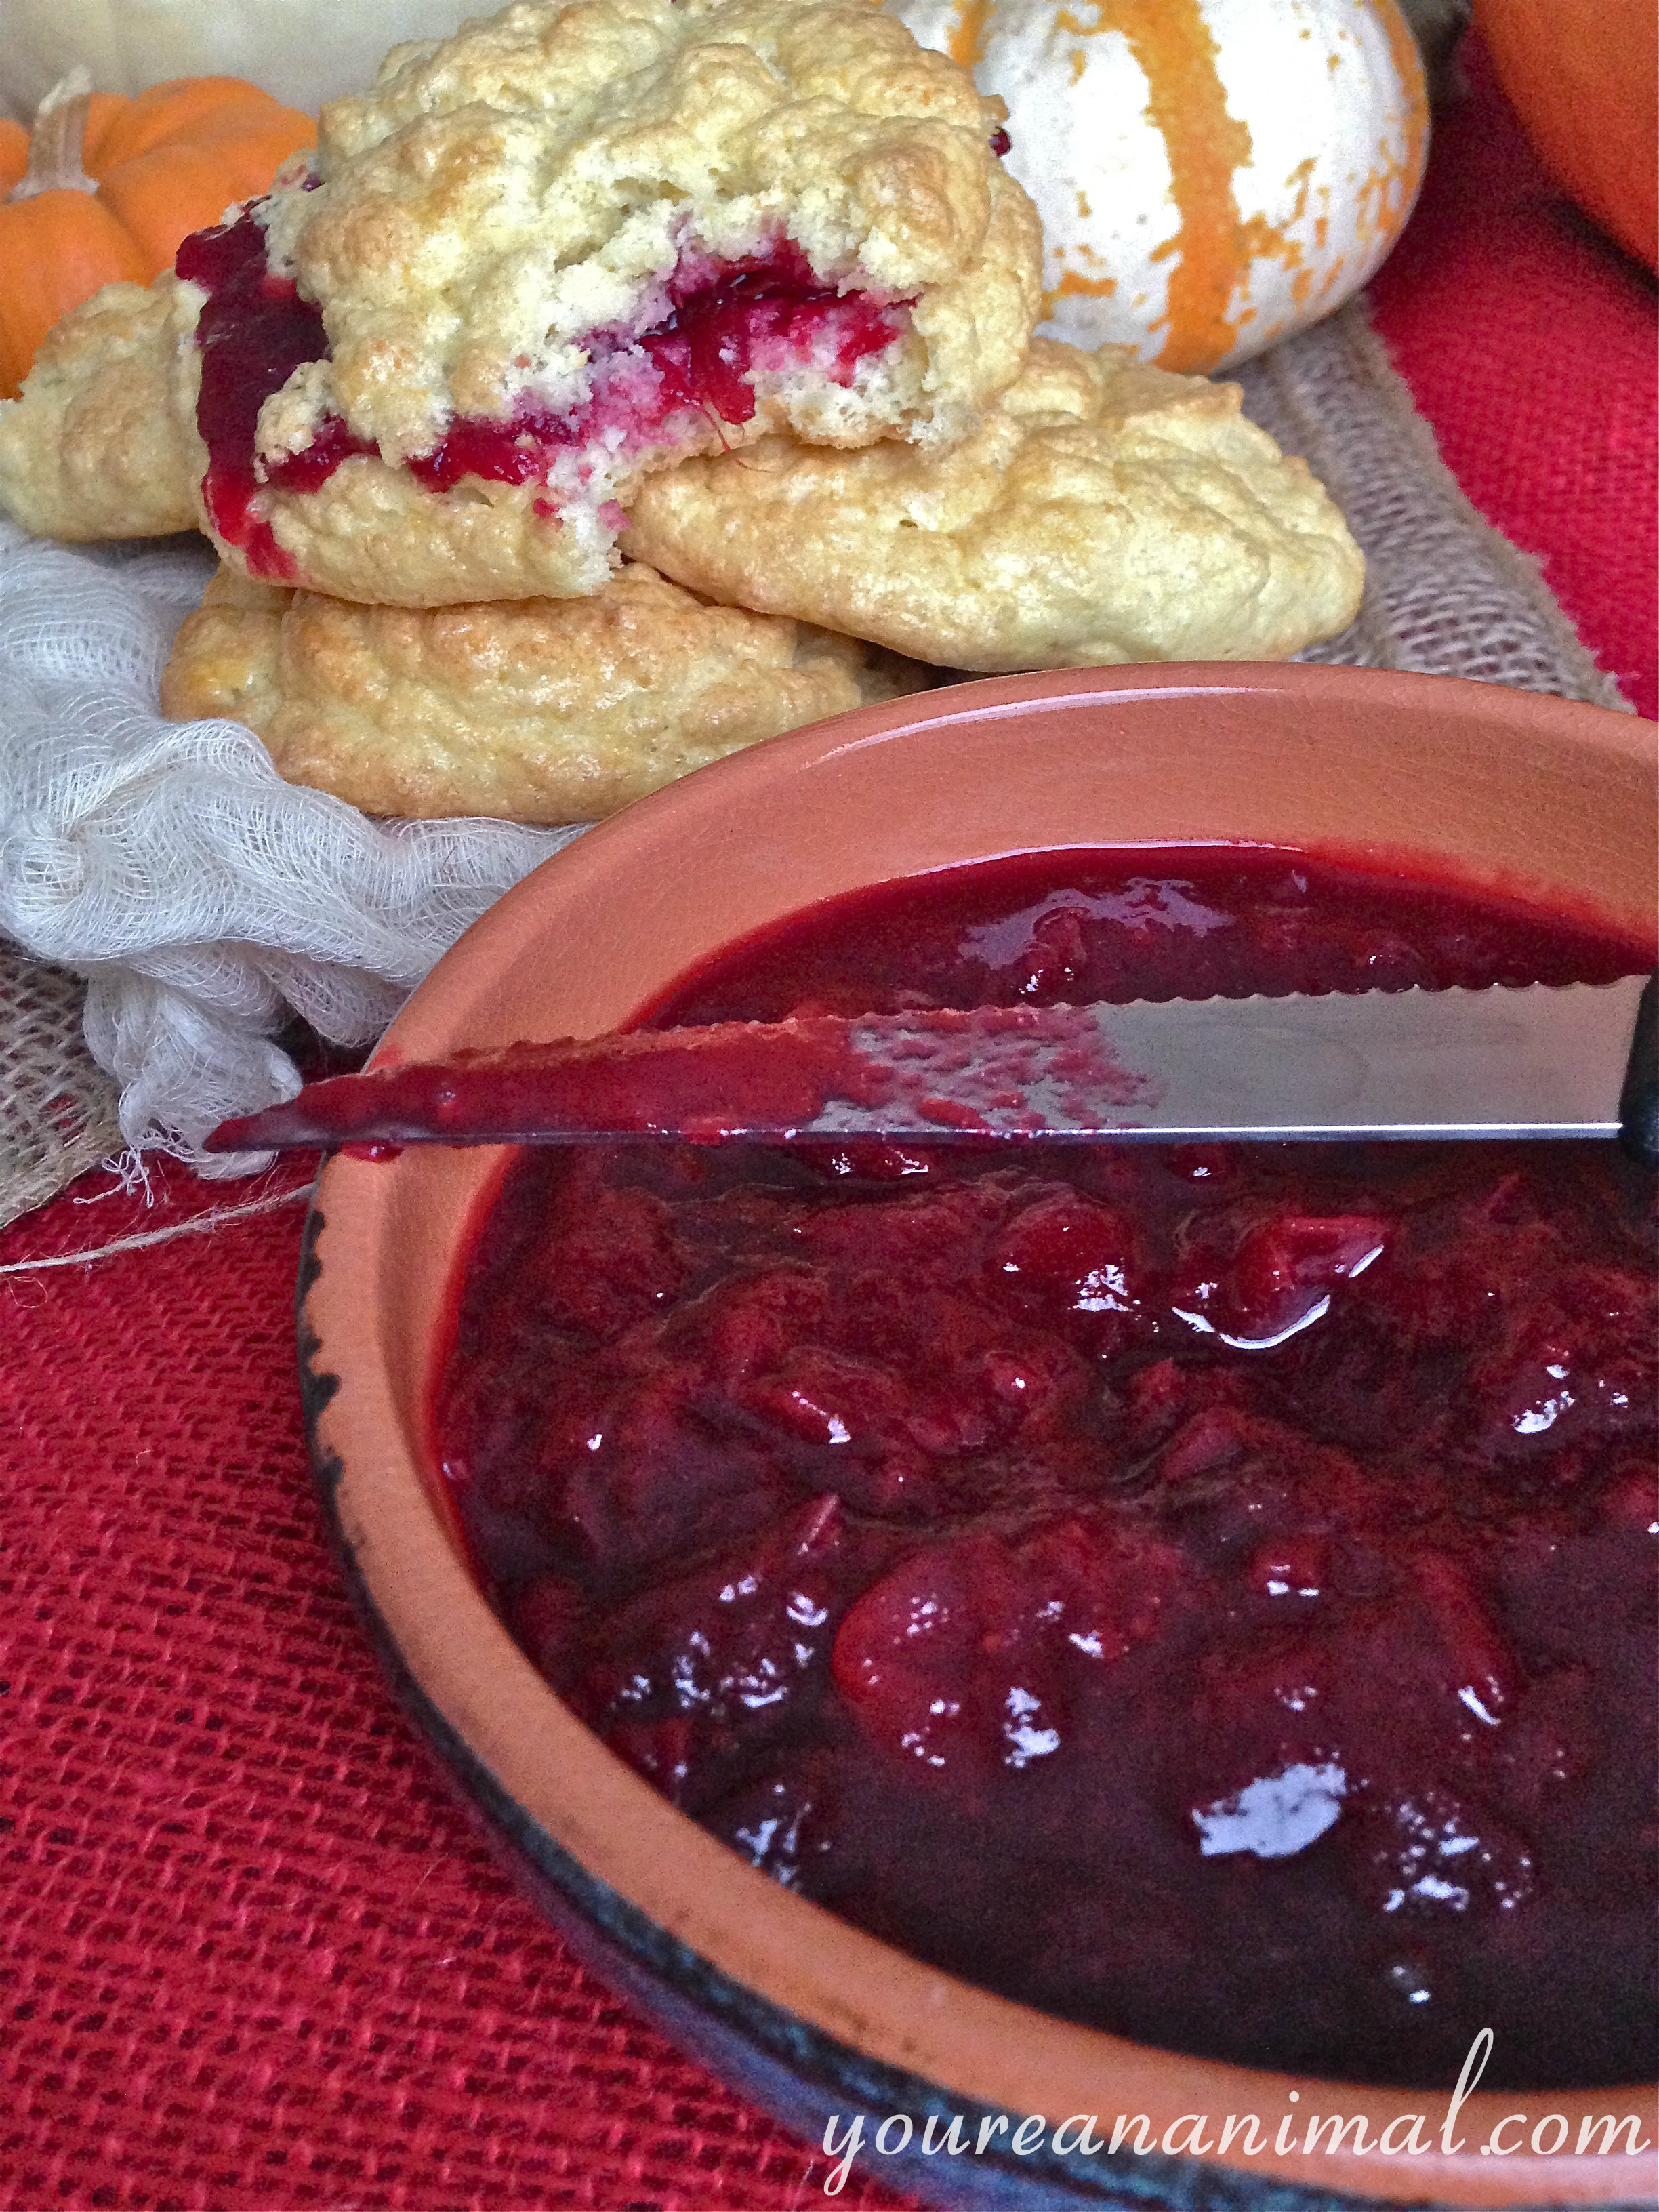
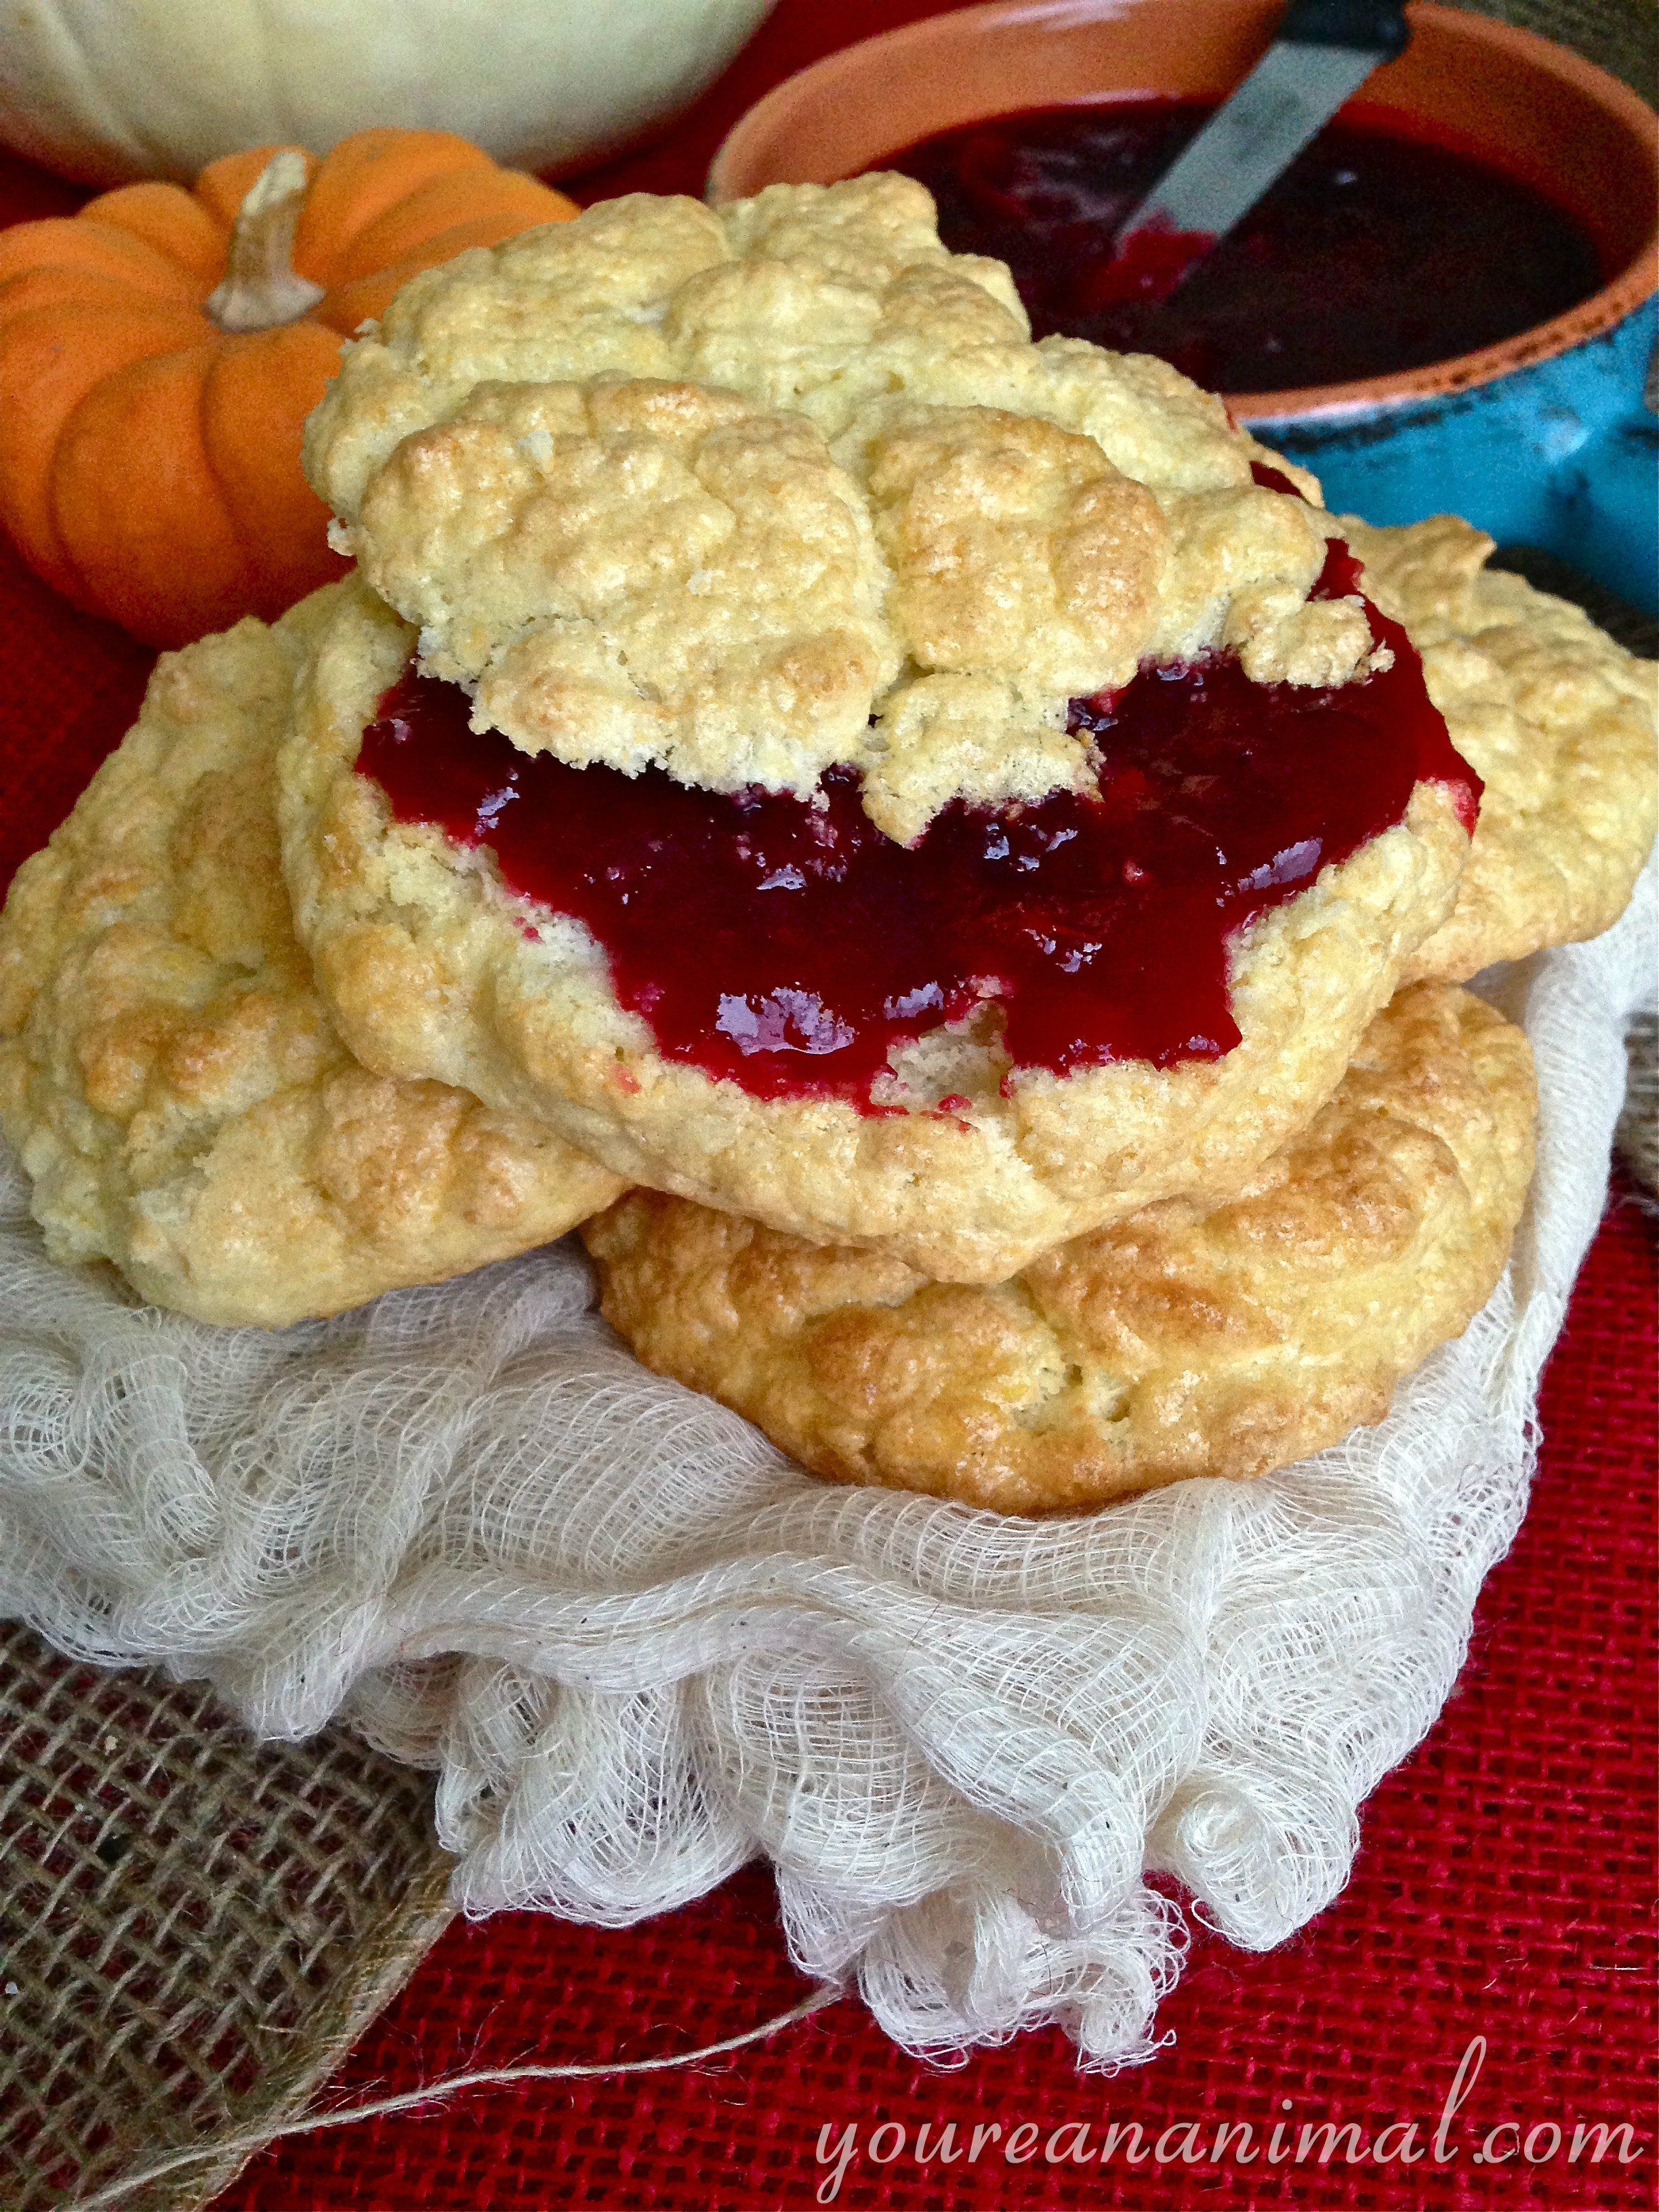
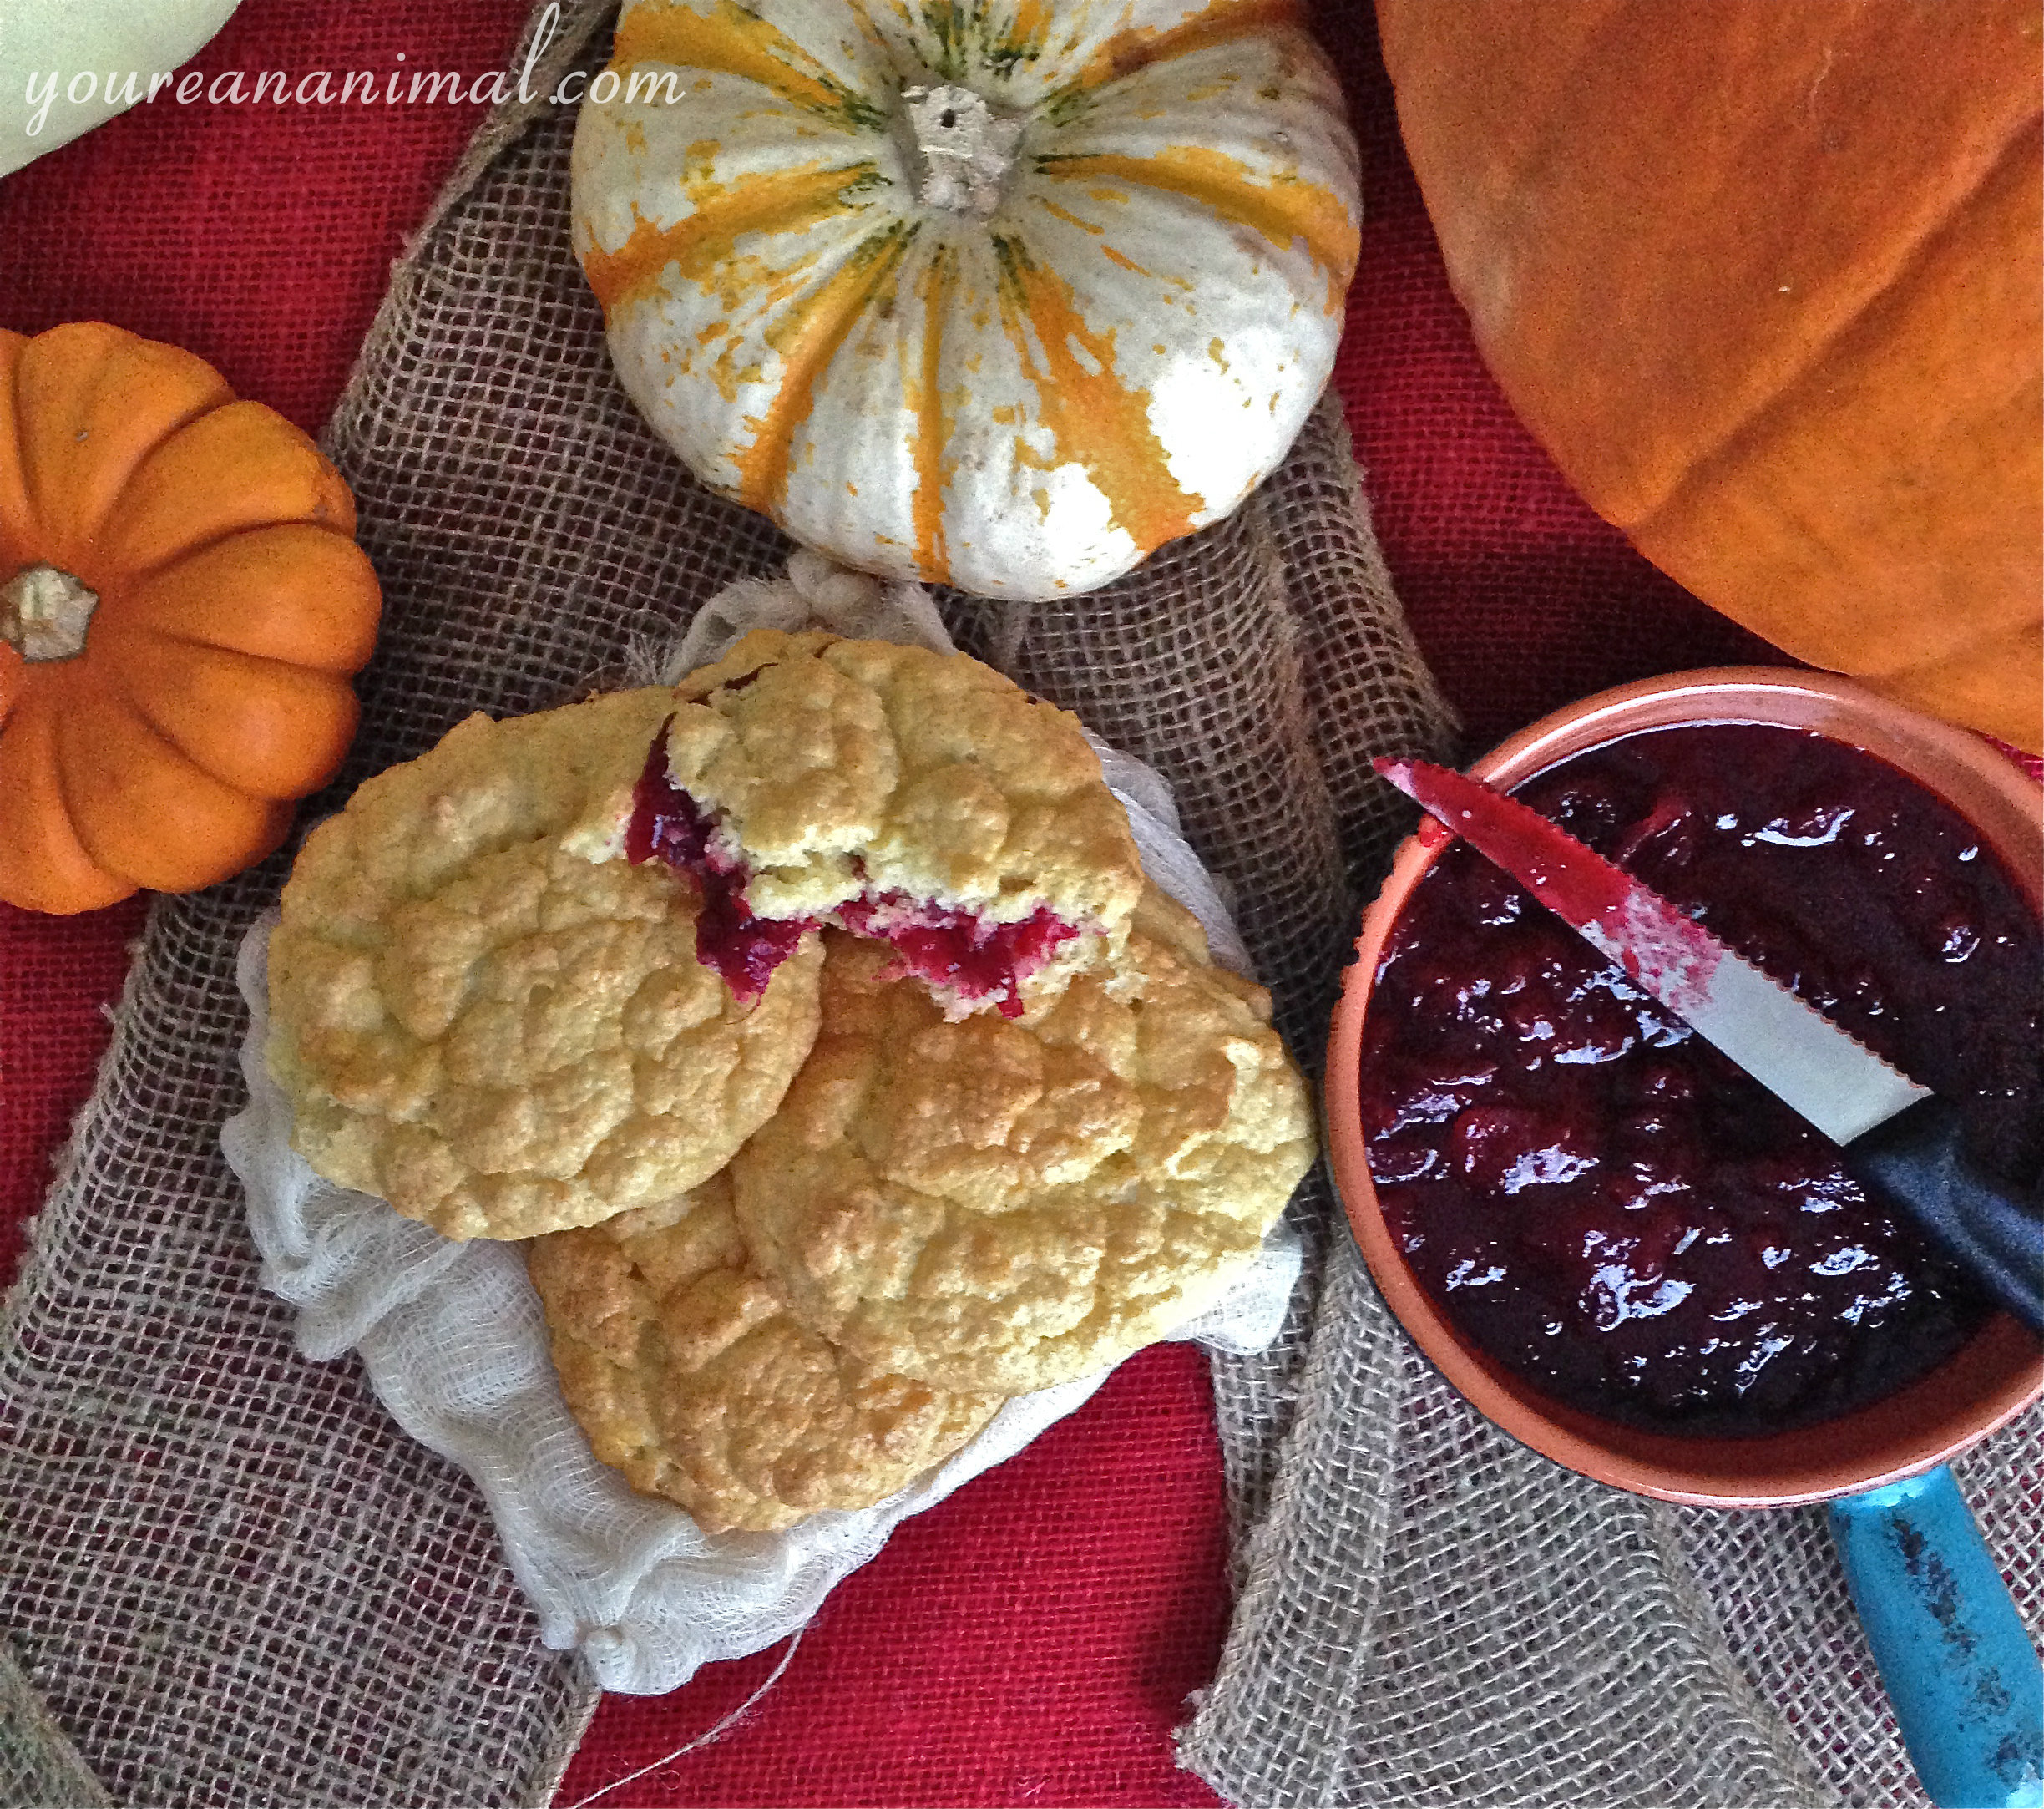
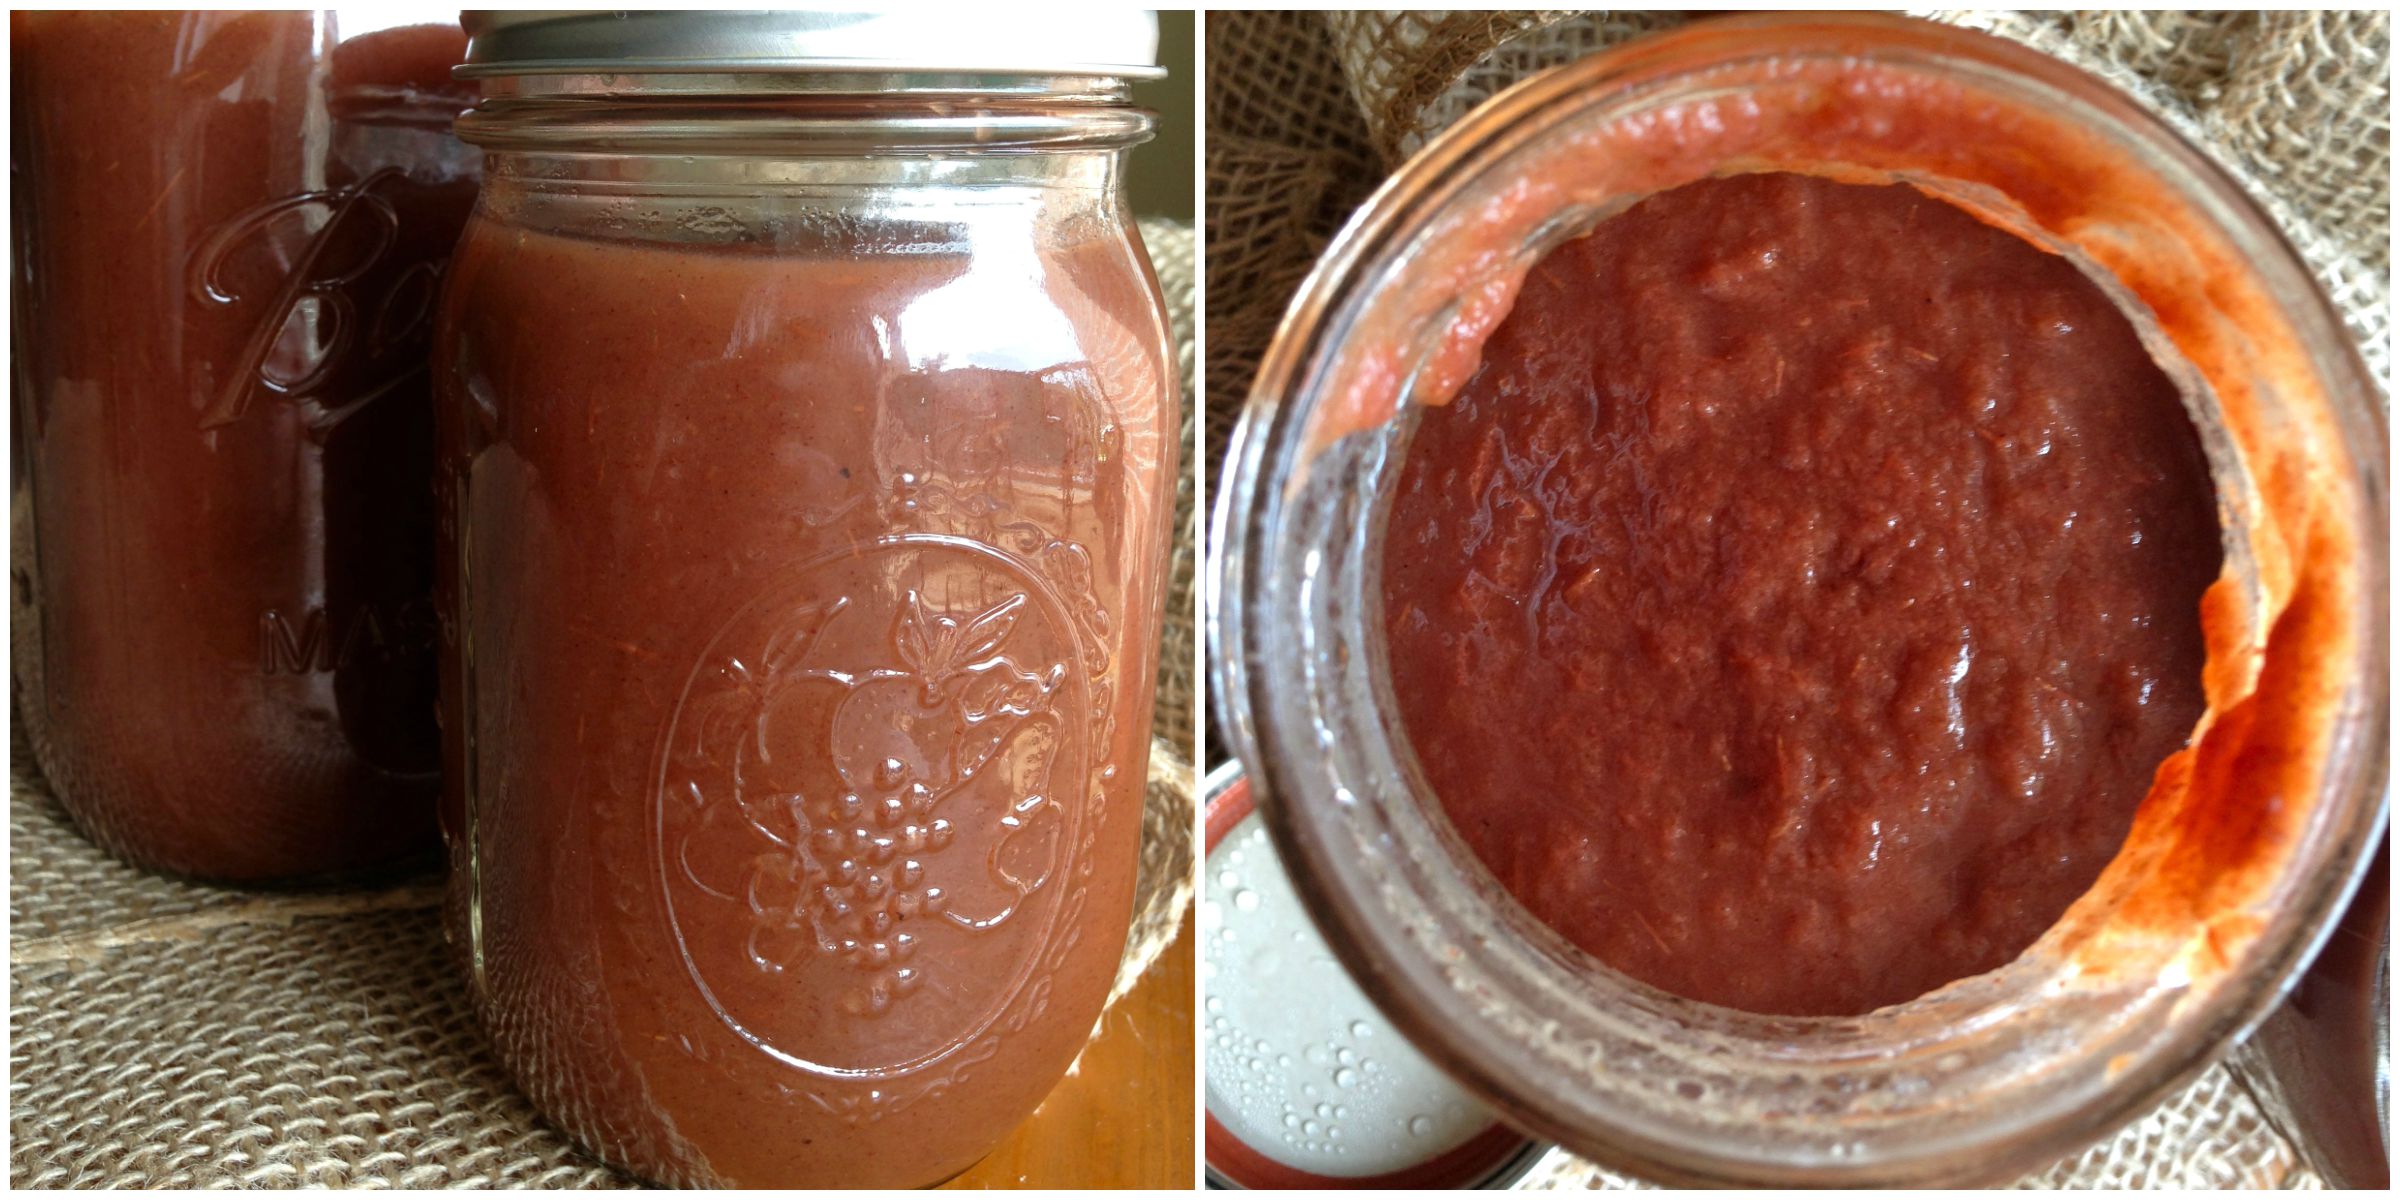
Cranberry sauce is not something I’ve ever really been able to get into. Don’t get me wrong, we always had it on the table, but something about it’s square/canned jelly shape really turned me away. But I know it’s a traditional staple, and it’s a fruit sauce, so I knew I had to be able to figure out a recipe that I would actually enjoy. From what I understand (I’ve never eaten it, remember?) people put this on whatever they want… meat, biscuits, spoons, anything. Same goes for this sauce. It’s more on the tart side, so it would go well on meat, but it’s sweet enough to eat on a biscuit which is exactly what I did. The wine gives it such a wonderfully rich flavor, this stuff is hard to pass up.
Pinot Noir Cranberry Sauce
6 oz of fresh, organic cranberries
1/2 cup of Pinot Noir
1/2 cup of orange juice
1/2 cup maple syrup or unfiltered honey
1 Tbsp lemon juice
Add all your ingredients to a medium sauce pan, and heat over medium to medium-high heat, until the mixture just starts to boil.
Continue to stir over heat, until the cranberries start to burst.
Using the back of a spoon, or a potato masher, smash the cranberries into a paste, continuing to stir.
Allow the mixture to sit over heat, bubbling slightly, and the sauce will start to thicken.
Stir occasionally, and continue to allow the sauce to thicken until it is a thick, syrupy consistency.
Transfer to a serving vessel and serve.
Makes about 1 cup of sauce.
https://nourishwild.com/cms/wp-content/uploads/2014/11/thanksgiving47.jpg32642448Morgan Carrhttps://nourishwild.com/cms/wp-content/uploads/2016/02/Logo-Only-Large-300x212.pngMorgan Carr2014-11-21 15:07:292016-02-27 21:29:53Pinot Noir Cranberry Sauce: Thanksgiving Cleaned Up Part 3
Thanksgiving is such a wonderful day. No presents, no pressure, just an abundance of food and family. But Thanksgiving can be a minefield of gluten-filled carbs, and sugar-overload. So in this series of “Thanksgiving Cleaned Up,” I’ve taken some classic Thanksgiving staple foods and made them a little bit less detrimental. You can check out my other posts, Sweet Potato Casserole, Pinot Noir Cranberry Sauce, and Grain-Free Drop Biscuits and have yourself a slightly less guilty, but certain not less hearty, Thanksgiving feast! Wonderful additions to this series would be my Autumn Salad and my Grain-Free Pumpkin Bread!
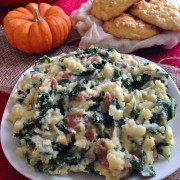
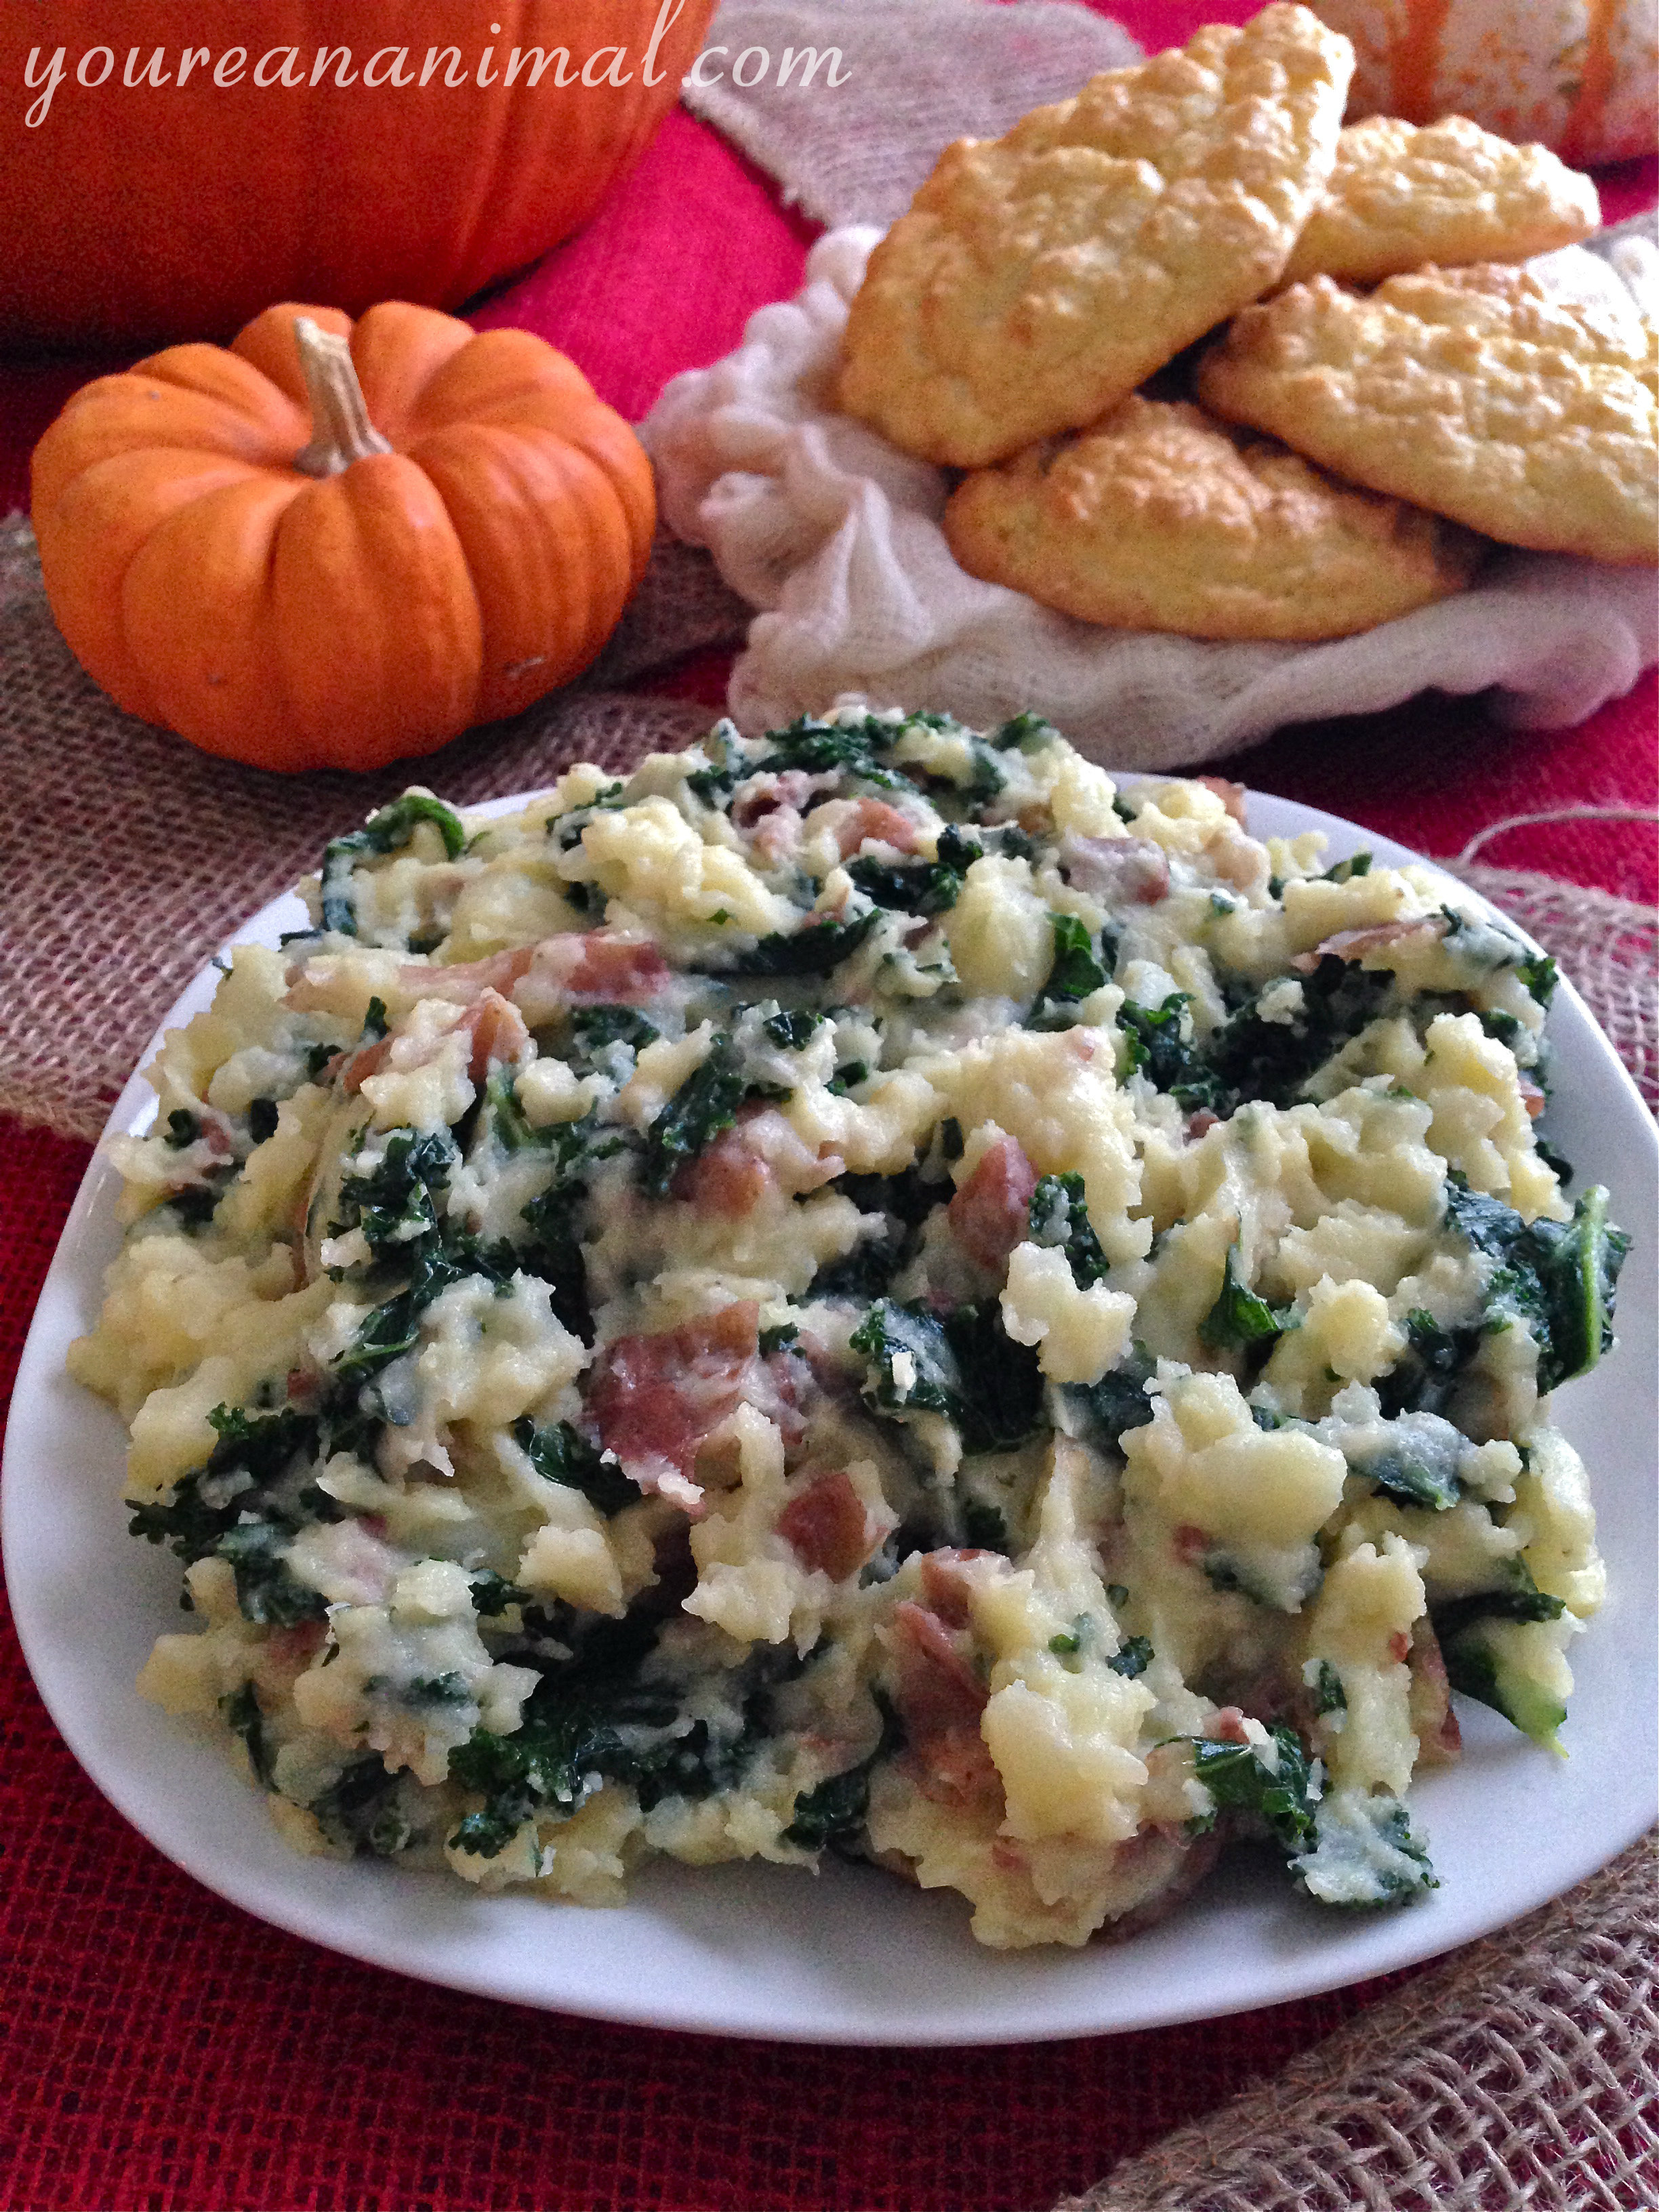
This is my favorite part of Thanksgiving: mashed potatoes. But sometimes it’s hard to feel like it’s okay eating an entire plateful (just me?). That is, until you add kale. Add kale and you can eat the entire pot. Those are my rules, and I’m sticking to them. These mashed potatoes are probably some of the best I’ve ever had. As I was mashing them up, I kept sneaking bites. Before I even took pictures of it, I’d probably eaten a few spoonfuls. Oh and they were gone by the end of the day. And like I said, totally not even feeling guilty because that means I ate a bunch of green goodness as well. These potatoes are everything you want from your comfort food friend, and then some. Bring this one to your Thanksgiving potluck and tell people to eat freely because it’s healthy (healthier…)!
In 3-4 quarts of water, boil your chopped potatoes until fork tender (about 20 minutes)
While the potatoes are boiling, add your olive oil, minced garlic, salt, pepper, and red pepper flakes to a saute pan over medium heat. Allow the garlic to cook and flavor the oil until just slightly golden.
To the oil mixture, add the chopped kale to the saute pan. Allow the kale to wilt and cook down, until it is completely shrunk down in size and wilted.
Drain the potatoes, and add them back to the now empty pot that they cooked in. Add the kale and flavored oil to the potatoes. Using a fork or potatoes masher, mash the potatoes until smooth and combined the kale and flavored oil into the potatoes.
Add the butter and Parmesan to the mashed potato mixture. Again, mix until melted and combined.
Serve hot.
Makes about 4-6 servings of potatoes.
https://nourishwild.com/cms/wp-content/uploads/2014/11/thanksgiving63.jpg32642448Morgan Carrhttps://nourishwild.com/cms/wp-content/uploads/2016/02/Logo-Only-Large-300x212.pngMorgan Carr2014-11-21 15:07:172016-02-27 21:30:24Garlic Kale Mashed Potatoes: Thanksgiving Cleaned Up Part 2
Thanksgiving is such a wonderful day. No presents, no pressure, just an abundance of food and family. But Thanksgiving can be a minefield of gluten-filled carbs, and sugar-overload. So in this series of “Thanksgiving Cleaned Up,” I’ve taken some classic Thanksgiving staple foods and made them a little bit less detrimental. You can check out my other posts, Garlic Kale Mashed Potatoes, Pinot Noir Cranberry Sauce, and Grain-Free Drop Biscuits and have yourself a slightly less guilty, but certain not less hearty, Thanksgiving feast! Wonderful additions to this series would be my Autumn Salad and my Grain-Free Pumpkin Bread!
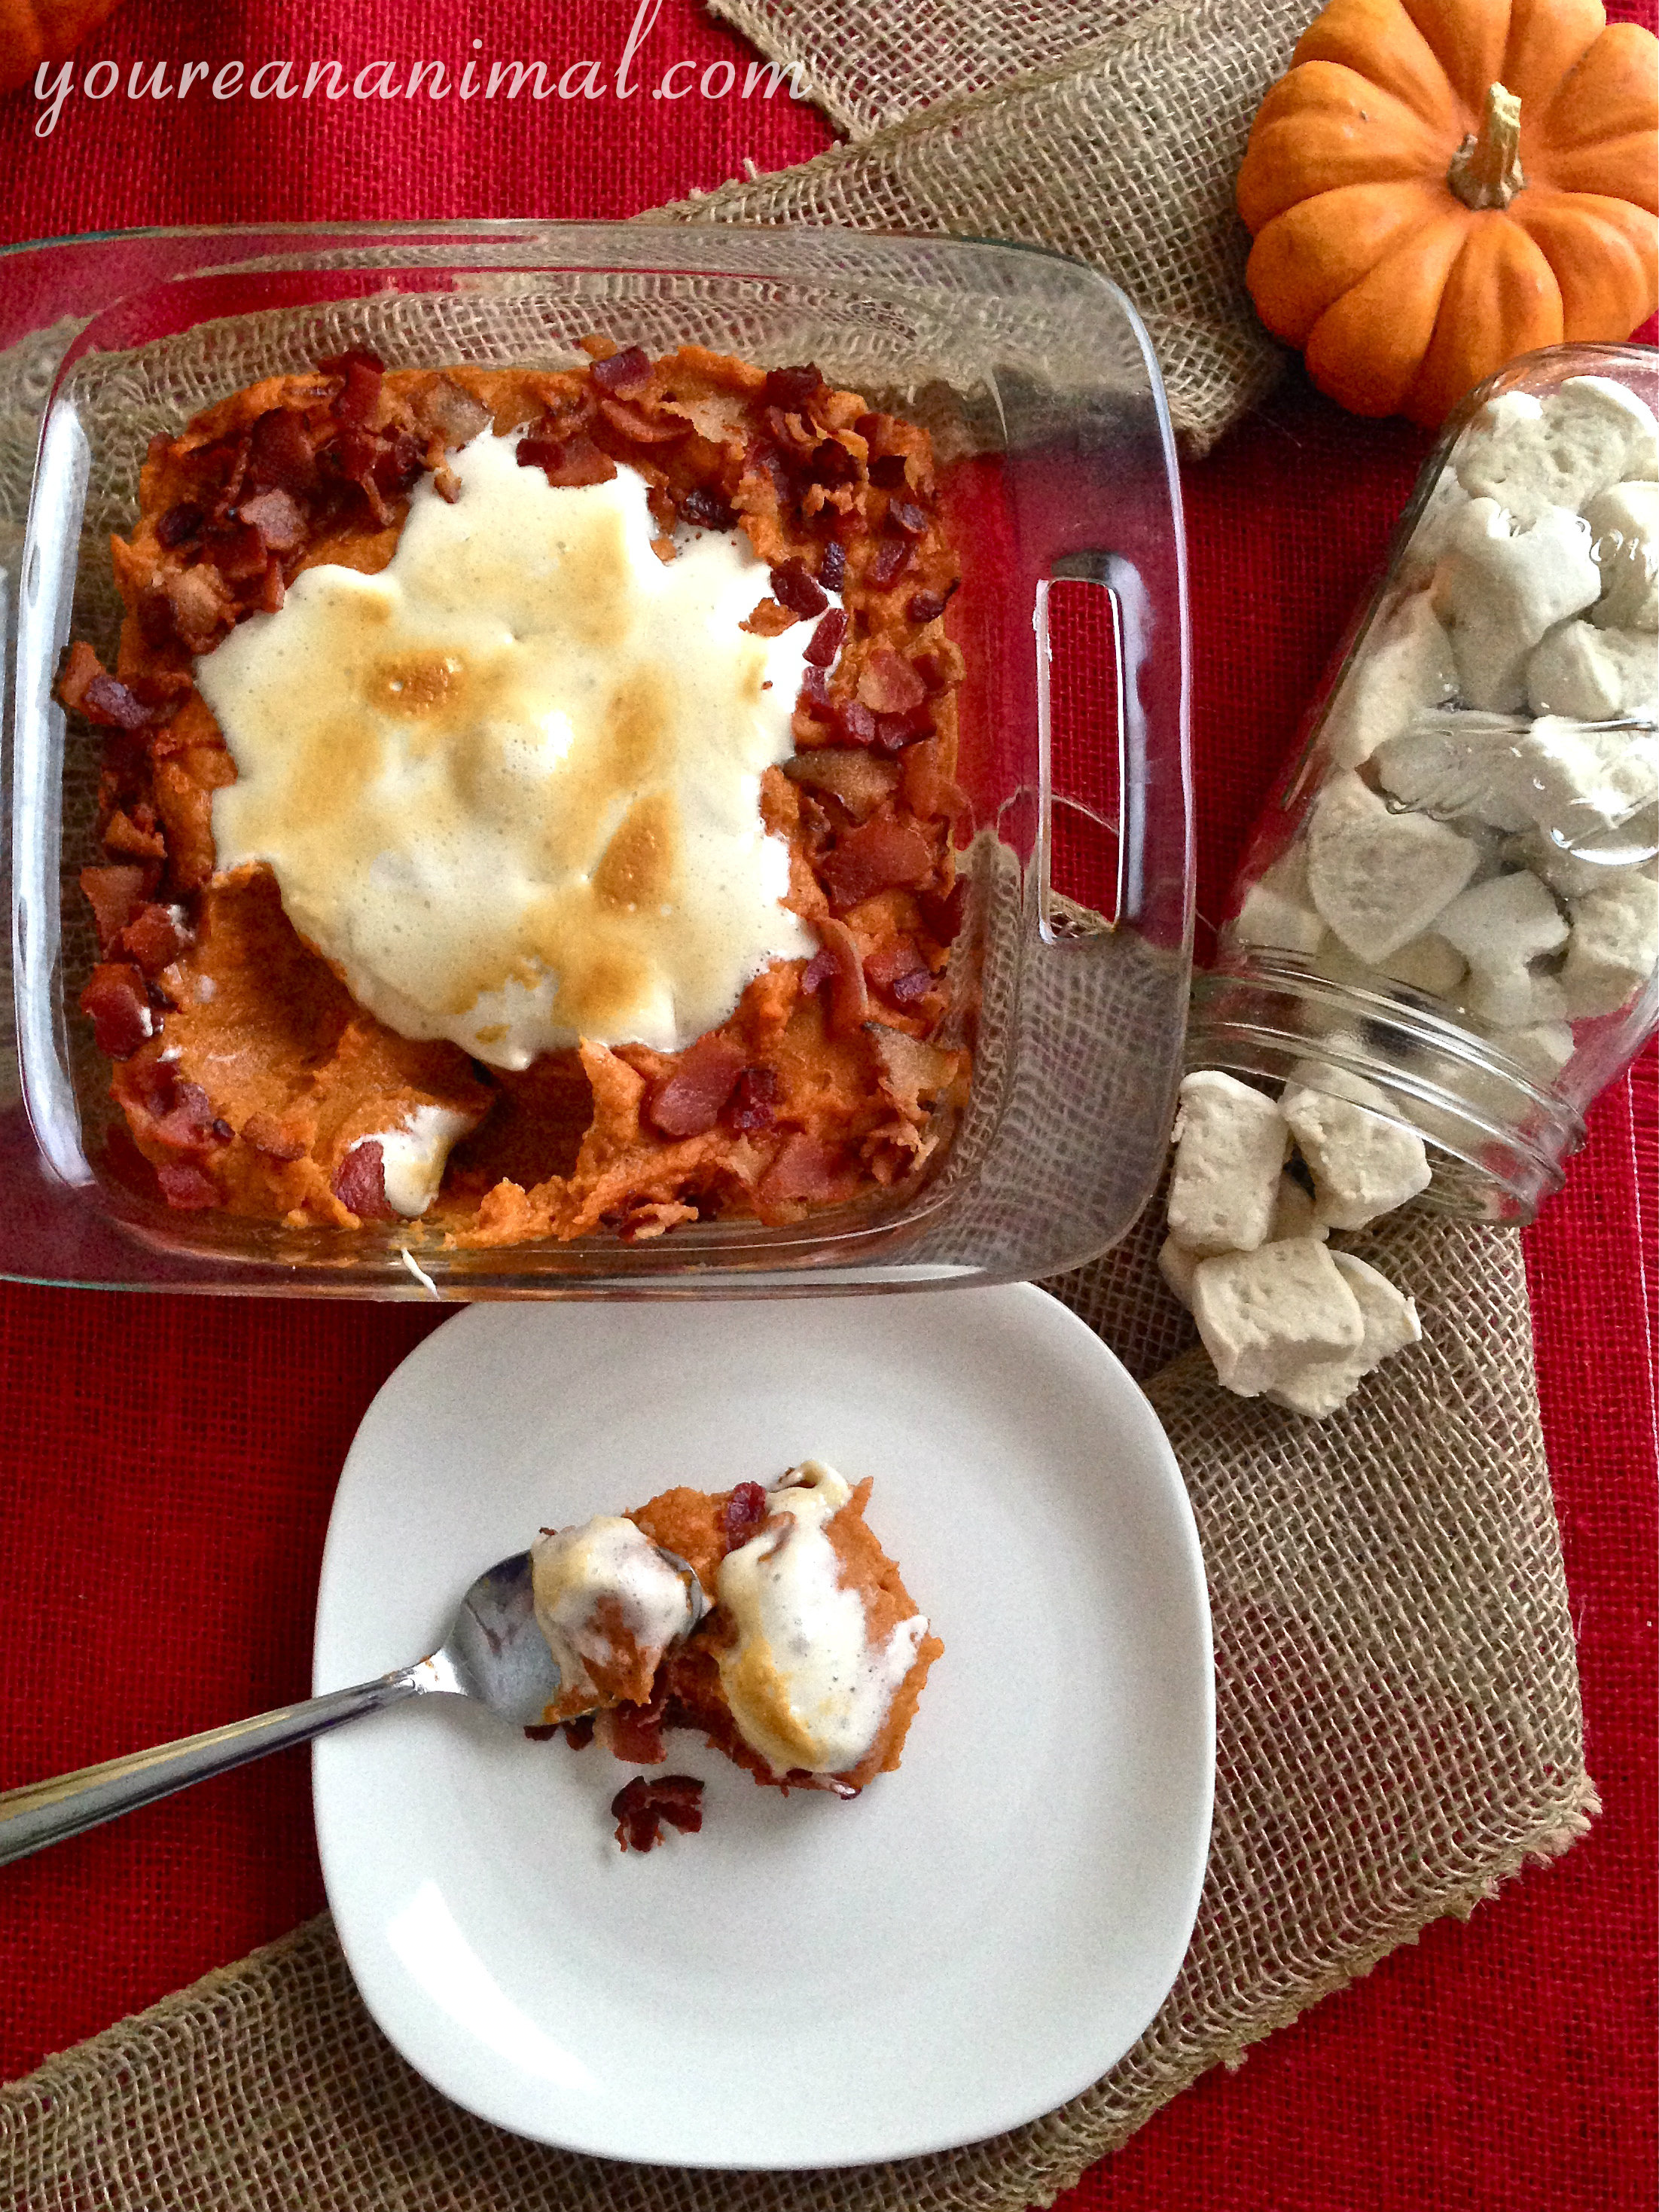
I’m starting this series off with dessert. Gotta eat dessert first ;). I know the classic dessert for Thanksgiving is pumpkin pie, but I don’t actually particularly like pie (except Key Lime… I know, apparently there’s something wrong with me.) So this “dessert” substitute is something we always had on our Thanksgiving table growing up: Sweet Potato Casserole. Complete with the toasted marshmallows, because that’s a must-have element. I also added some bacon, because everything is better with bacon and this is no exception. No added sugar to the potatoes because sweet potatoes are just that: sweet. And the marshmallows already add that little extra sugar. The sweet, spicy and salty combo is perfect to round out your Thanksgiving table for dessert, with your meal, or as a pre-feast snack… I won’t tell!
Sweet Potato Casserole
2 lbs of sweet potatoes, roasted and mashed
1/2 cup coconut milk (from a can)
1/2 tsp each of ground clove, ground nutmeg and ground ginger
This tea has gotten me through some hard times recently. And by hard times I mean this cold front that has taken the entire country in its icy grip and refused to let go. Luckily, here in RVA we have yet to see snow, but the cold and I don’t get along too well. On top of that, I’ve been fighting hard against a cold that has been trying to turn into a sinus infection (and so far I’m winning… huzzah!) and this tea (plus my handy dandy netti pot) has been one of my closest fraaaands. Not to mention this tea is a combination of things that will do a body good. I mean GOOD. Let me break it down for you:
Turmeric: This spice is a member of the ginger root family, and is known for its anti-inflammatory effects. In fact, in India, it is widely used for arthritis and joint pain relief. A main compound of turmeric, curcumin, has been shown in at least 30 different studies to have anti-tumor/anticancer and antioxidant effects. This spice has also been shown to be a wonderful detoxing agent for the liver.
Ginger: A classic for settling an upset stomach, this root too has anti-inflammatory effects. Ginger has also been shown to improve circulation, and has been used in Asian cultures for hundreds of years to treat cold hands and feet.
Cinnamon: Cinnamon has been shown to lower blood sugar by increasing glucose metabolism, and also to improve capillary function. This spice also has antimicrobial and anti-inflammatory effects.
Source for spice information:
Aside from all of these amazing benefits, personally I think this tea tastes amazing. And I am not a tea drinker. My idea of tea used to be McDonald’s Sweet Tea… yeah, I’ve moved on to bigger an better things these days.
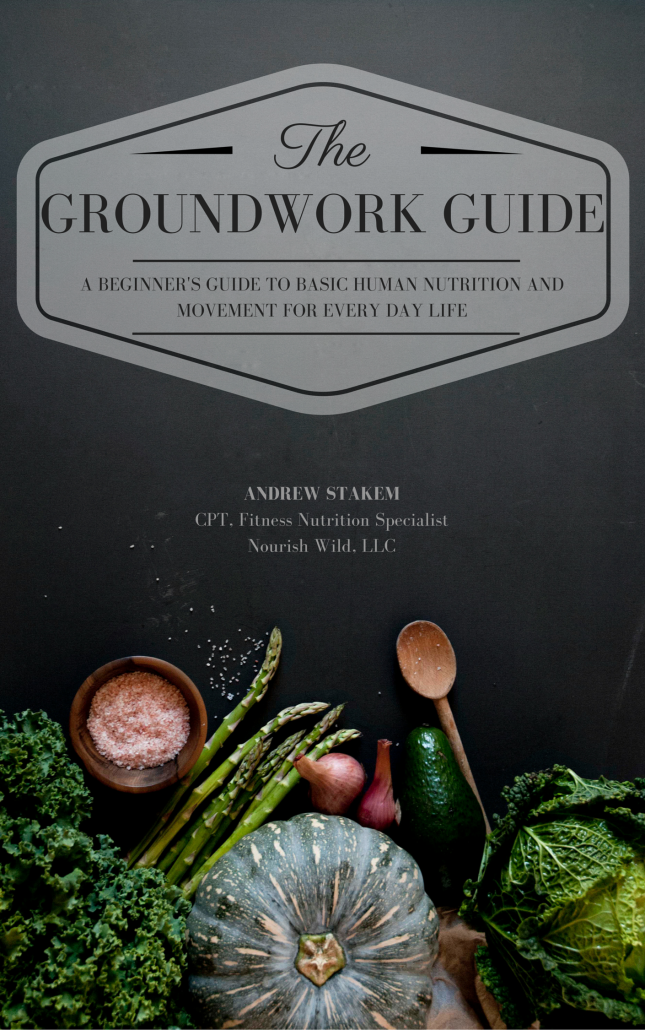
Ready to learn more about how to nourish your body with basic nutrition principles? We have an eBook for that!
The Groundwork Guide is the best place to start if you’re looking for the “hows” and “whys” of healthy living, particularly from a scientific perspective. This guide will arm you with the very basics of human health, and help you be able to navigate the often muddy waters and mixed signals we are given every day about our bodies. Perfect for those who want to understand the most foundational levels of nutrition and movement, you can learn more about what is included in this very special manual here.
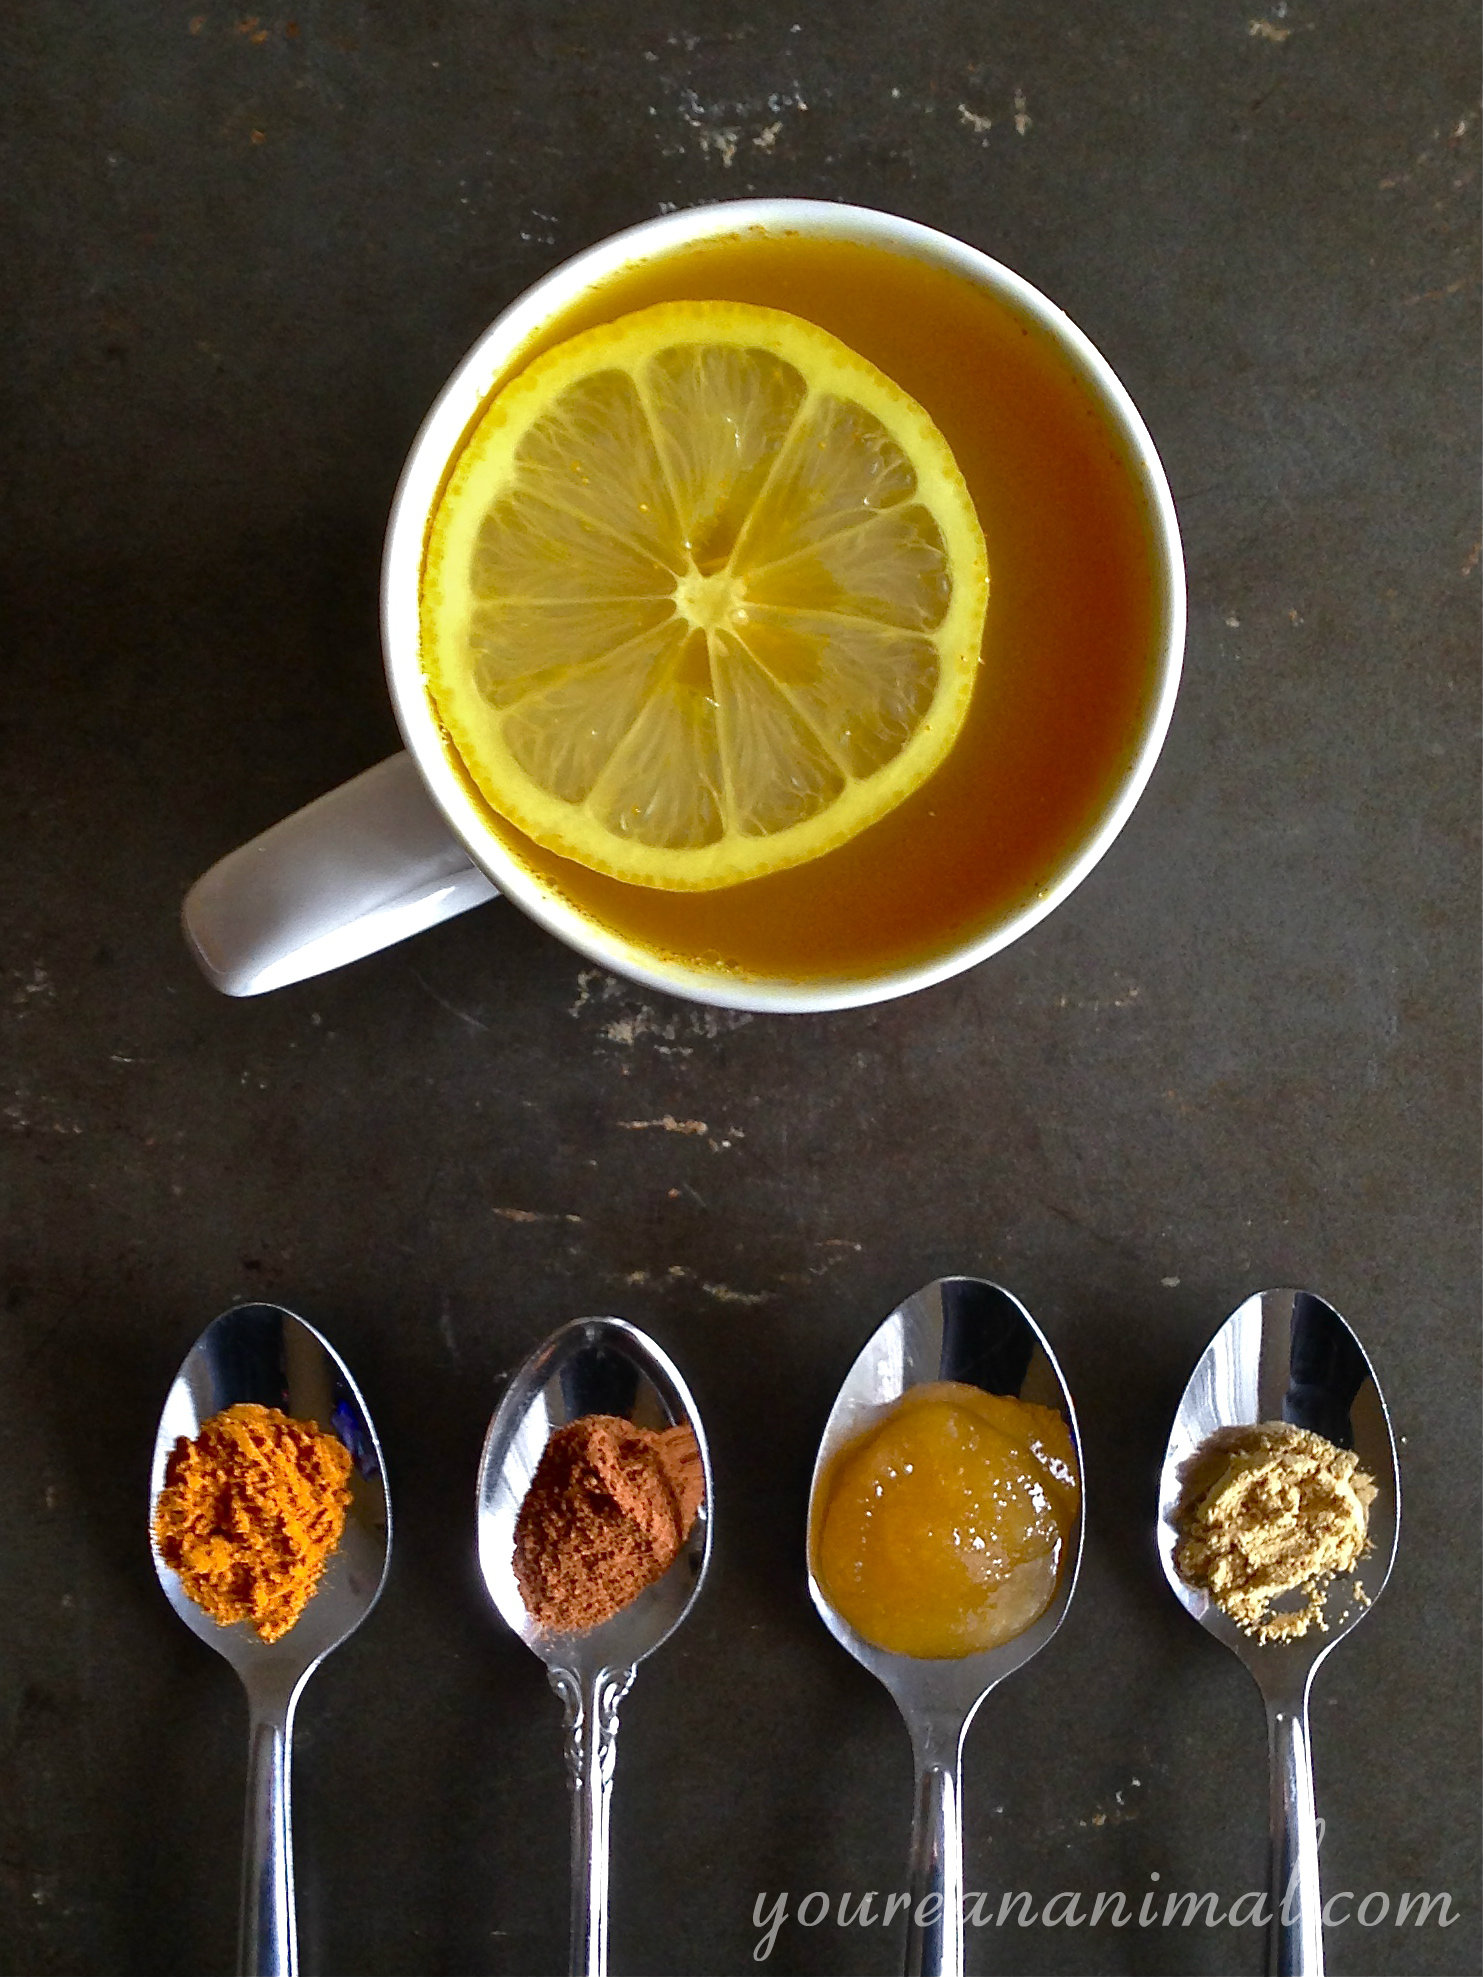
Anti-Inflammatory Turmeric Tea
1 cup of water
1/4 tsp ground turmeric
1/4 tsp ground cinnamon
1/4 tsp ground ginger
1/2-1 tsp unfiltered honey (depending on your preferred sweetness)
1 Tbsp lemon juice
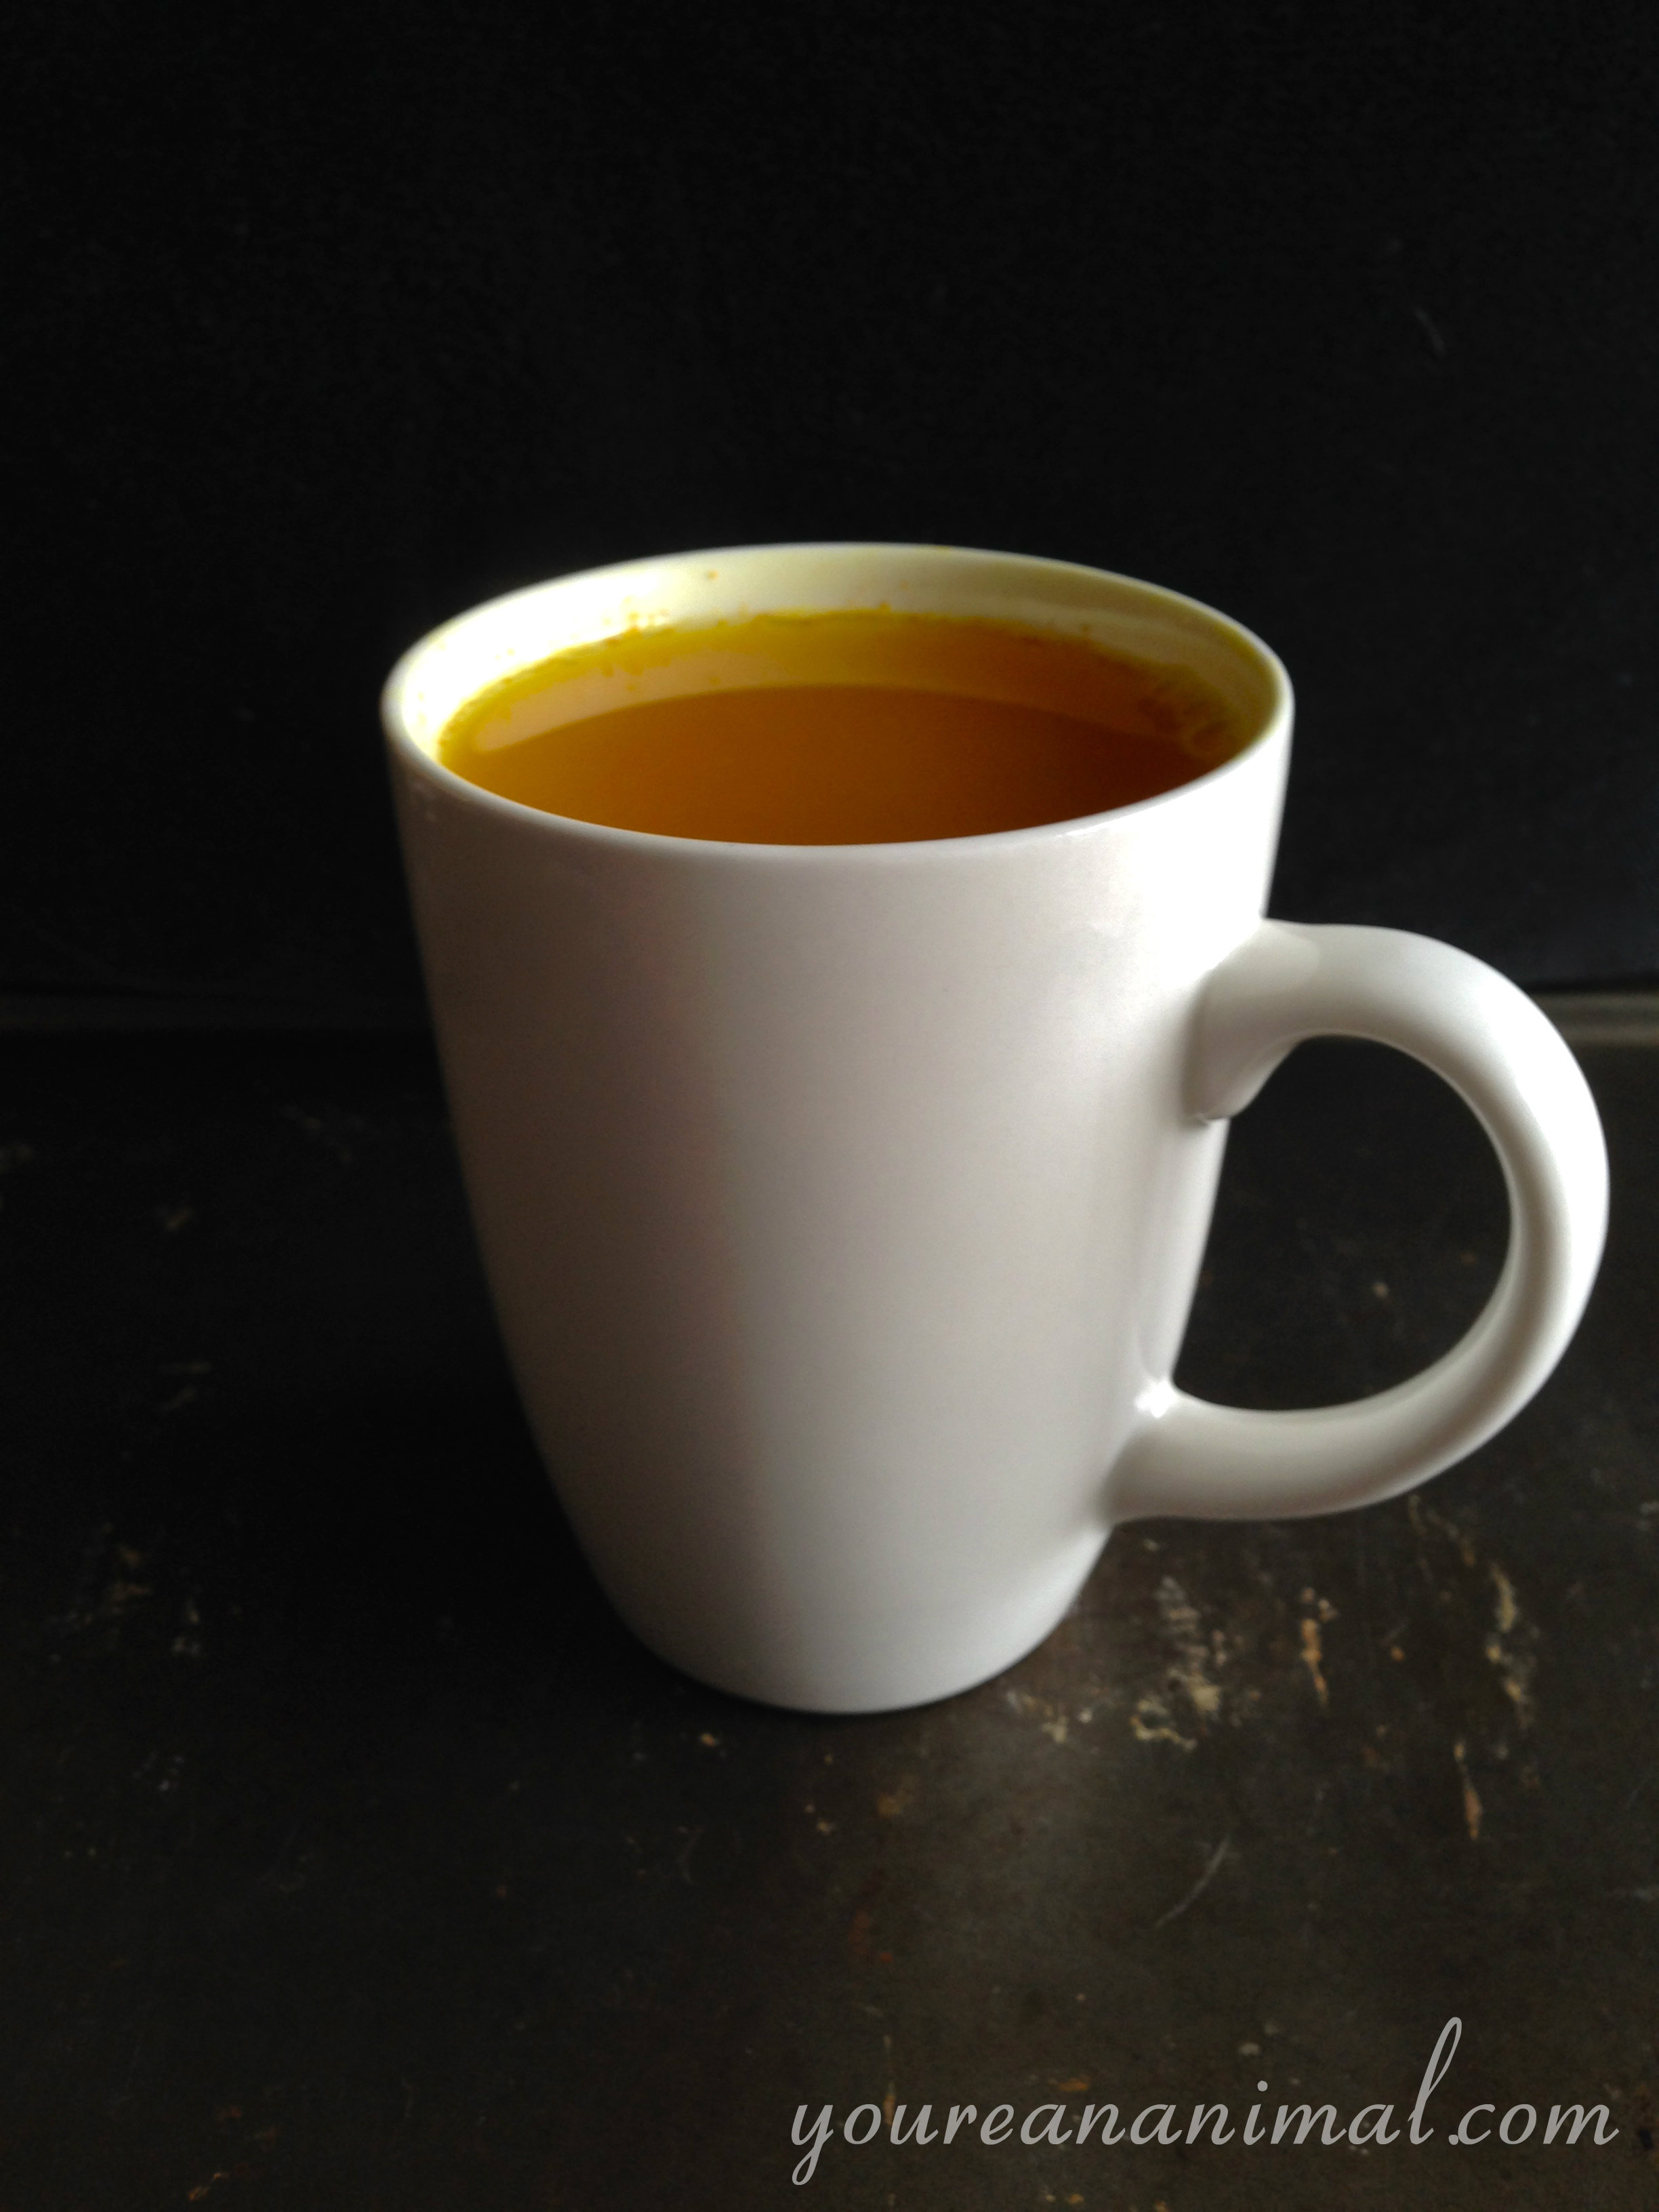
In a small saucepan, bring the water to a steam (not quite to a boil, the hotter it gets, the longer you have to wait for it to cool.)
Add the spices, honey and lemon juice, and stir to combine.
Remove the saucepan from heat, and cover with a lid.
Allow the mixture to steam and combine for 10 minutes.
Drink once cooled. This tea will settle as you drink it, so you will need a spoon to redistribute the spices.
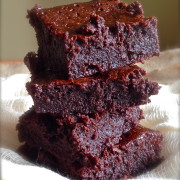
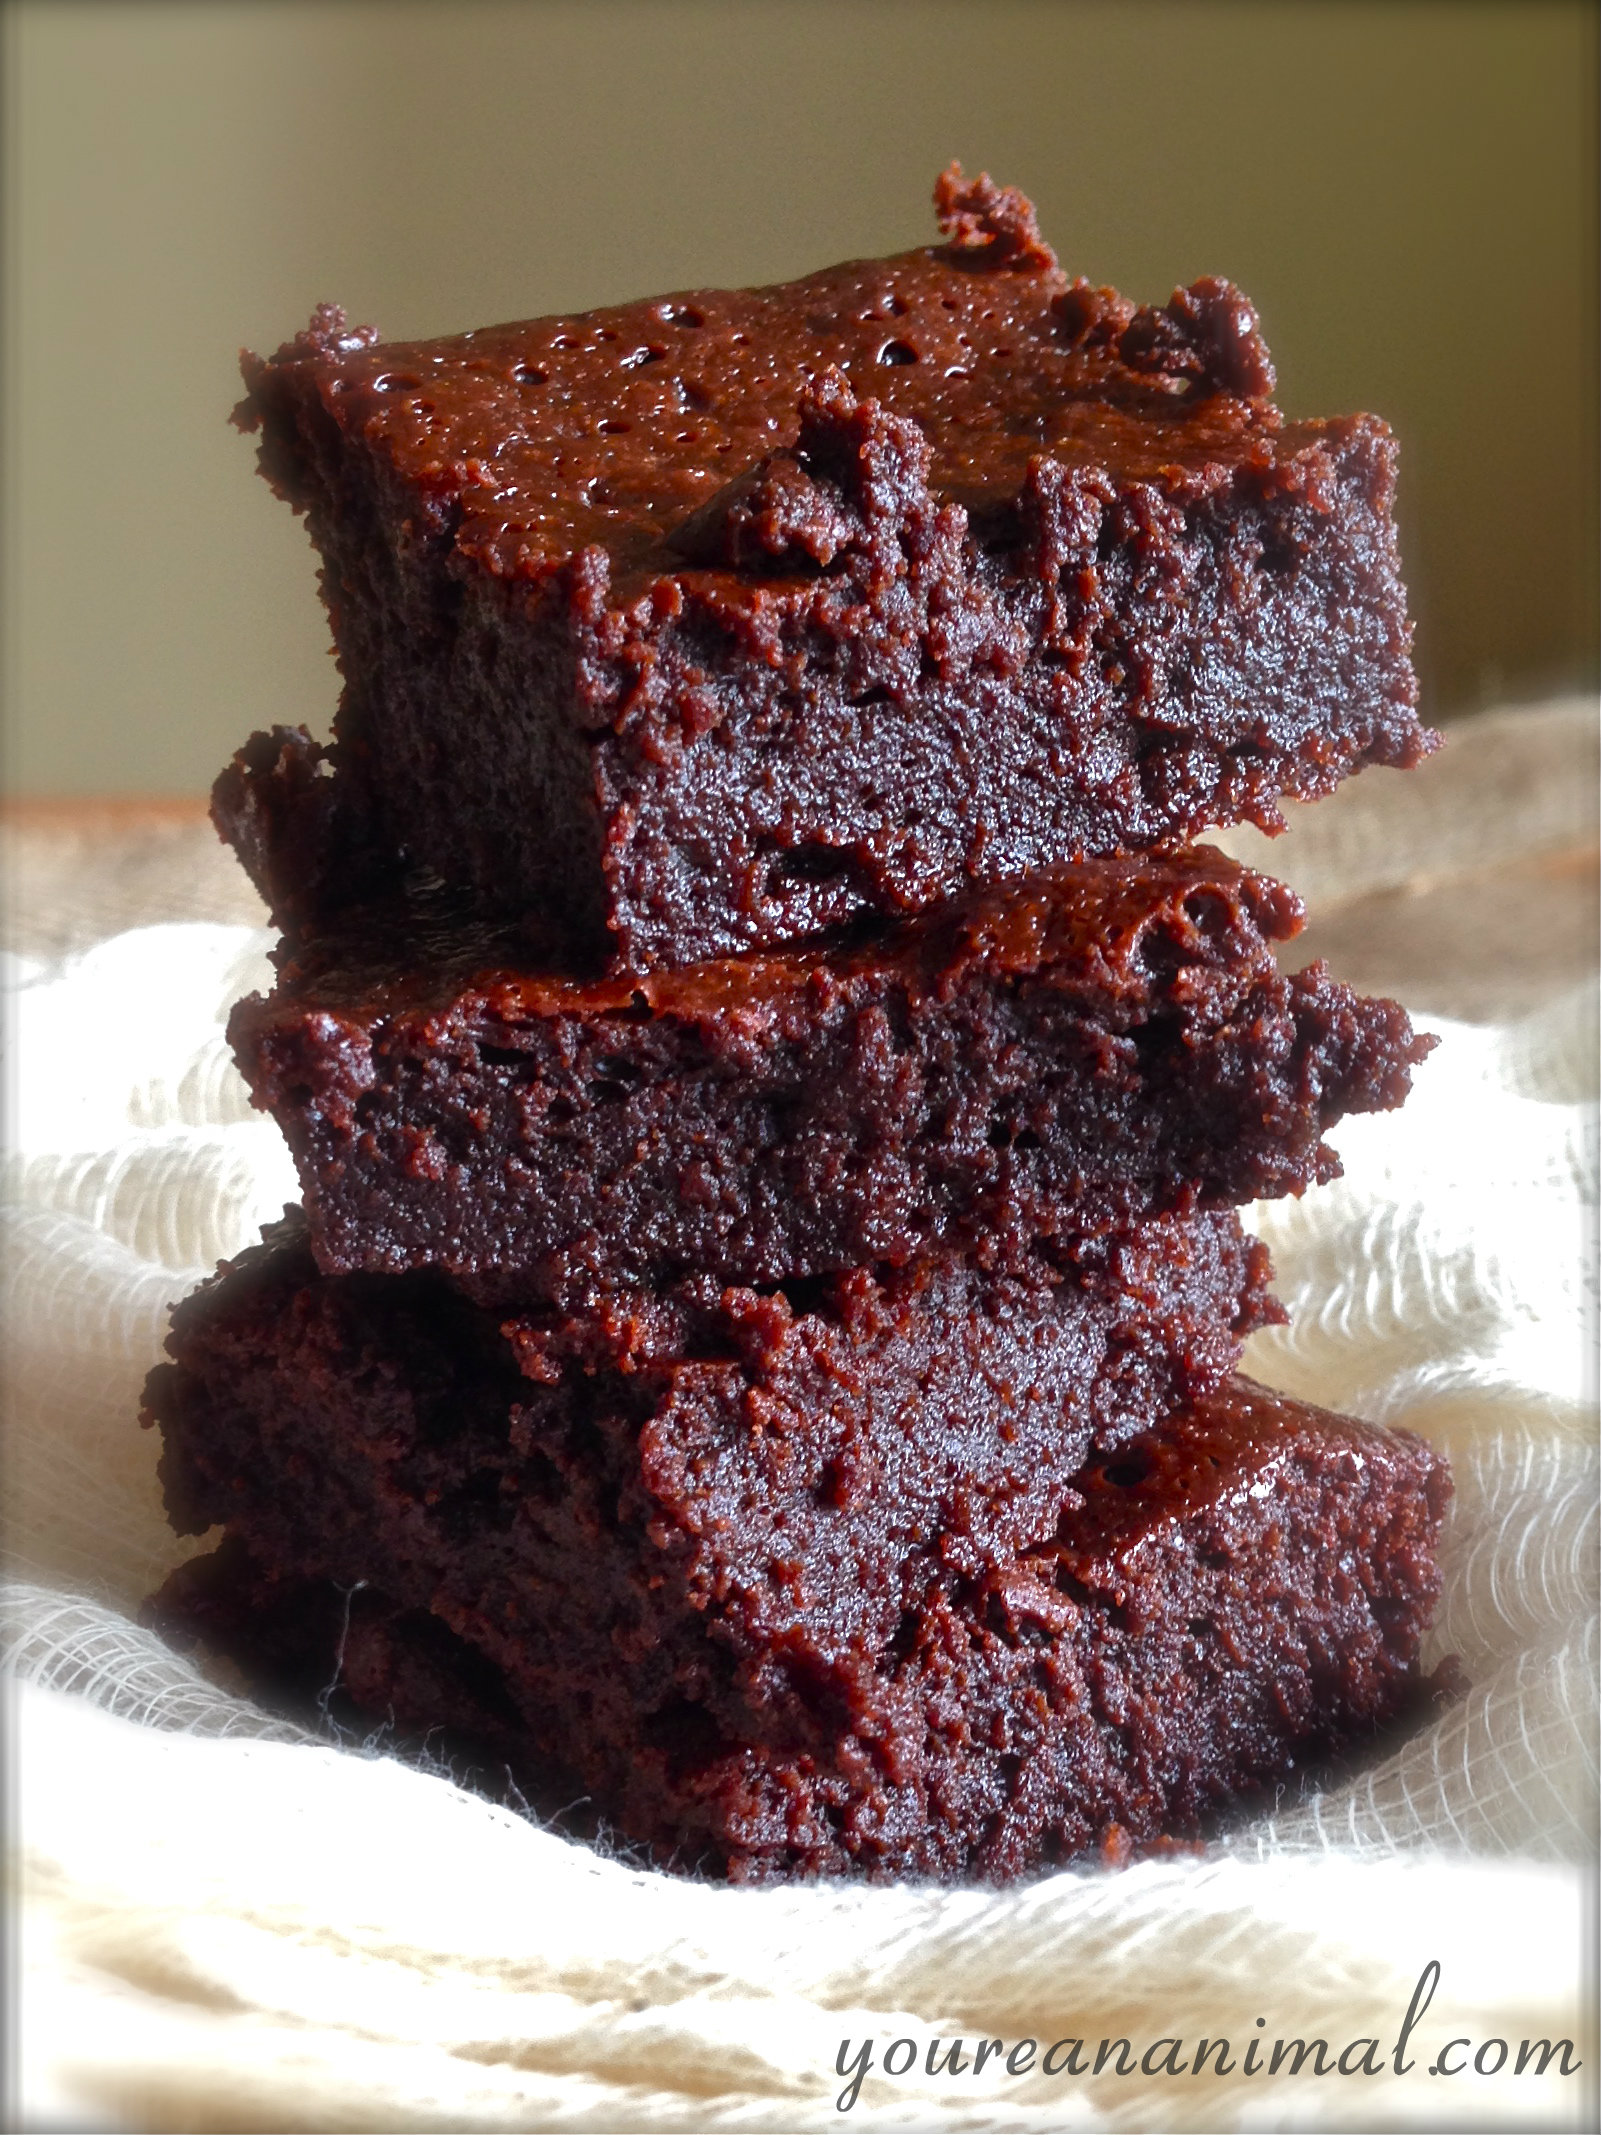
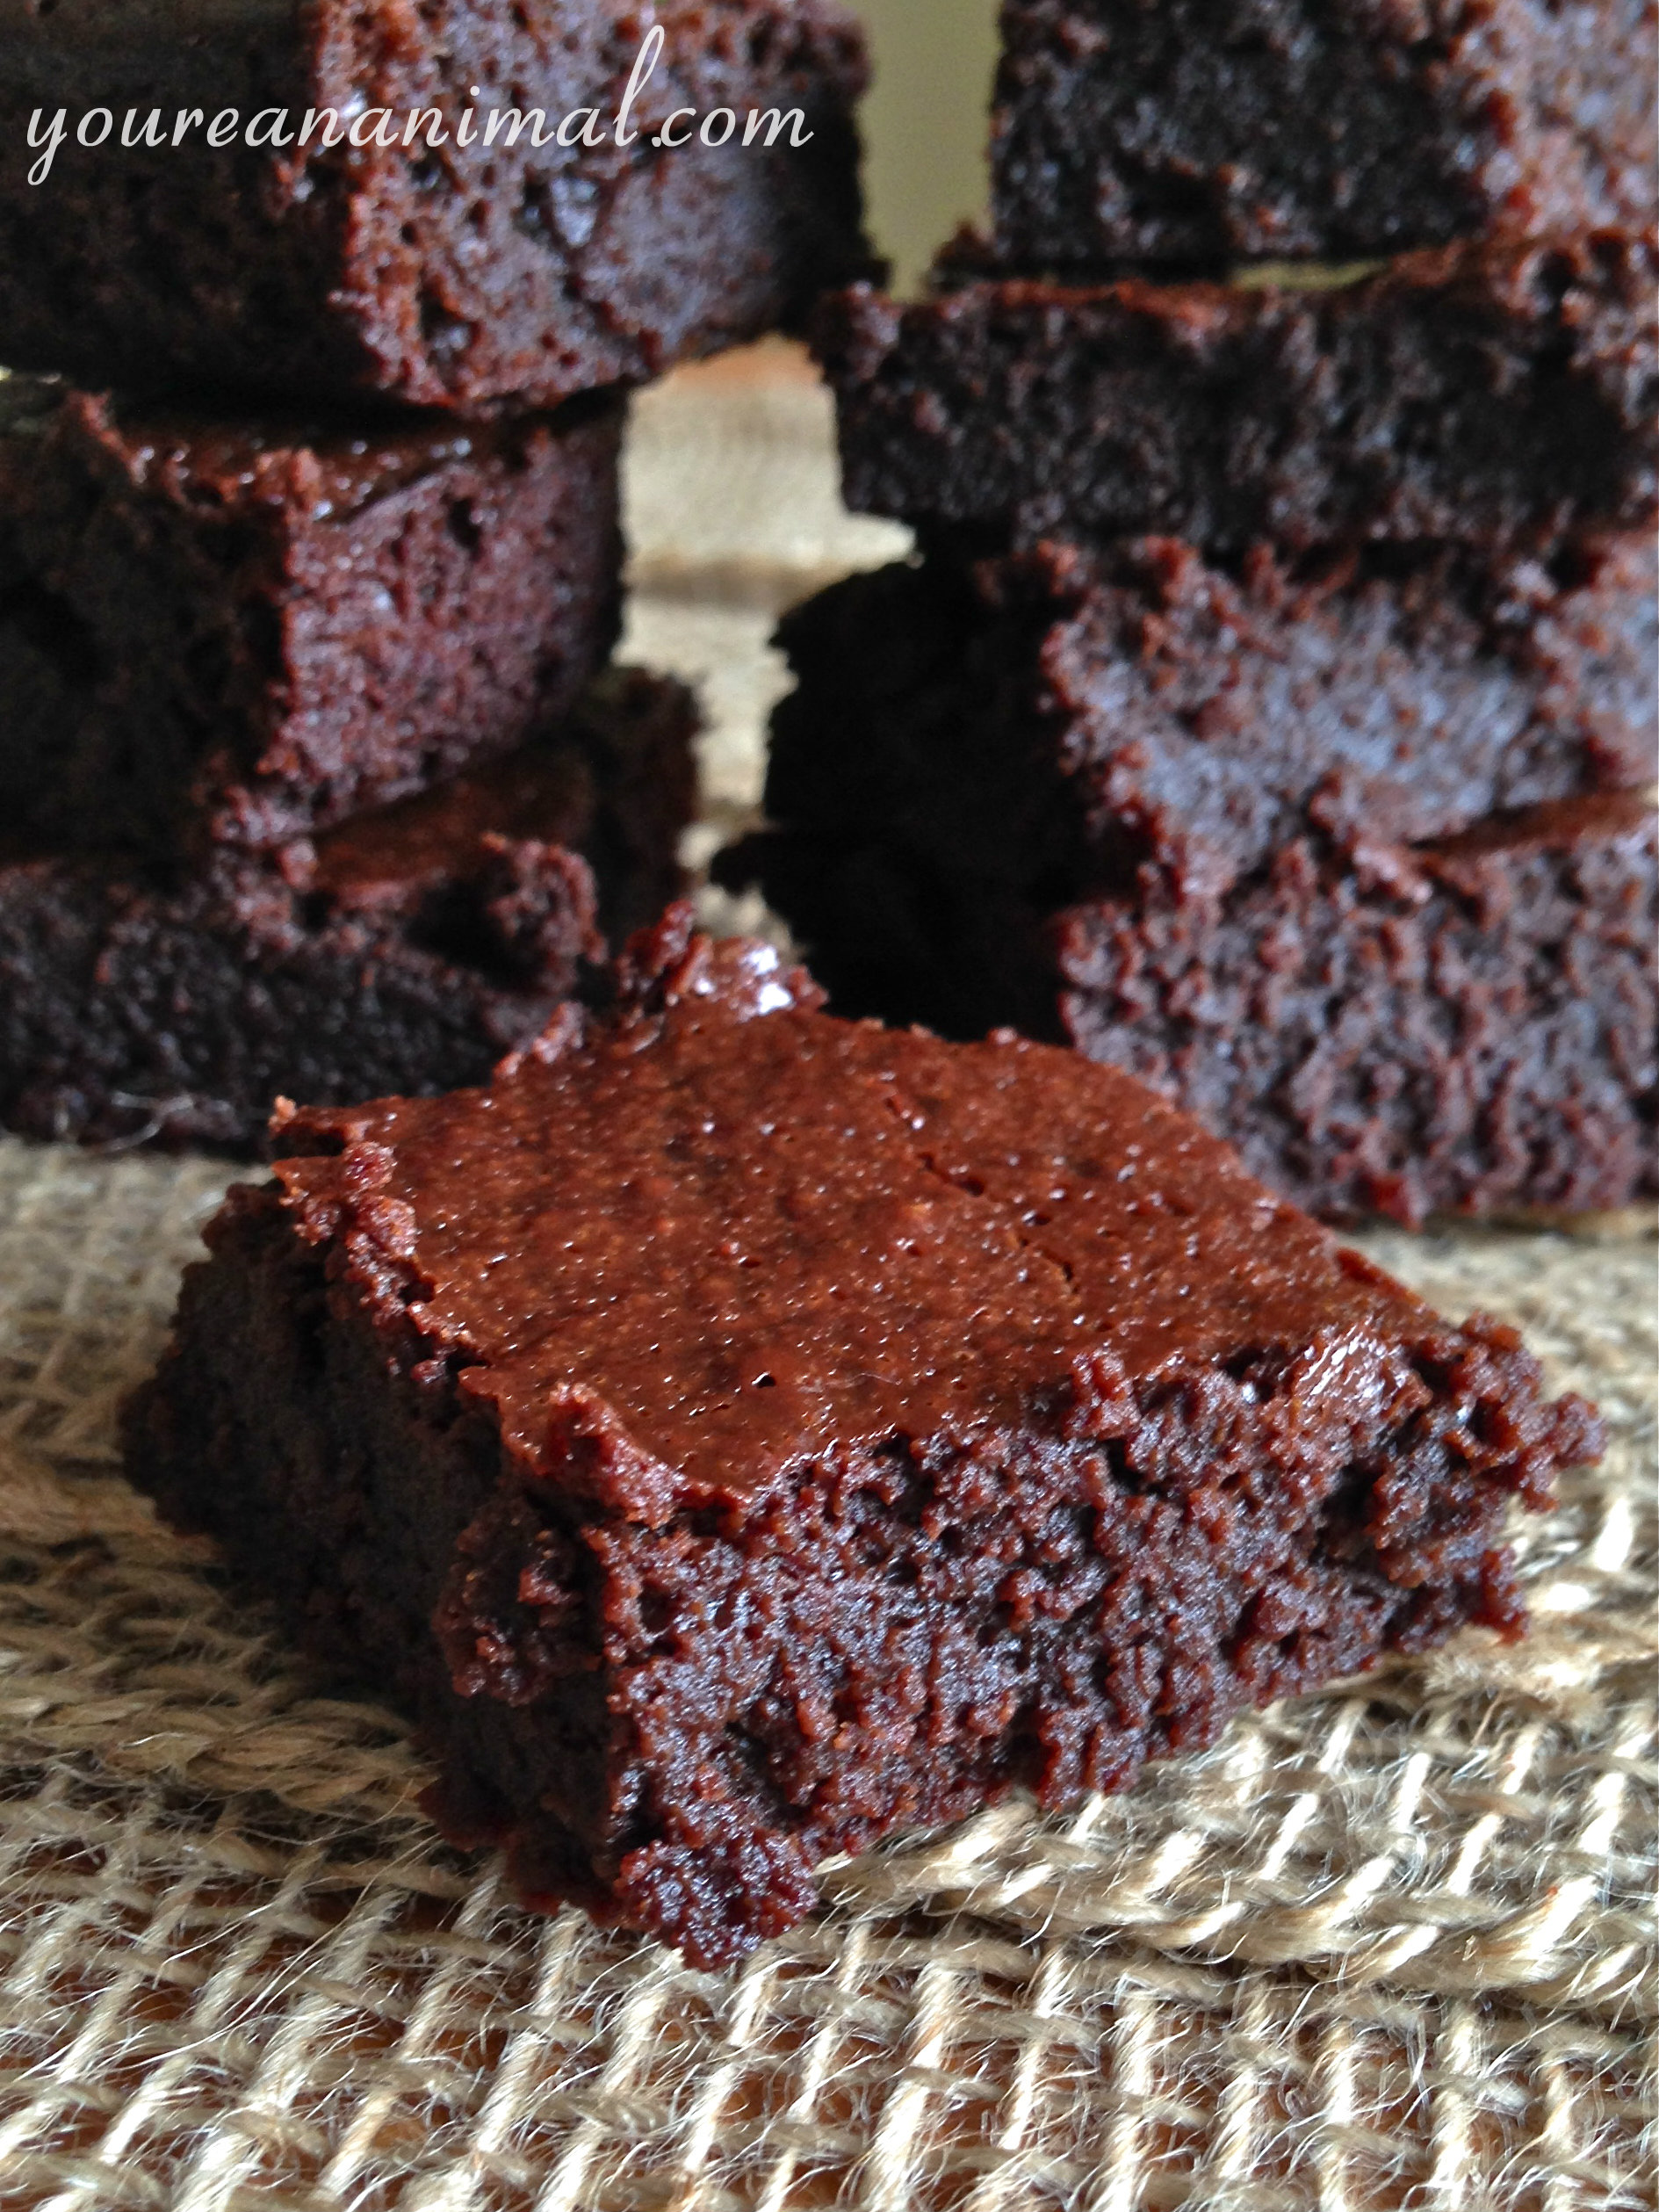
These are not healthy brownies. These are sugary, delicious, albeit minimally-processed, fudgey goodness brownies. Sometimes ladies human beings are in need of some chocolately heaven, without the stipulation of being “healthy.” This is not to say I have anything against avocado brownies or other nutrient-dense fudgey desserts, but sometimes you just need that classic brownie to dive right into. On this overcast Sunday afternoon, Andrew and I are relaxing after attending a funeral yesterday and both recovering from a minor cold. And by relaxing, I mean having a brownie ice cream sundae brunch and watching a DVR’d marathon of How To Get Away With Murder. This. Is. The. Life. Adulthood, yessss.
These brownies are minimally processed in that they use coconut palm sugar and unfiltered honey for the sugar, and arrowroot starch instead of flour. But like I said, they aren’t healthy, because they are about 80% sugar. So with that knowledge, it’s probably best to either share these bad boys, or make them last several days. But hey, sometimes you just need to bake up some brownies. And these are the ones that will satisfy that craving. Dense, fudgey, chewy… just the way brownies should be if you ask me!
Sinful. But not quite as sinful as they used to be.
I adapted this recipe from Life Made Simple. You can find the original recipe here.
Grease the bottom of an 8×8 glass baking dish with coconut oil or butter. (I learned from Betty Crocker that you should only grease the bottom of the pan when baking brownies. If you grease the sides, the brownies sink in the middle and rise on the sides, resulting in uneven brownies.)
In a double broiler over medium-high heat (boiling water), melt the butter. When the butter is melted, add the coconut palm sugar and honey to the butter, still in the double broiler.
Once the coconut palm sugar and honey are melted into the butter, add the chocolate chips. Stir to combine and allow the chocolate chips to melt as well. Once the chocolate chips are melted, remove the pot from the boiling water.
Add the room temperature eggs (If you’re impatient like me and can’t wait for them to come up to room temperature, you can crack the eggs into a separate bowl, and temper the eggs by added a small amount of the warm chocolate mixture to the eggs, bringing up the temperature of the eggs without cooking them. Add some of the chocolate mixture, stirring each time you add more, until the eggs are no longer cold. Then pour this mixture back into the original chocolate batter.)
Add the salt and vanilla to the batter.
Sift in the cocoa powder and arrowroot starch, and stir until well combined.
Pour the batter into the greased pan, and bake at 350 degrees for 25-30 minutes, or until an inserted toothpick comes out clean.
Please note that some of the links in the above post are affiliate links that will take you to an Amazon.com page. If you choose to purchase a product featured in this post using an affiliate link, you will be directly supporting You’re An Animal. Thanks!
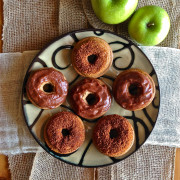
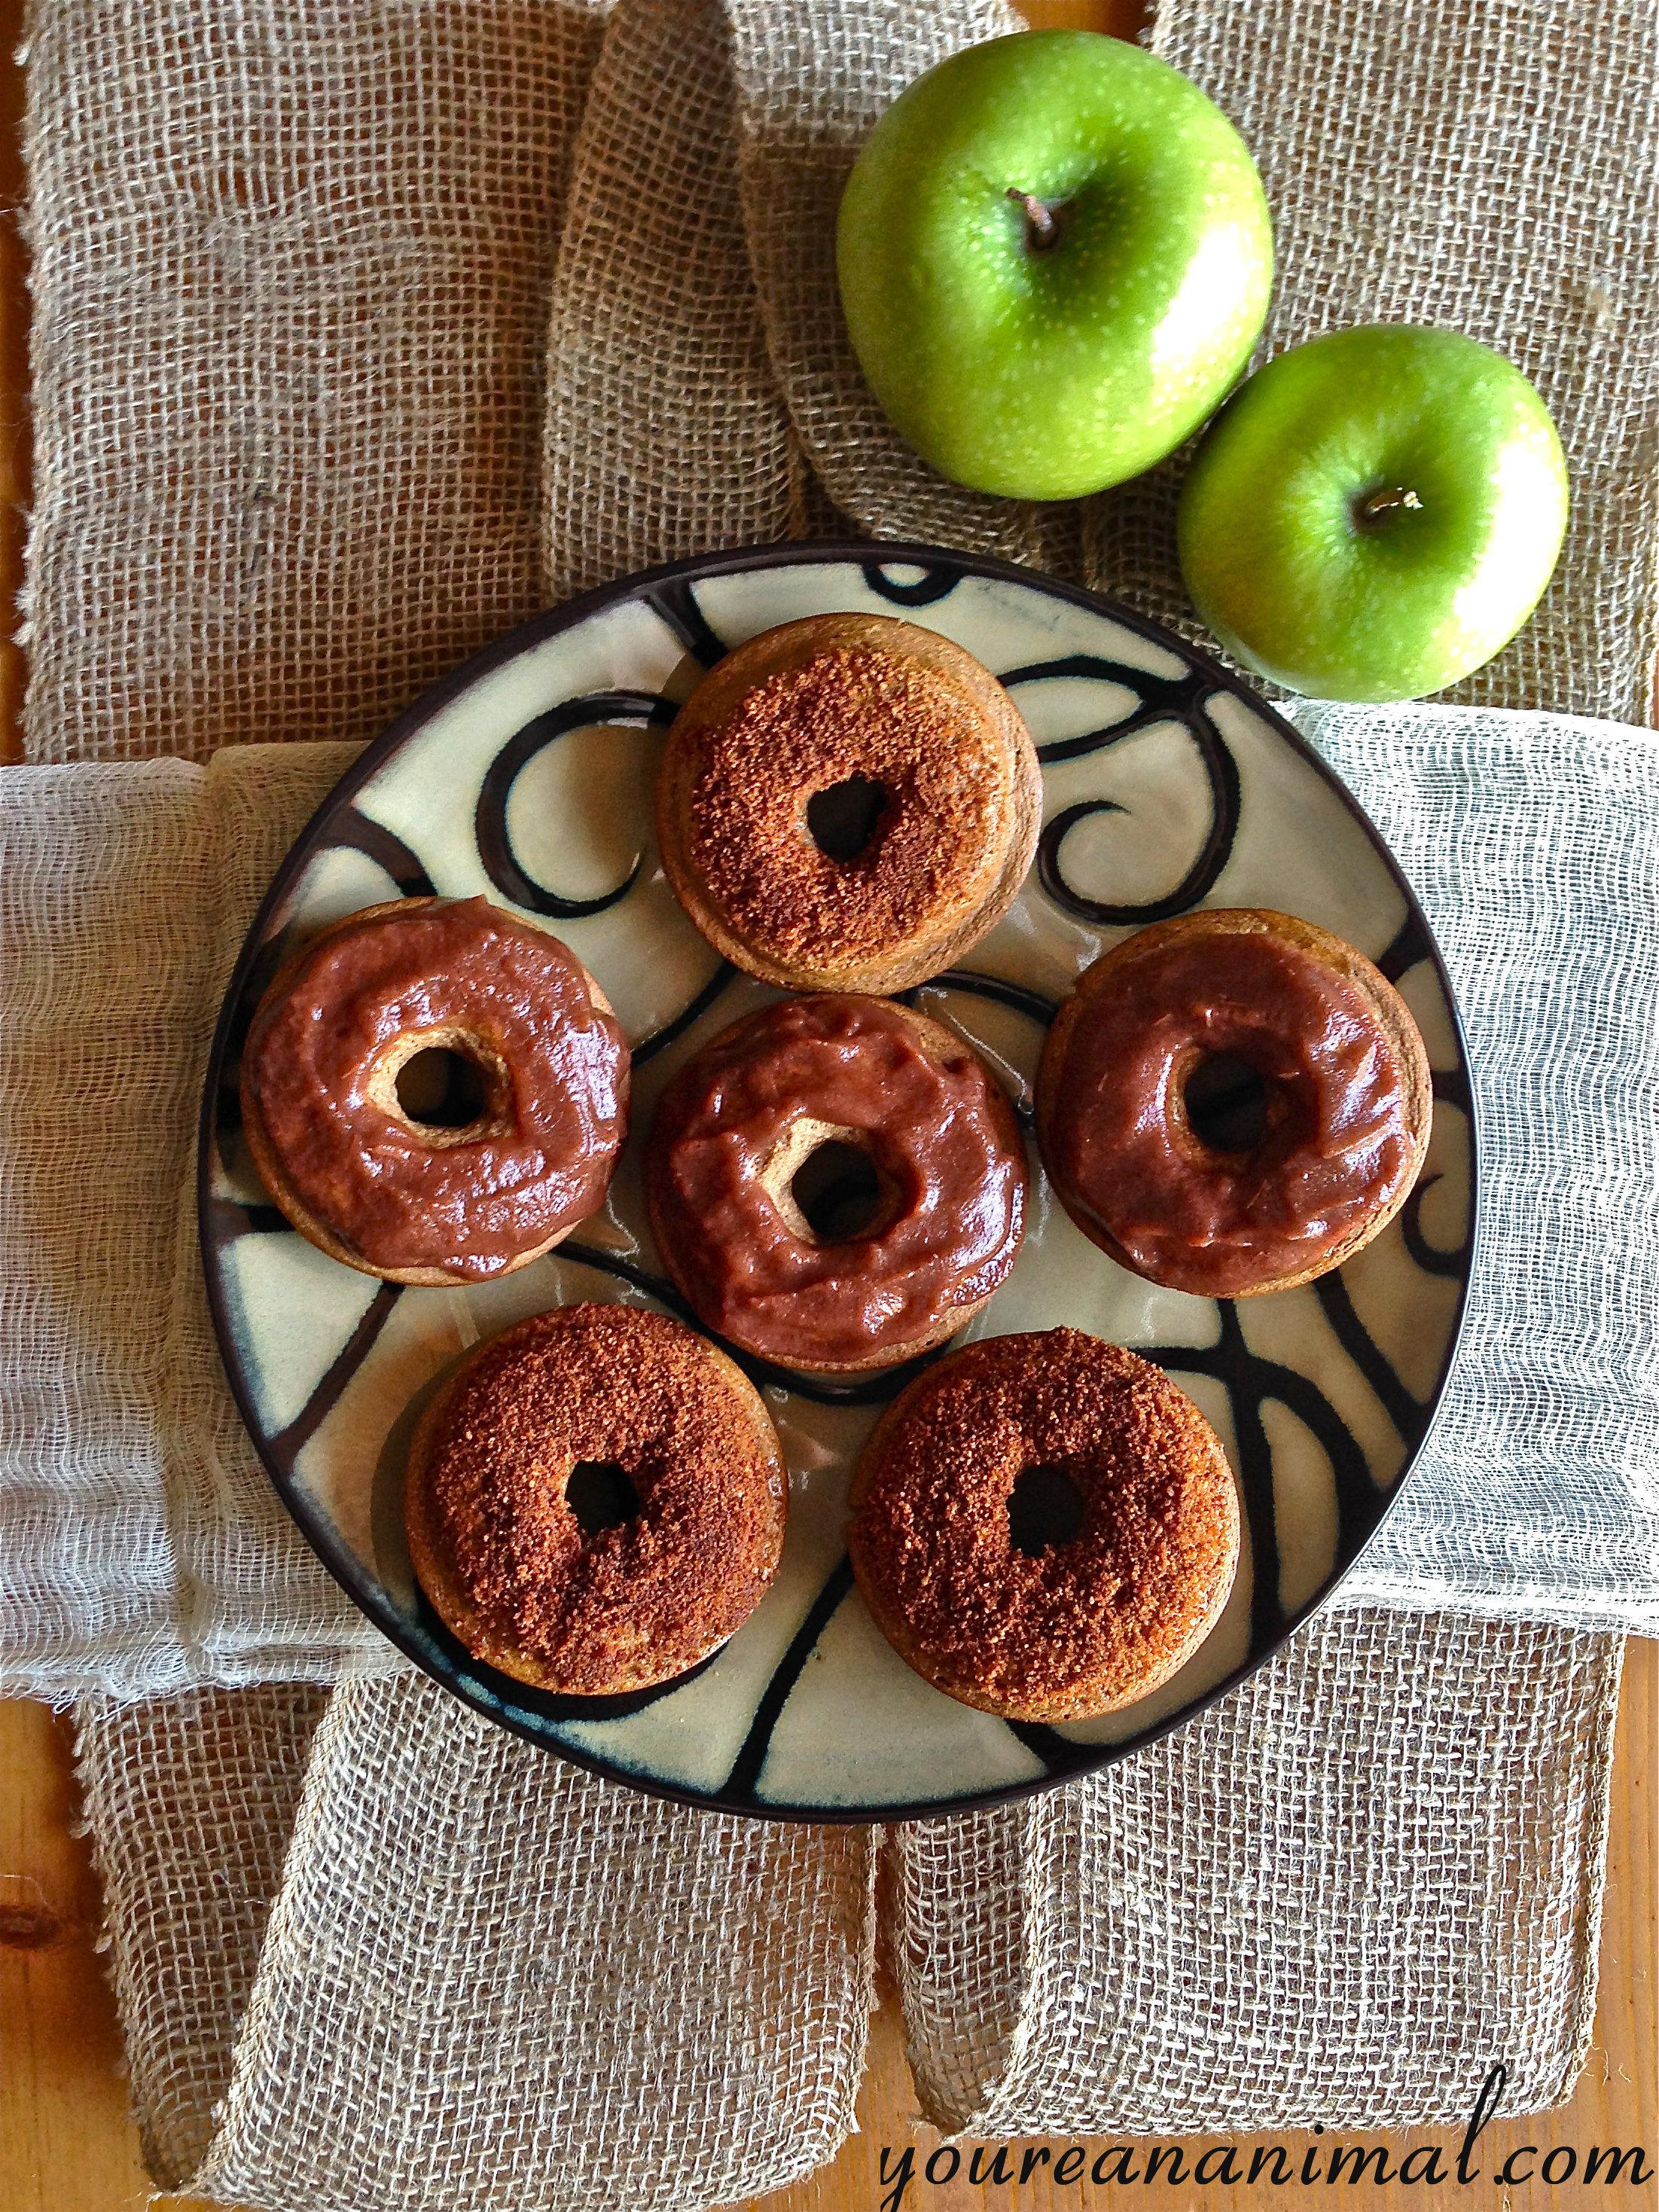
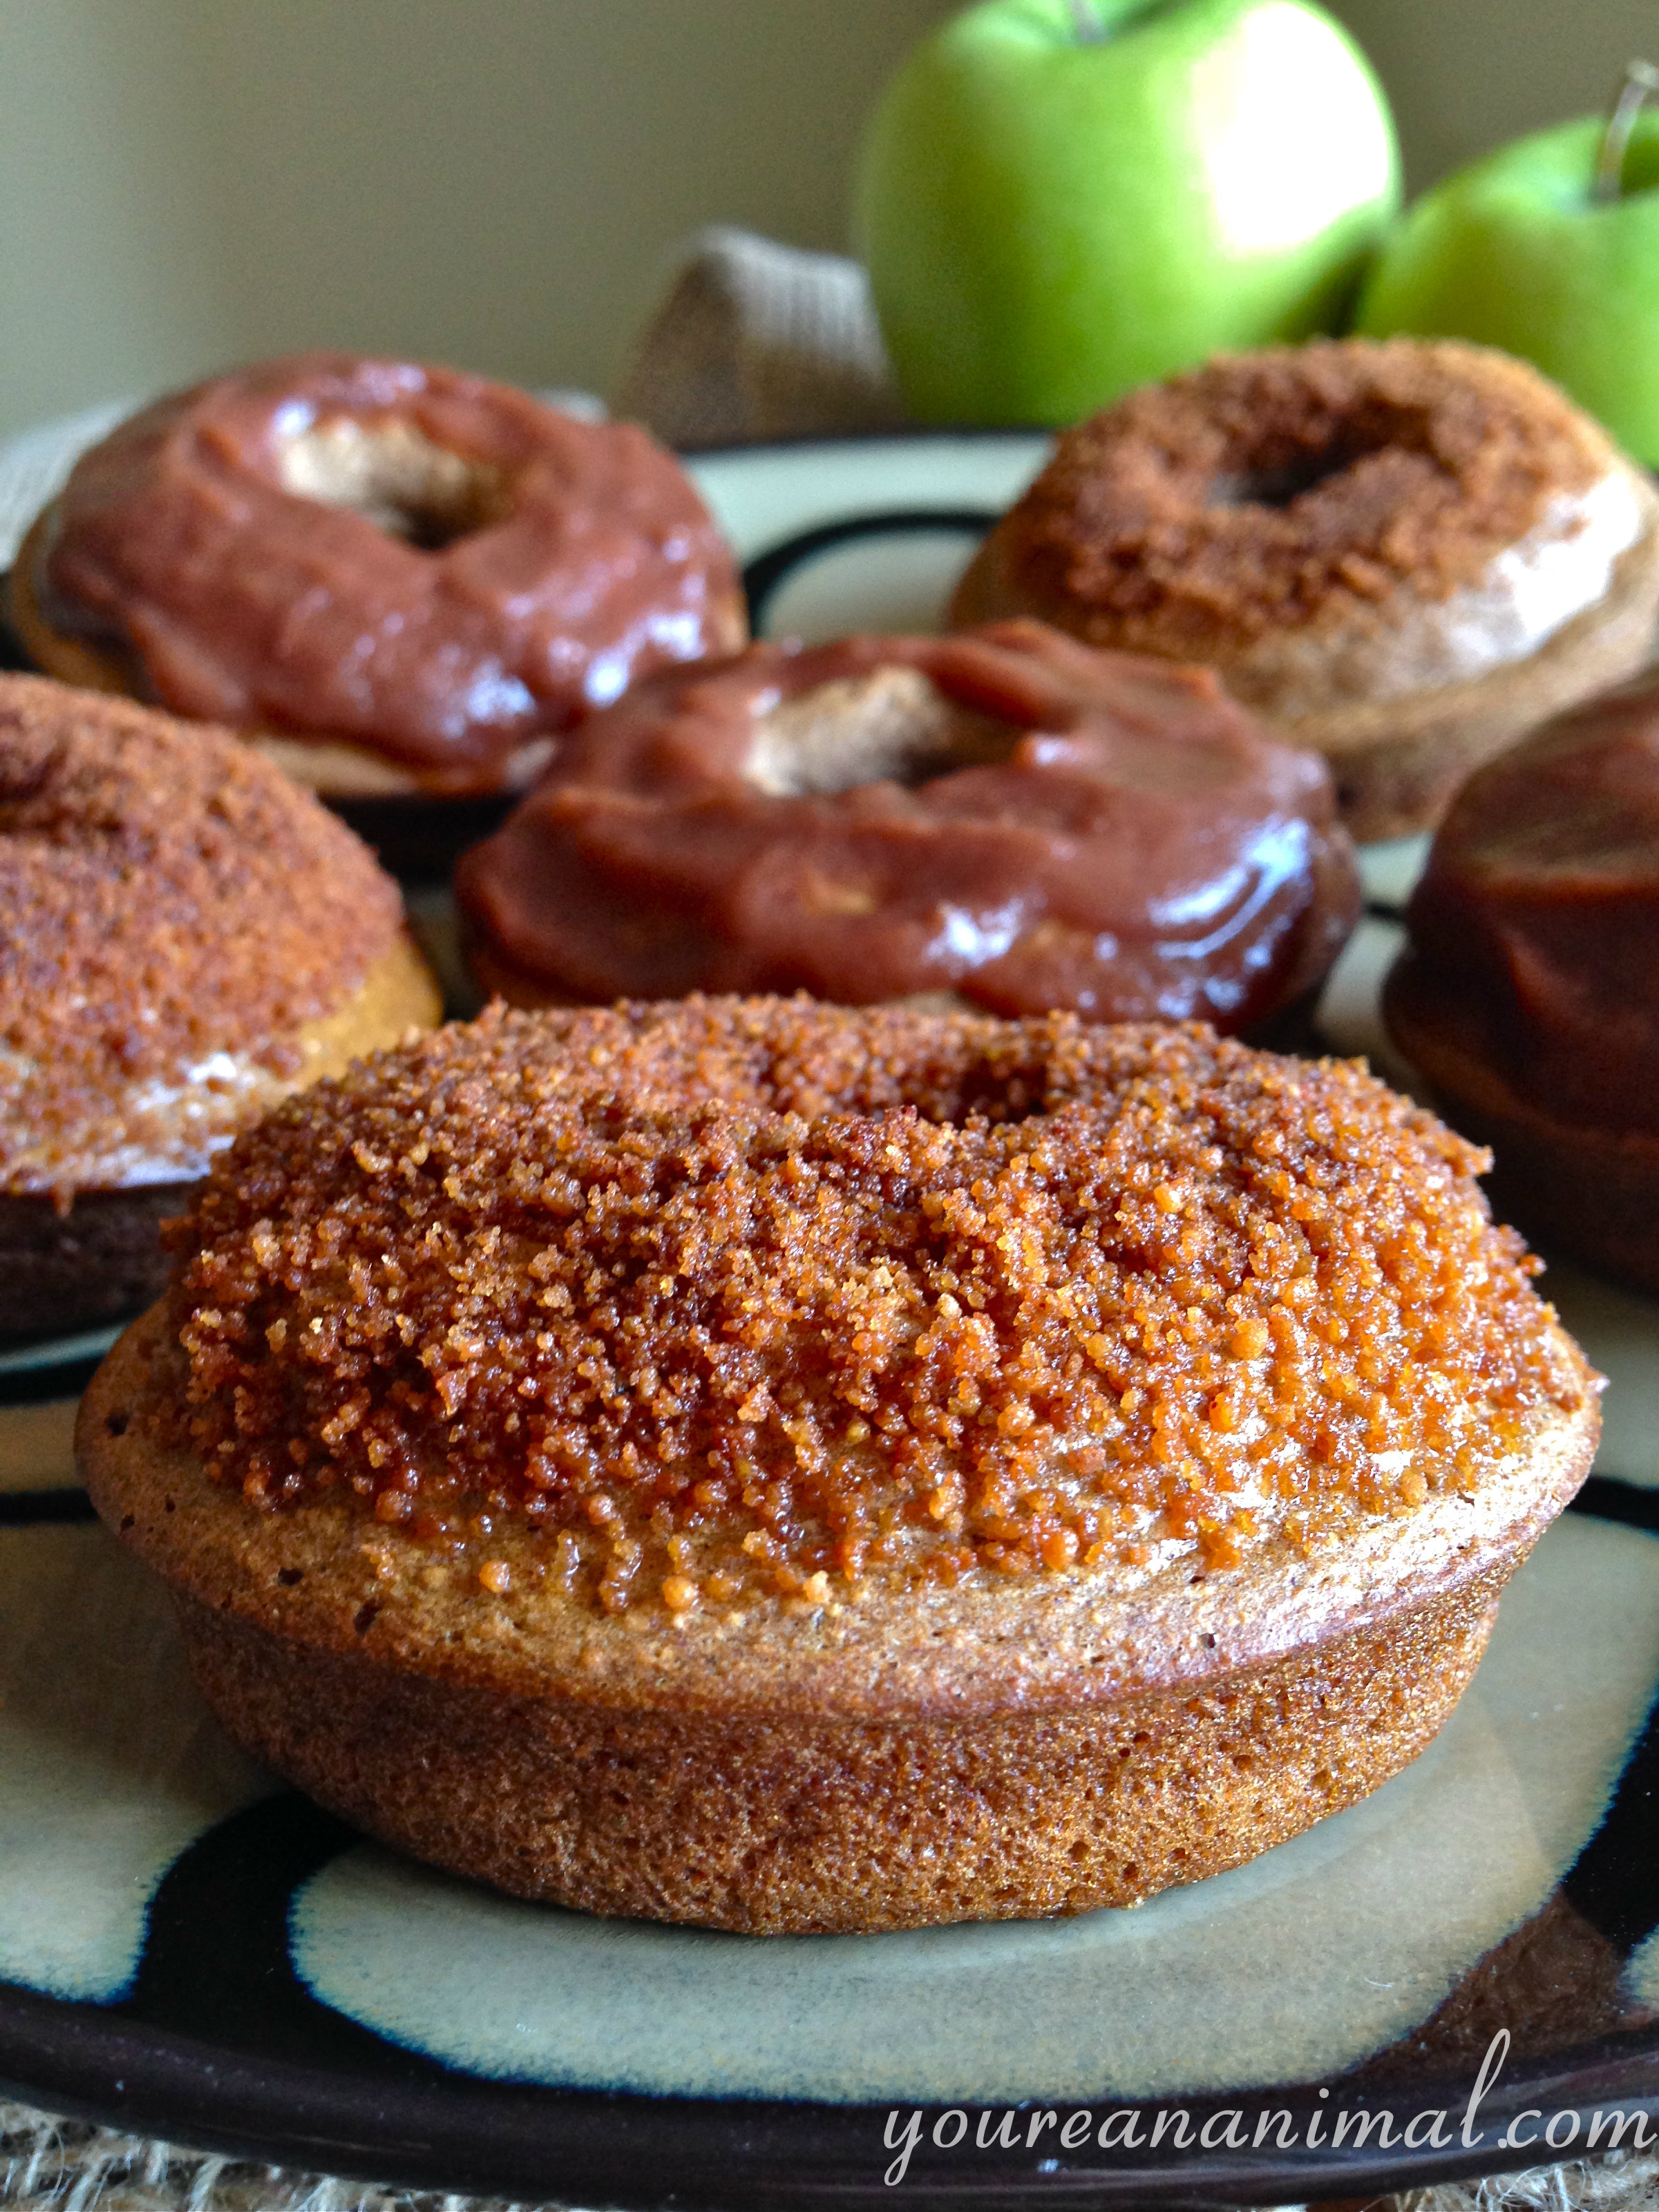
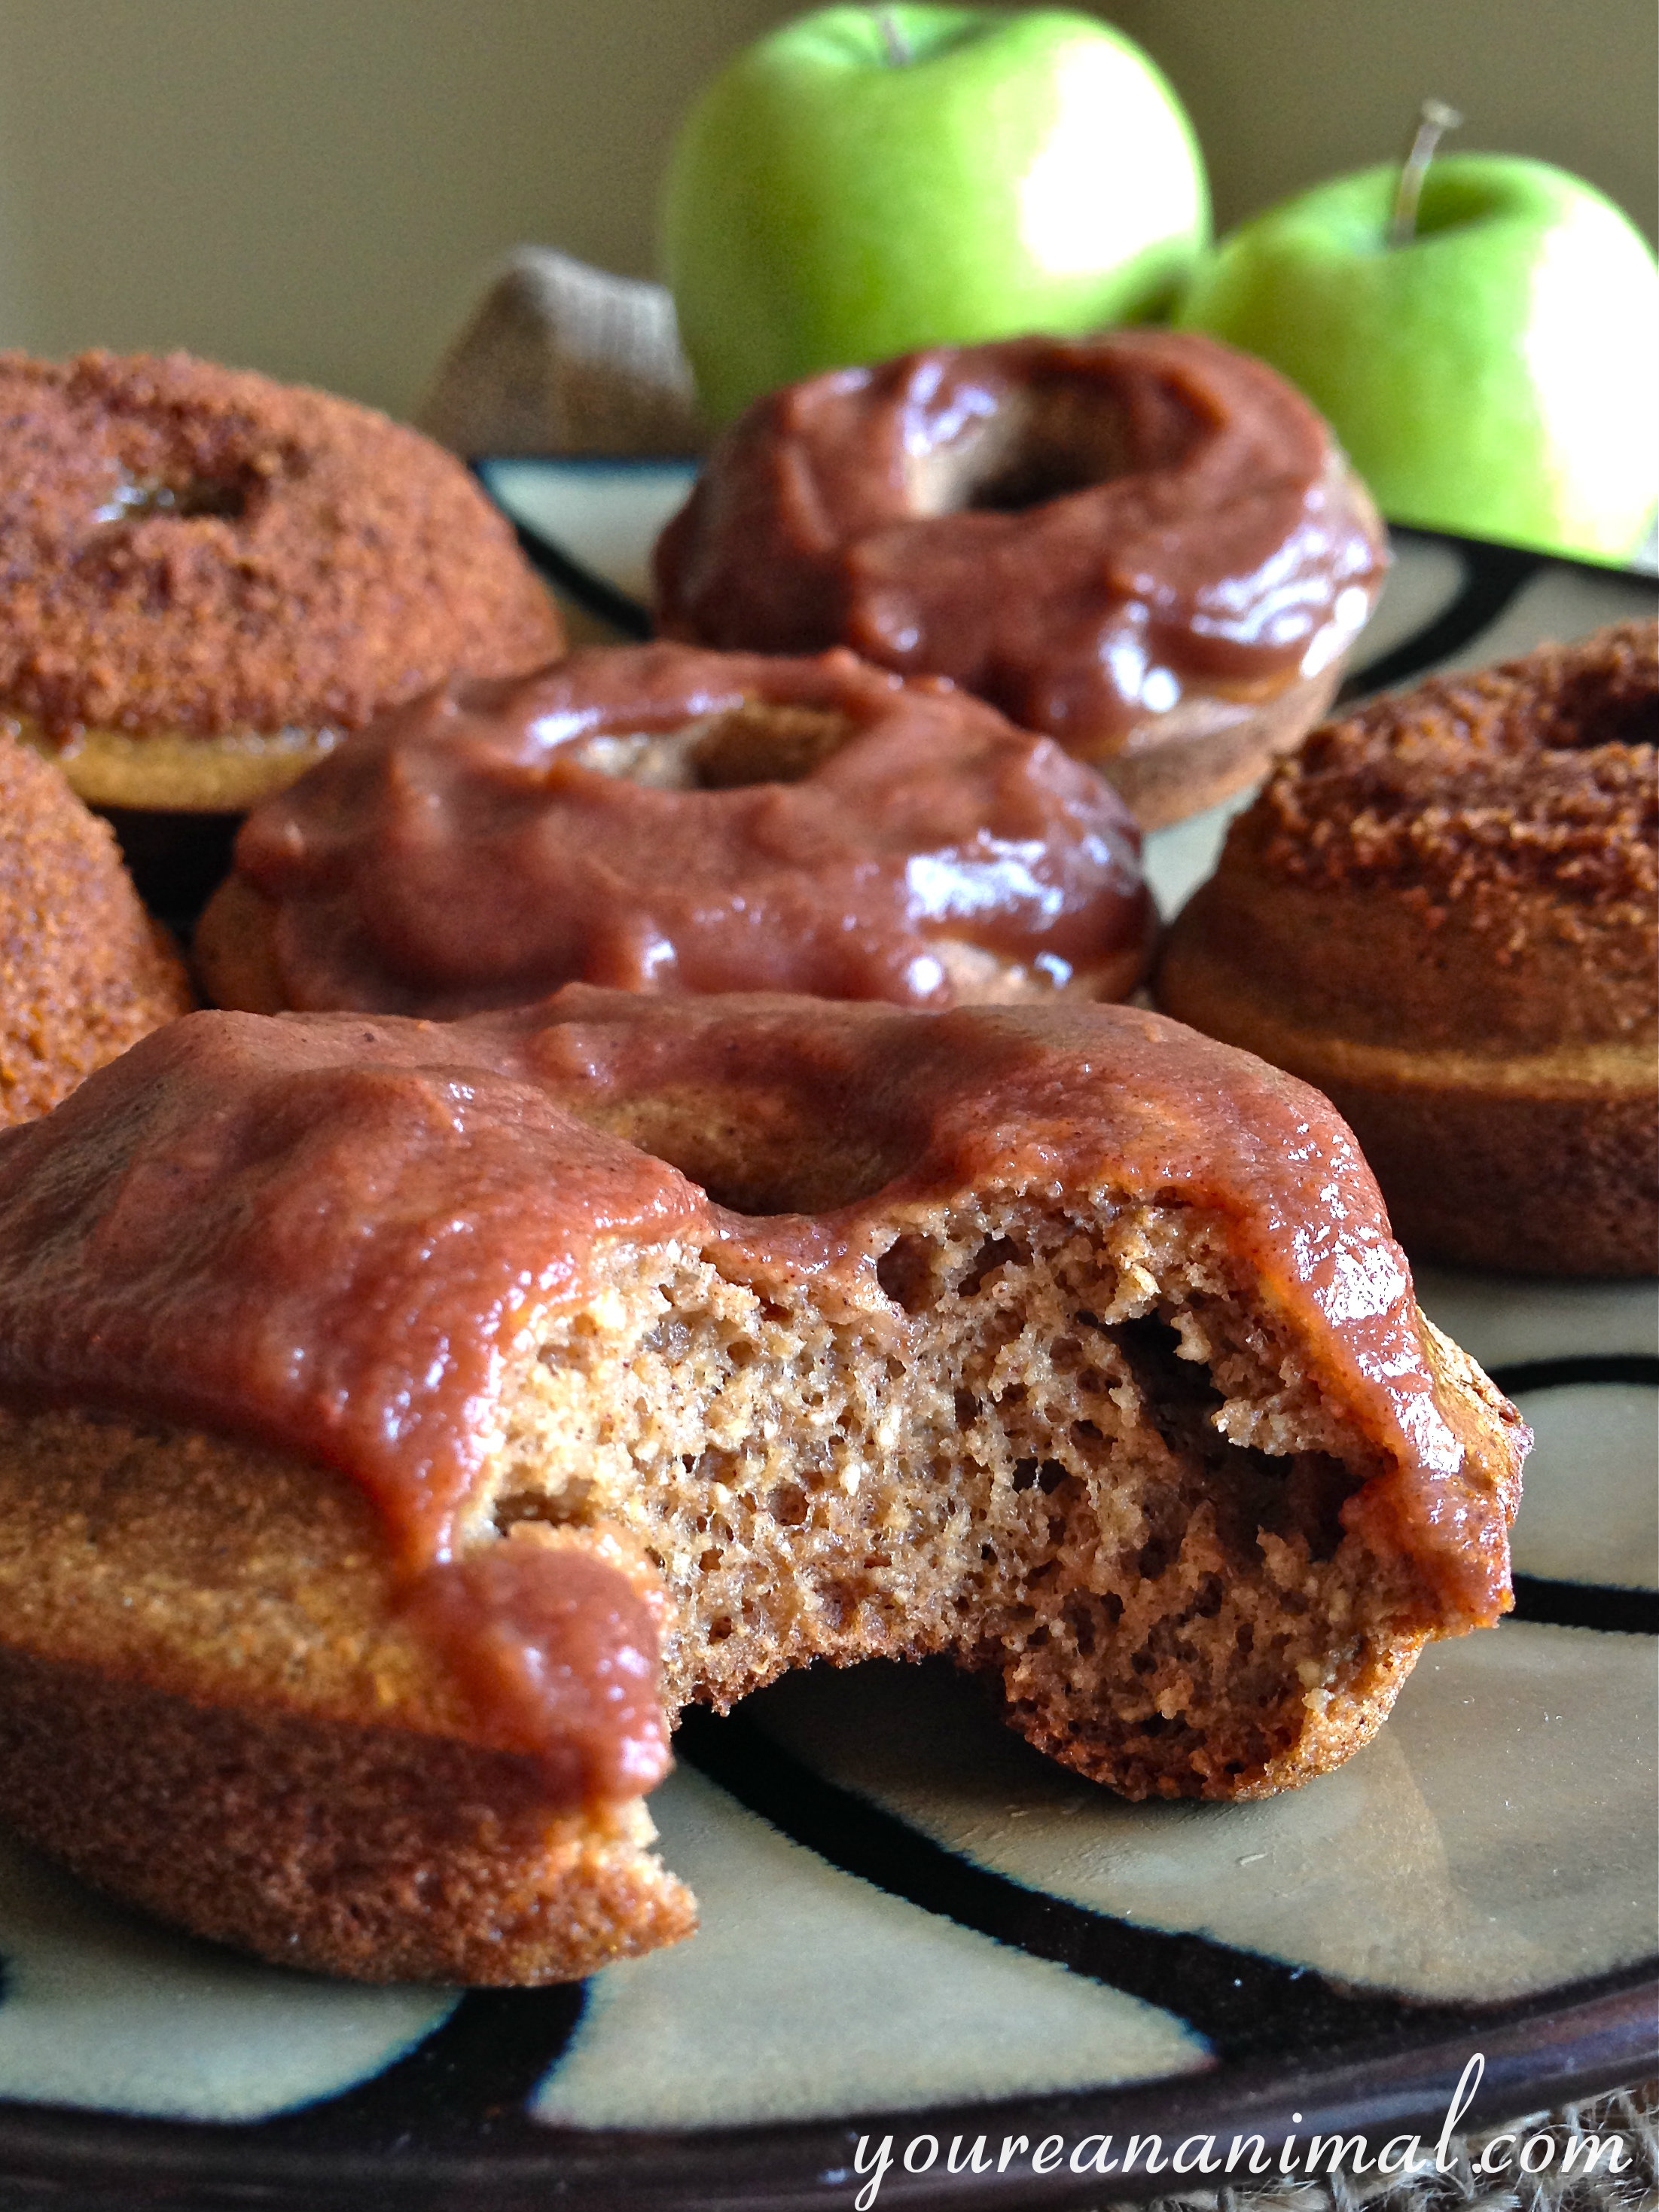
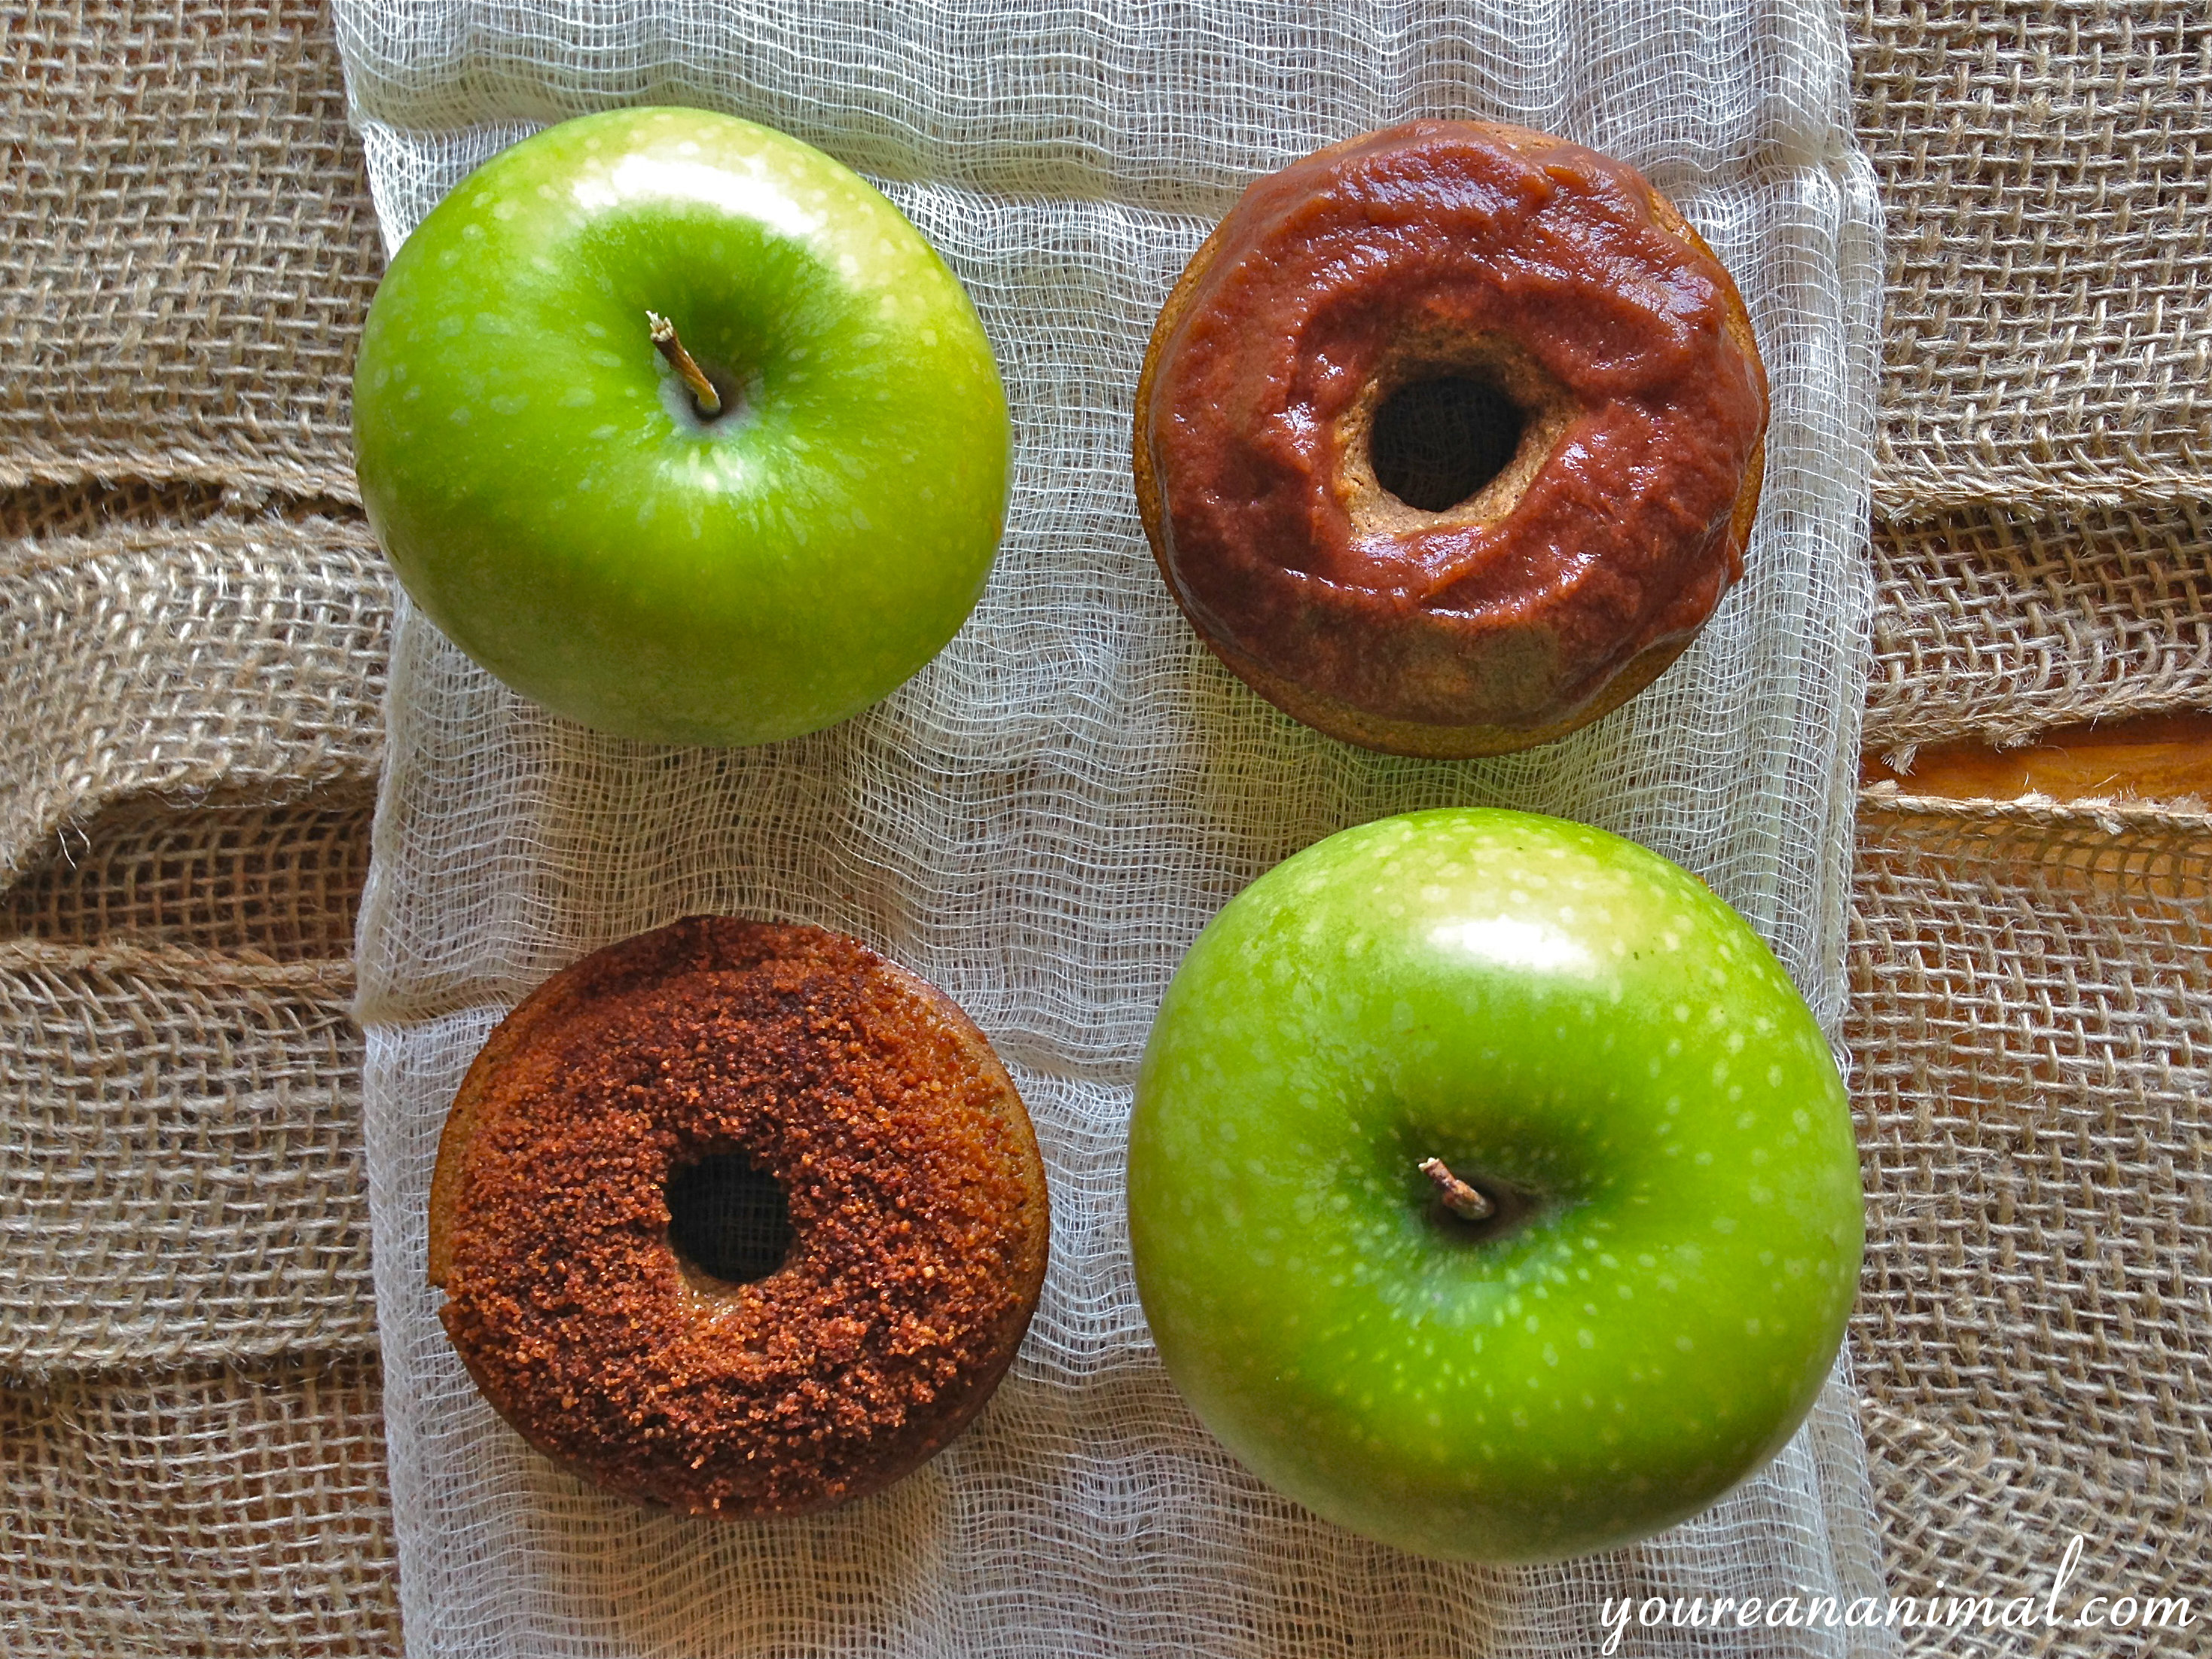
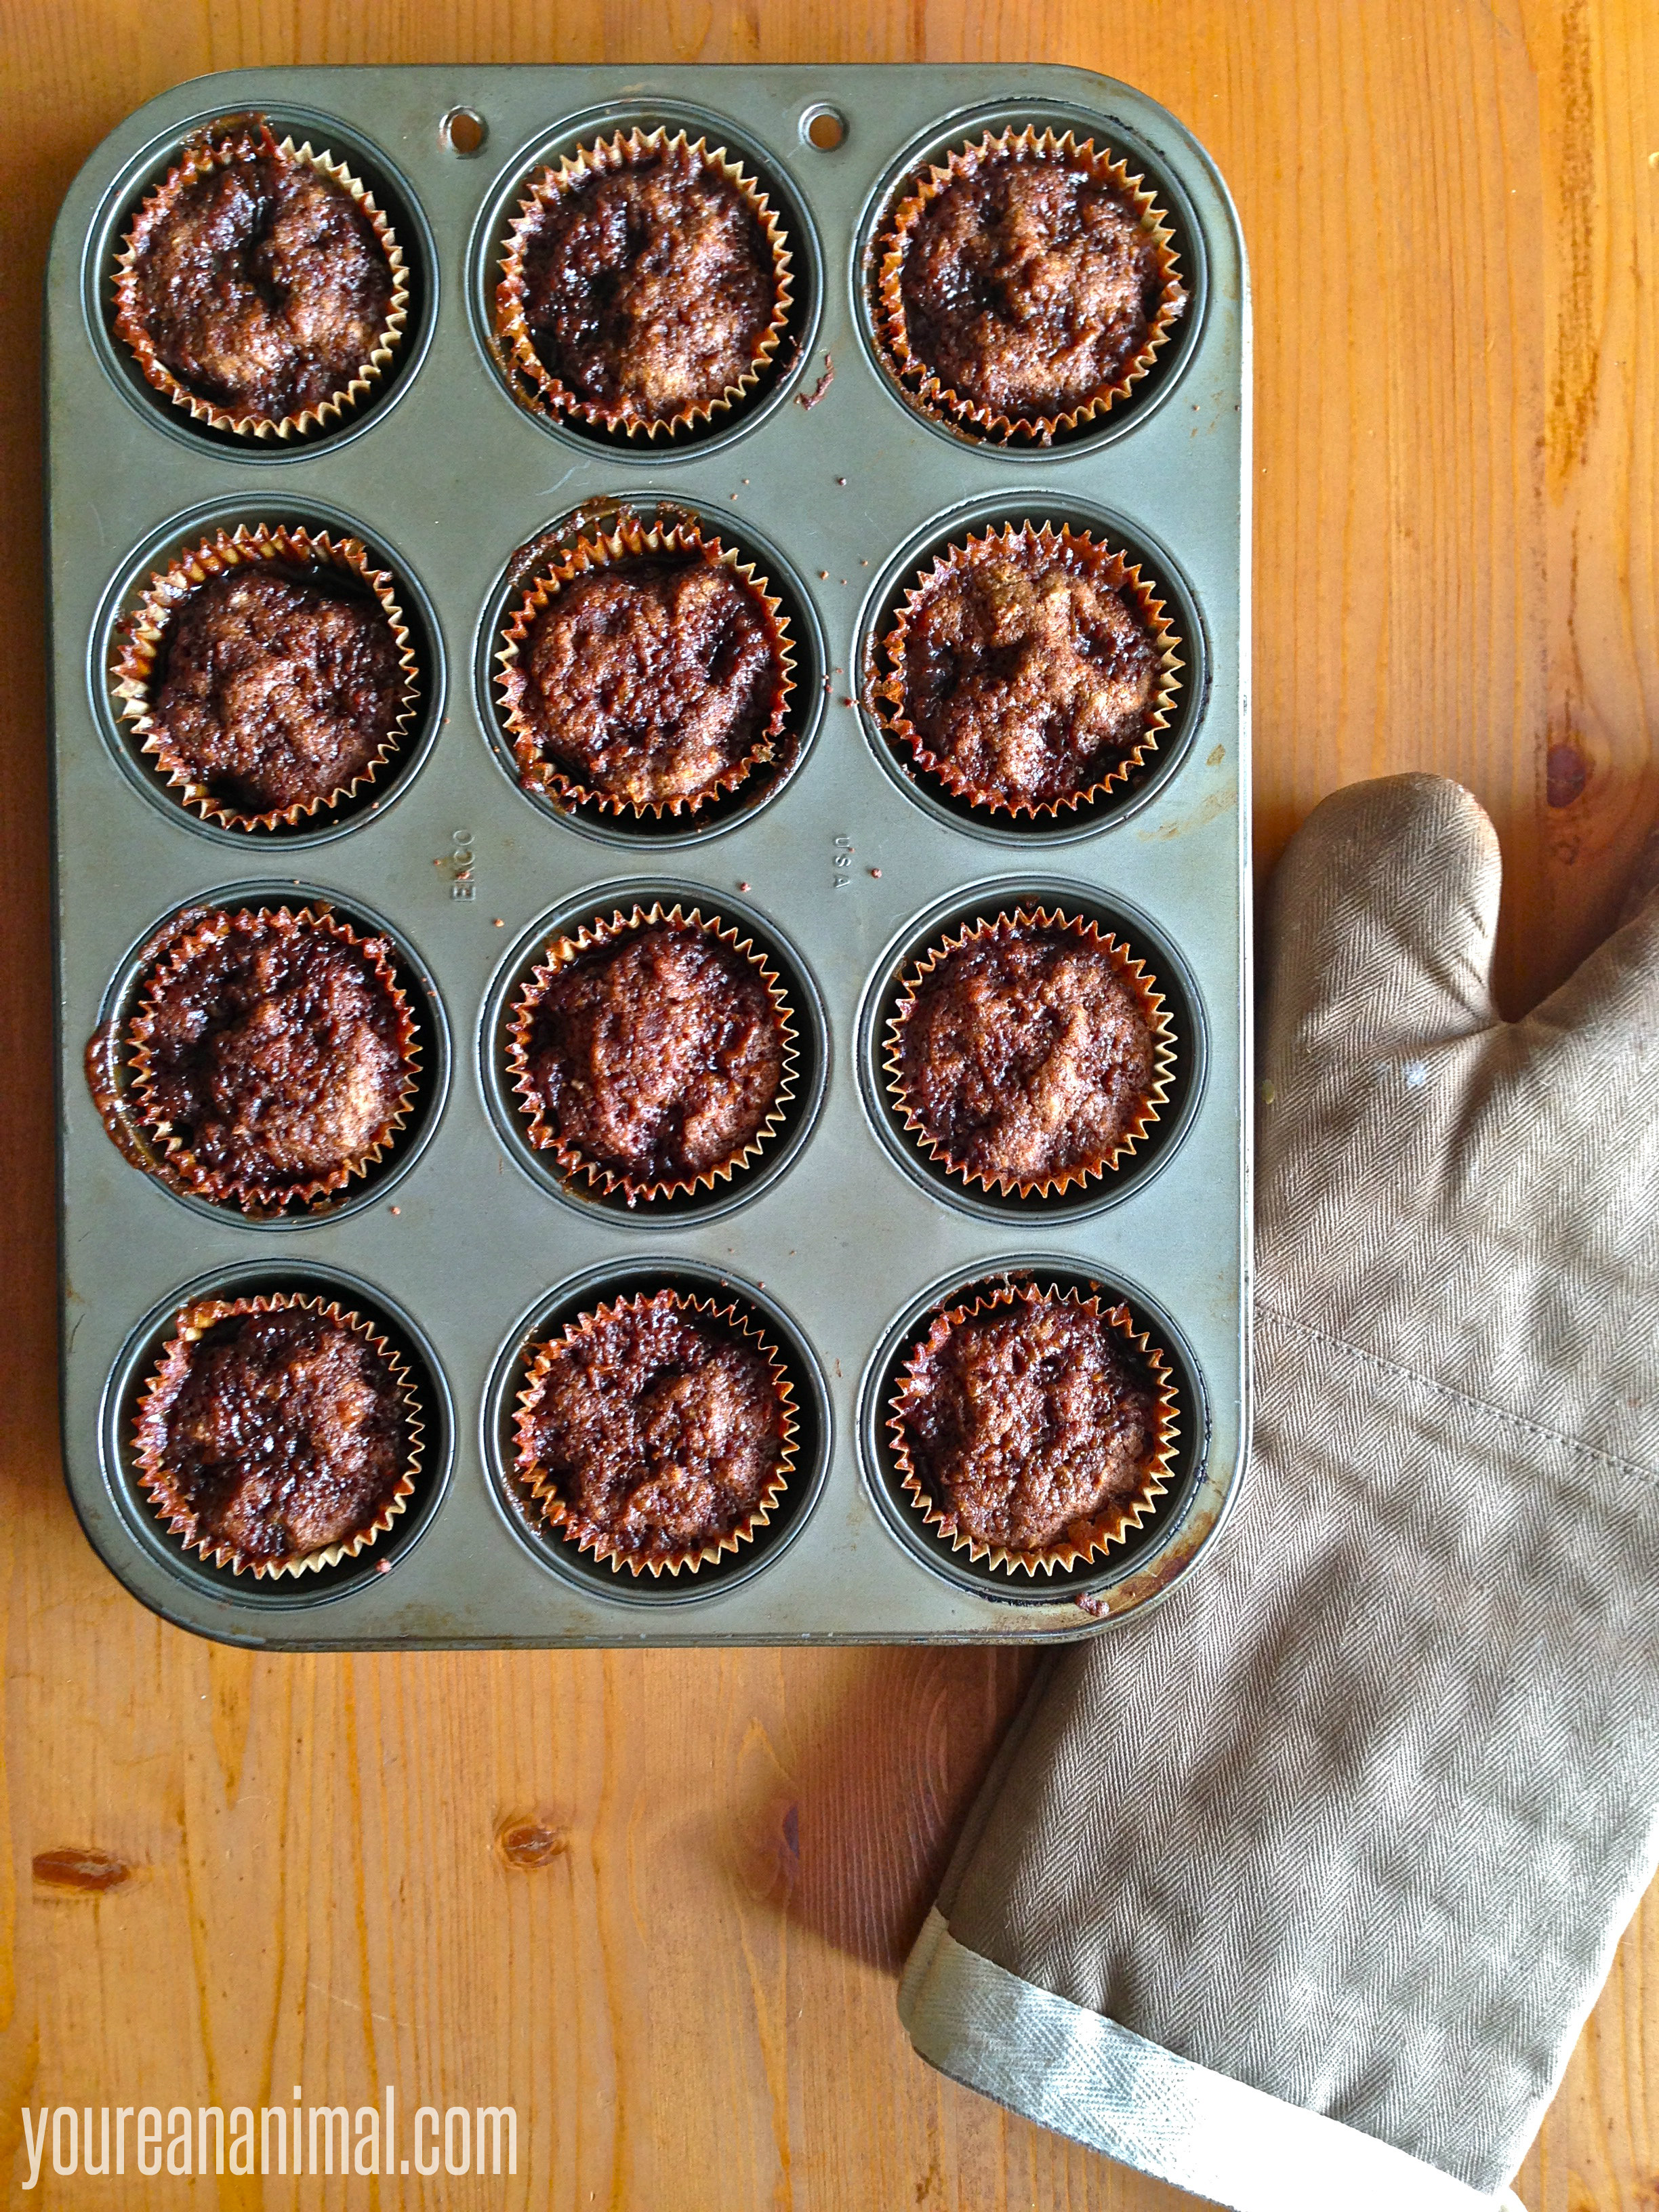
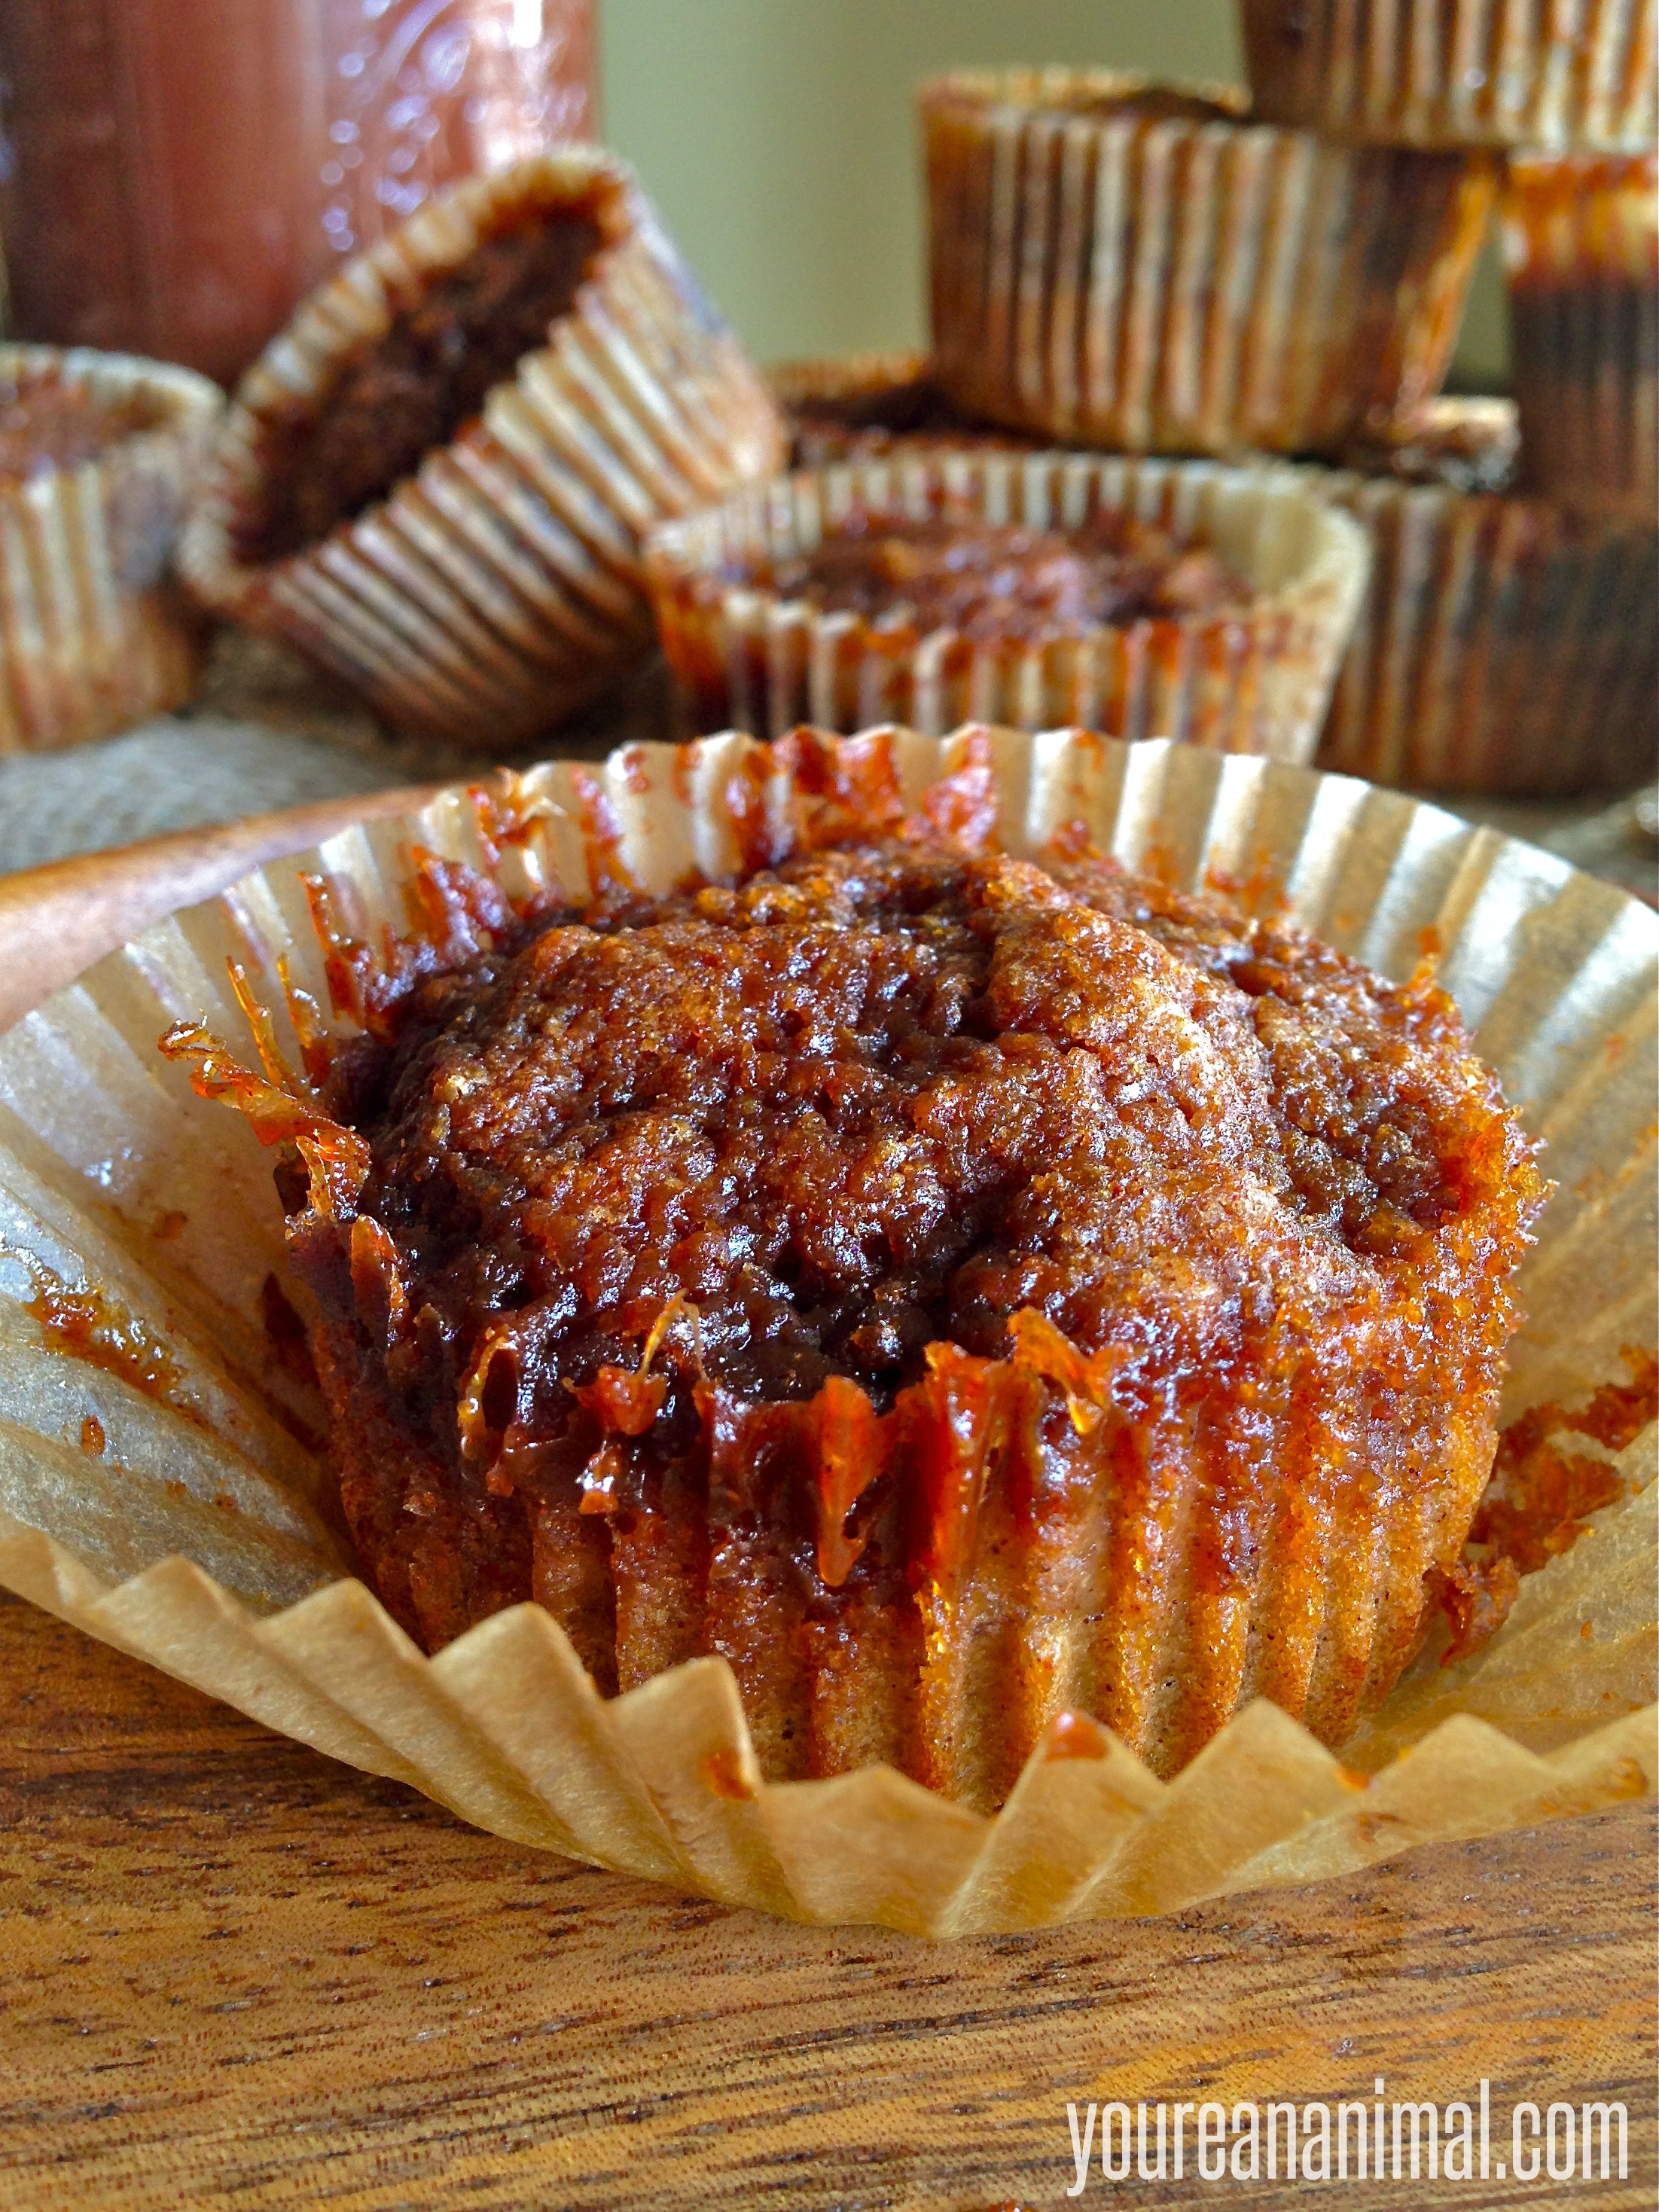
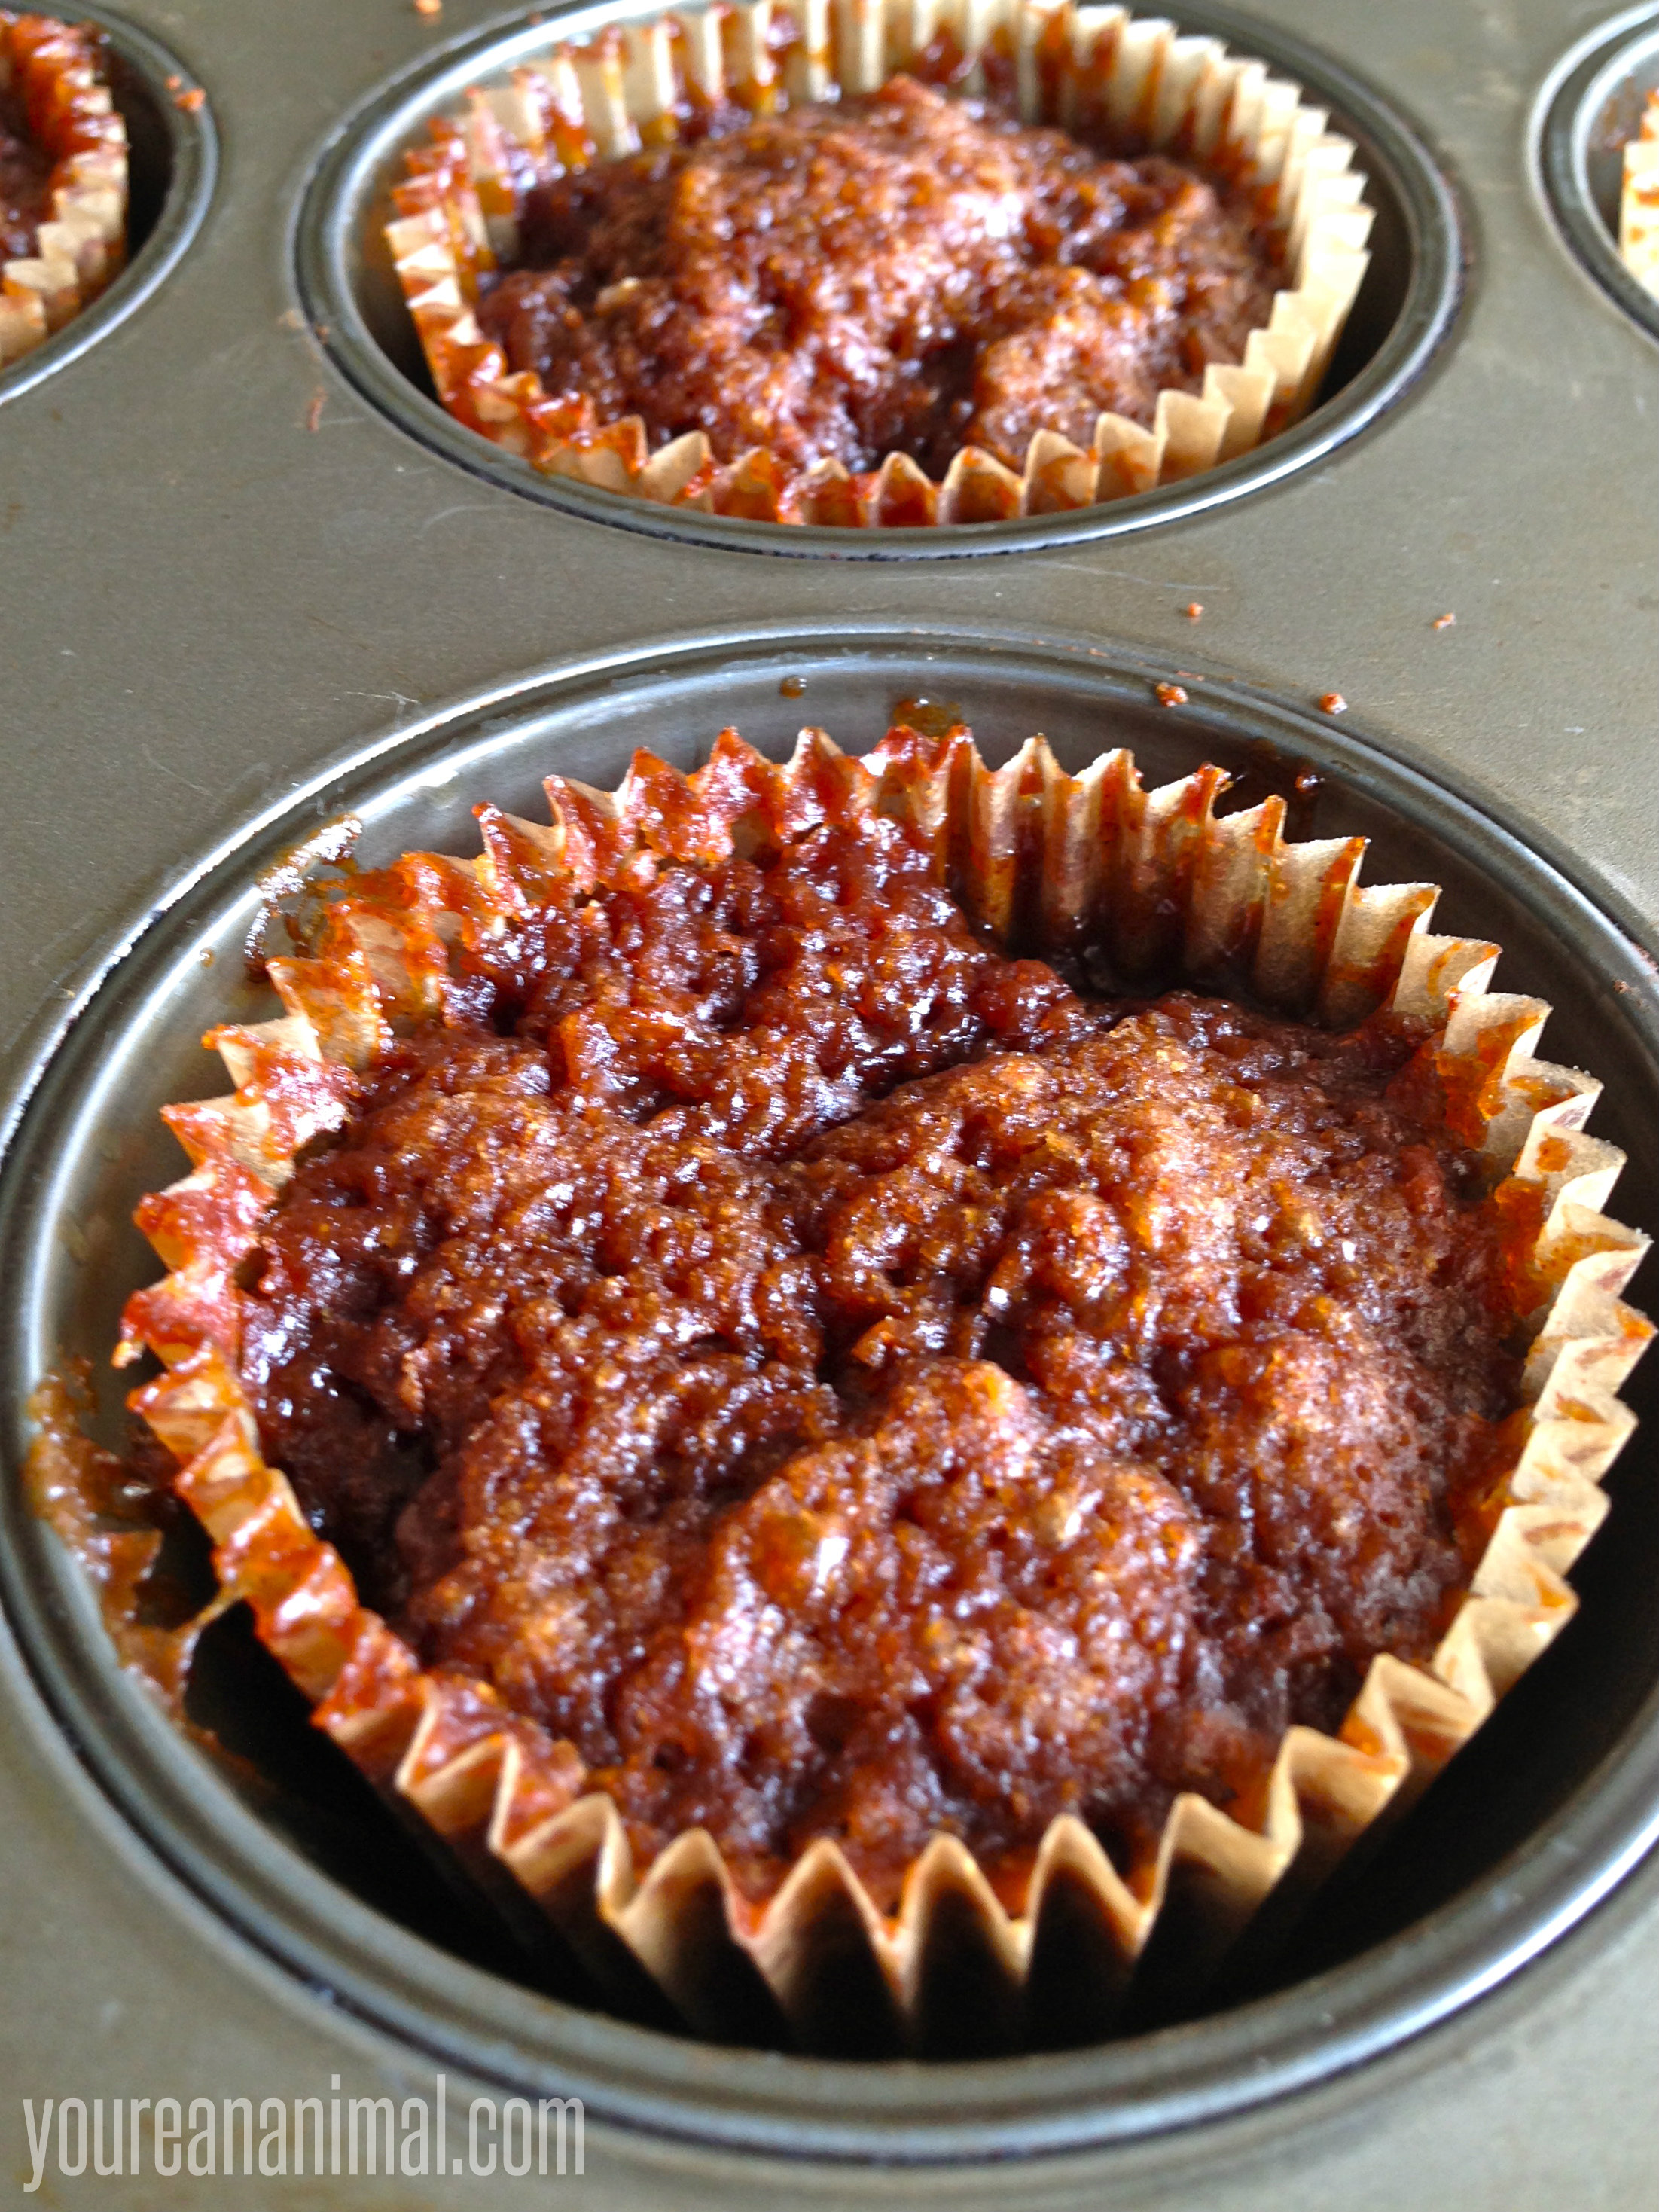
A couple weeks ago, I told you about my super-amazingly easy crockpot apple butter. The only thing about that apple butter recipe is that it makes a lot of apple butter. What’s a girl to do with alladat? Well, after making my apple butter muffins, and topping my protein pancakes with apple butter, and eating apple butter by the spoonful, I decided to go another direction… donuts. Because if apple butter donuts don’t say fall, I don’t know was does! Astute readers will notice that this recipe base is very similar to the apple butter muffins. However, there are some tweaks, which makes these a lot more donut-y than muffin-y. Mainly, they are chewier, like a donut should be! I’ve baked these in a handy dandy donut pan, but I believe you could probably shallow-fry these as well. The batter is a little runny though, so it might take some playing with. Or you could just bake them like I did… trust me, it’s divine. I didn’t add any sugar to these guys; I found the apple butter itself makes these sweet enough for my taste (since cutting back on sugar, my taste buds are a lot more sensitive to sweetness, which is amazing!) I topped off half of them with pure apple butter, and the other half with cinnamon sugar. The cinnamon sugar ones were my preference, and the apple butter ones were Andrew’s preference, so it’s up to you!
The texture is that of a chewy cake donut, and the flavor is spicy with the slightest hint of apples. Basically autumn on your taste buds.
For the cinnamon sugar topped ones, I melted a little Kerrygold grass-fed butter, dunked the tops of the donuts in the butter so the topping would stick, then swirled the donut in a combination of cinnamon and coconut palm sugar.
For the apple butter topped ones, I just spooned a little leftover apple butter on the tops. That’s it!
1/2 tsp each of baking soda, baking powder and apple cider vinegar
1/4 tsp each of cinnamon, nutmeg, and clove
splash of vanilla extract
Preheat your oven to 400 degrees F, and grease your donut pan (6 donuts) liberally with butter or coconut oil.
Combine your wet ingredients (apple butter, eggs, vanilla, and apple cider vinegar) in a large mixing bowl.
Add your dry ingredients (arrowroot, potato starch, coconut flour, baking soda, baking powder, and spices) to your wet ingredients mixture.
Use an electric mixer to fully combine your batter, until it is smooth.
Evenly distribute your batter in your donut pan, so each well is about 3/4 full.
Bake in preheated oven for 14-17 minutes, or until the donuts spring back when touched.
Allow to cool completely before adding any toppings (see above post for suggestions)
Makes 6 donuts
Please note that some of the links in the above post are affiliate links that will take you to an Amazon.com page. If you choose to purchase a product featured in this post using an affiliate link, you will be directly supporting You’re An Animal. Thanks!
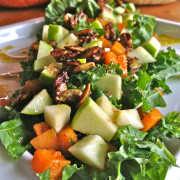
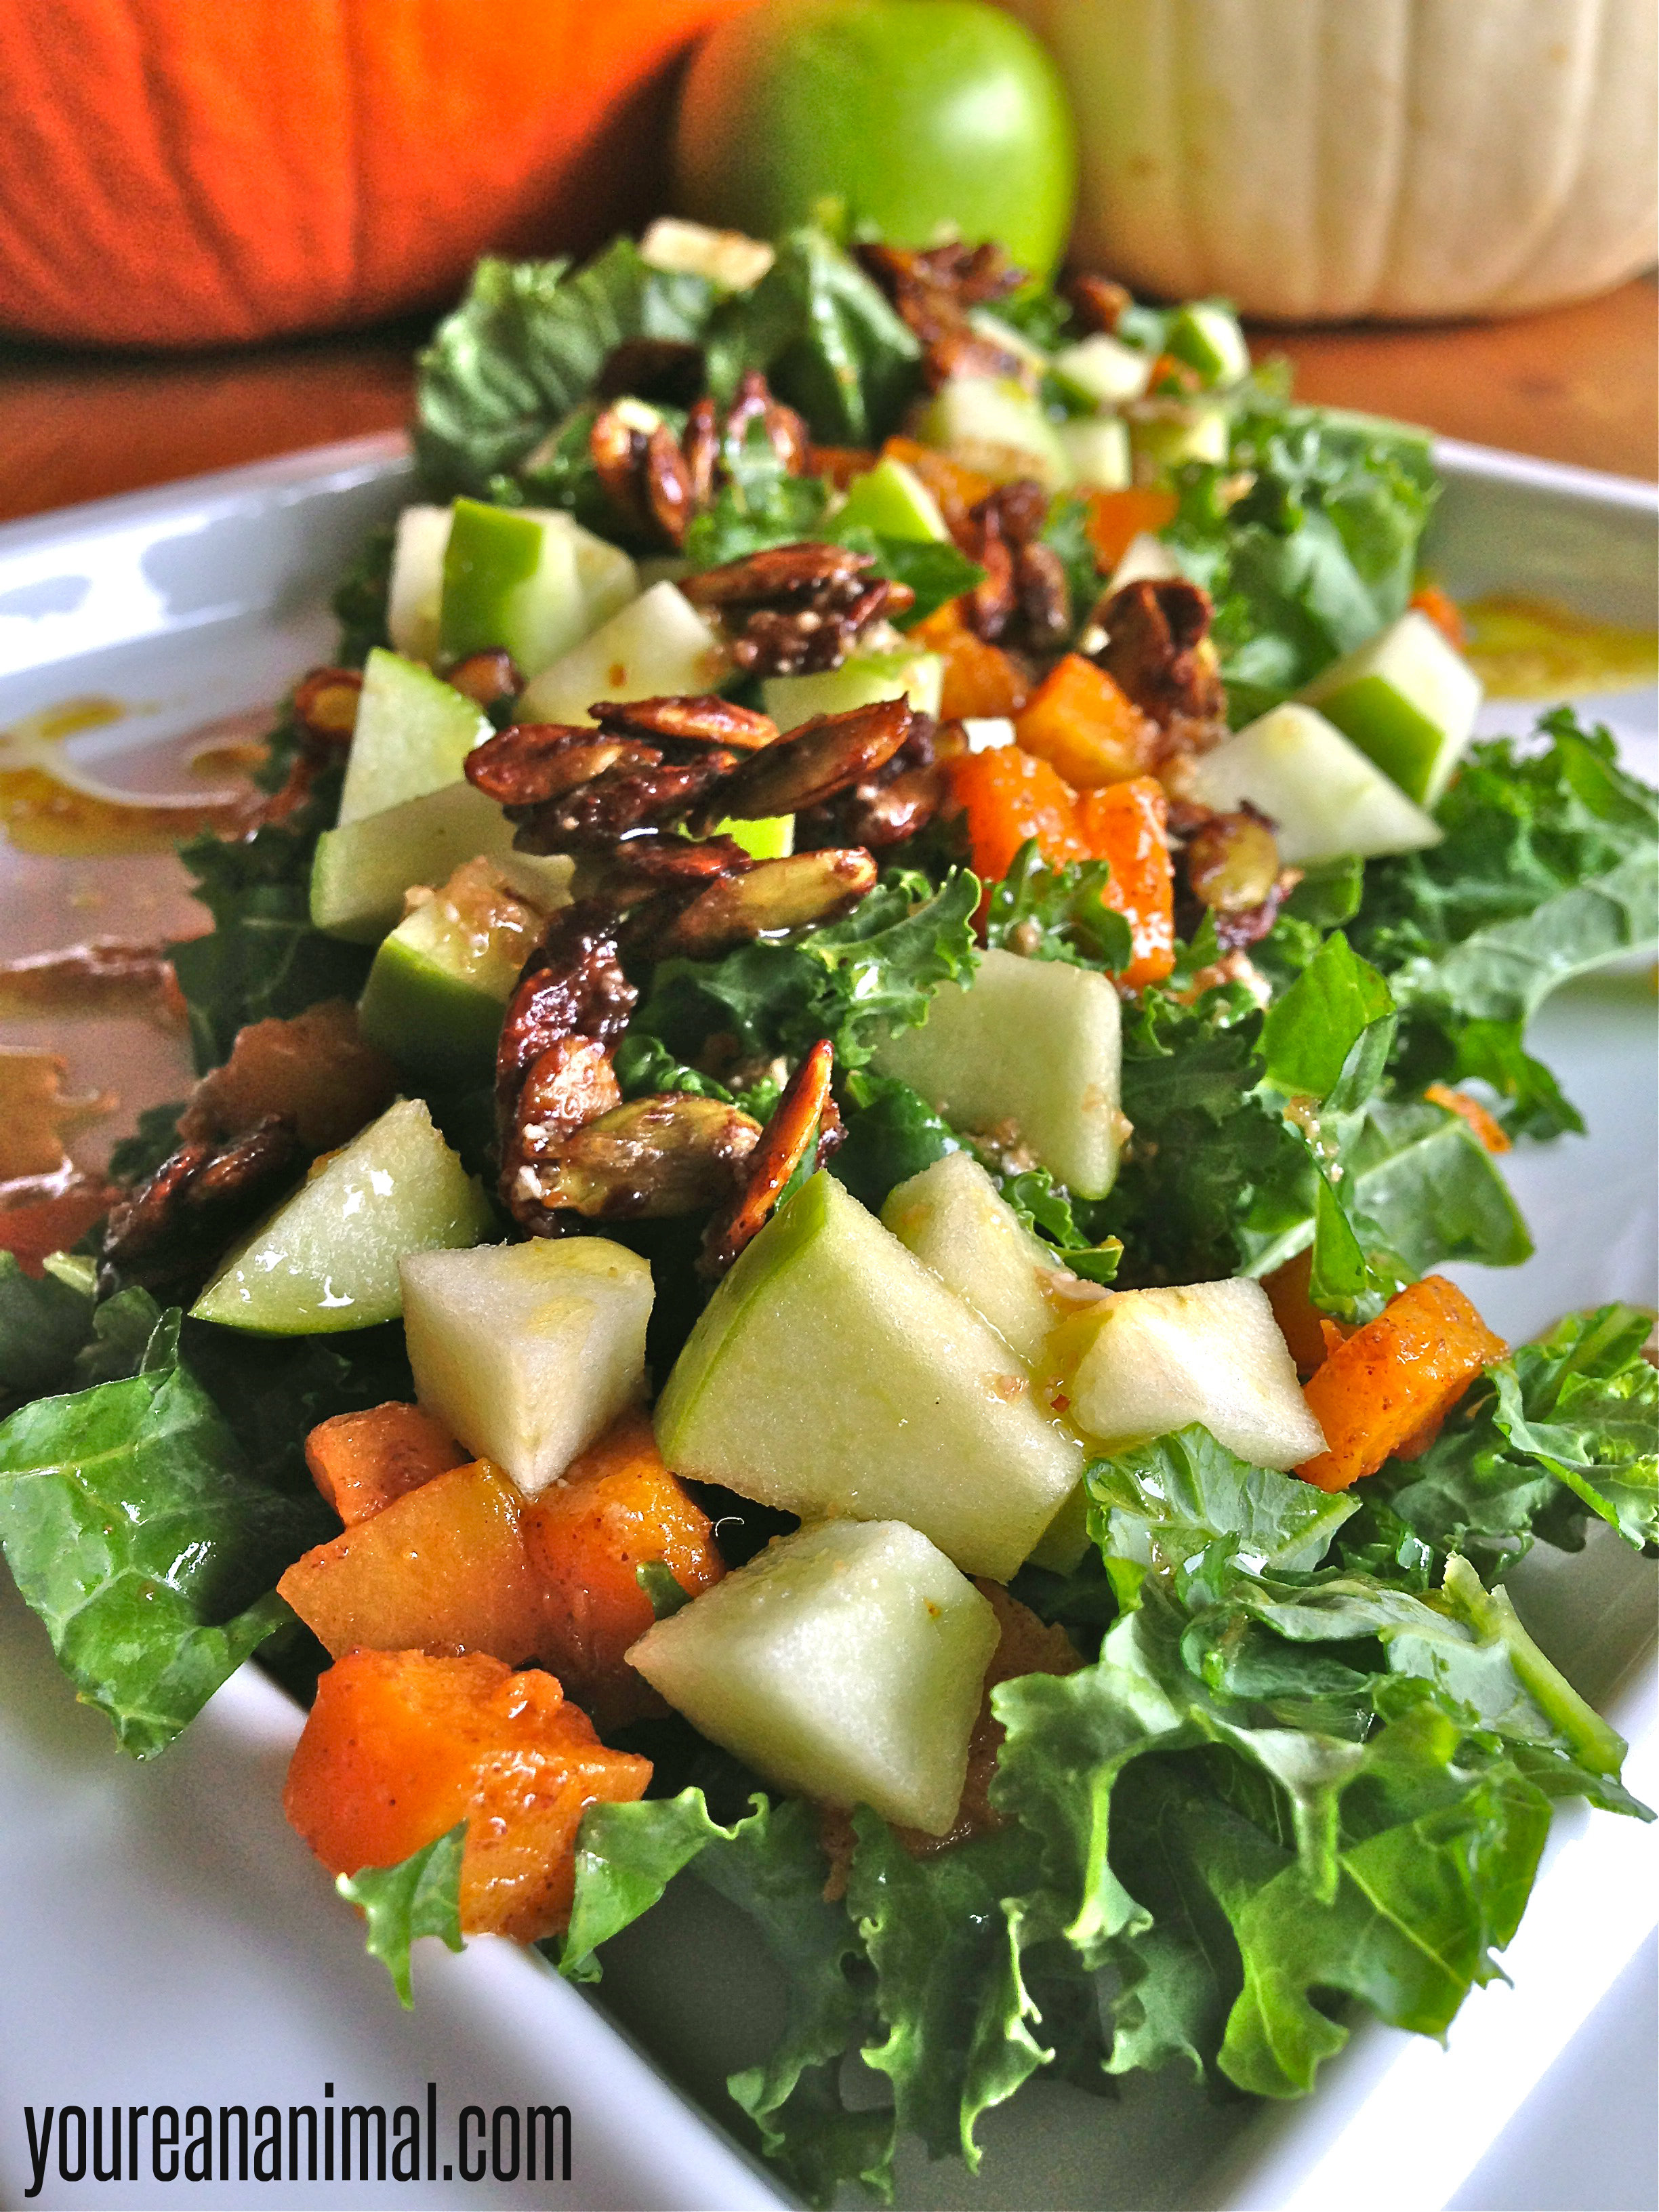
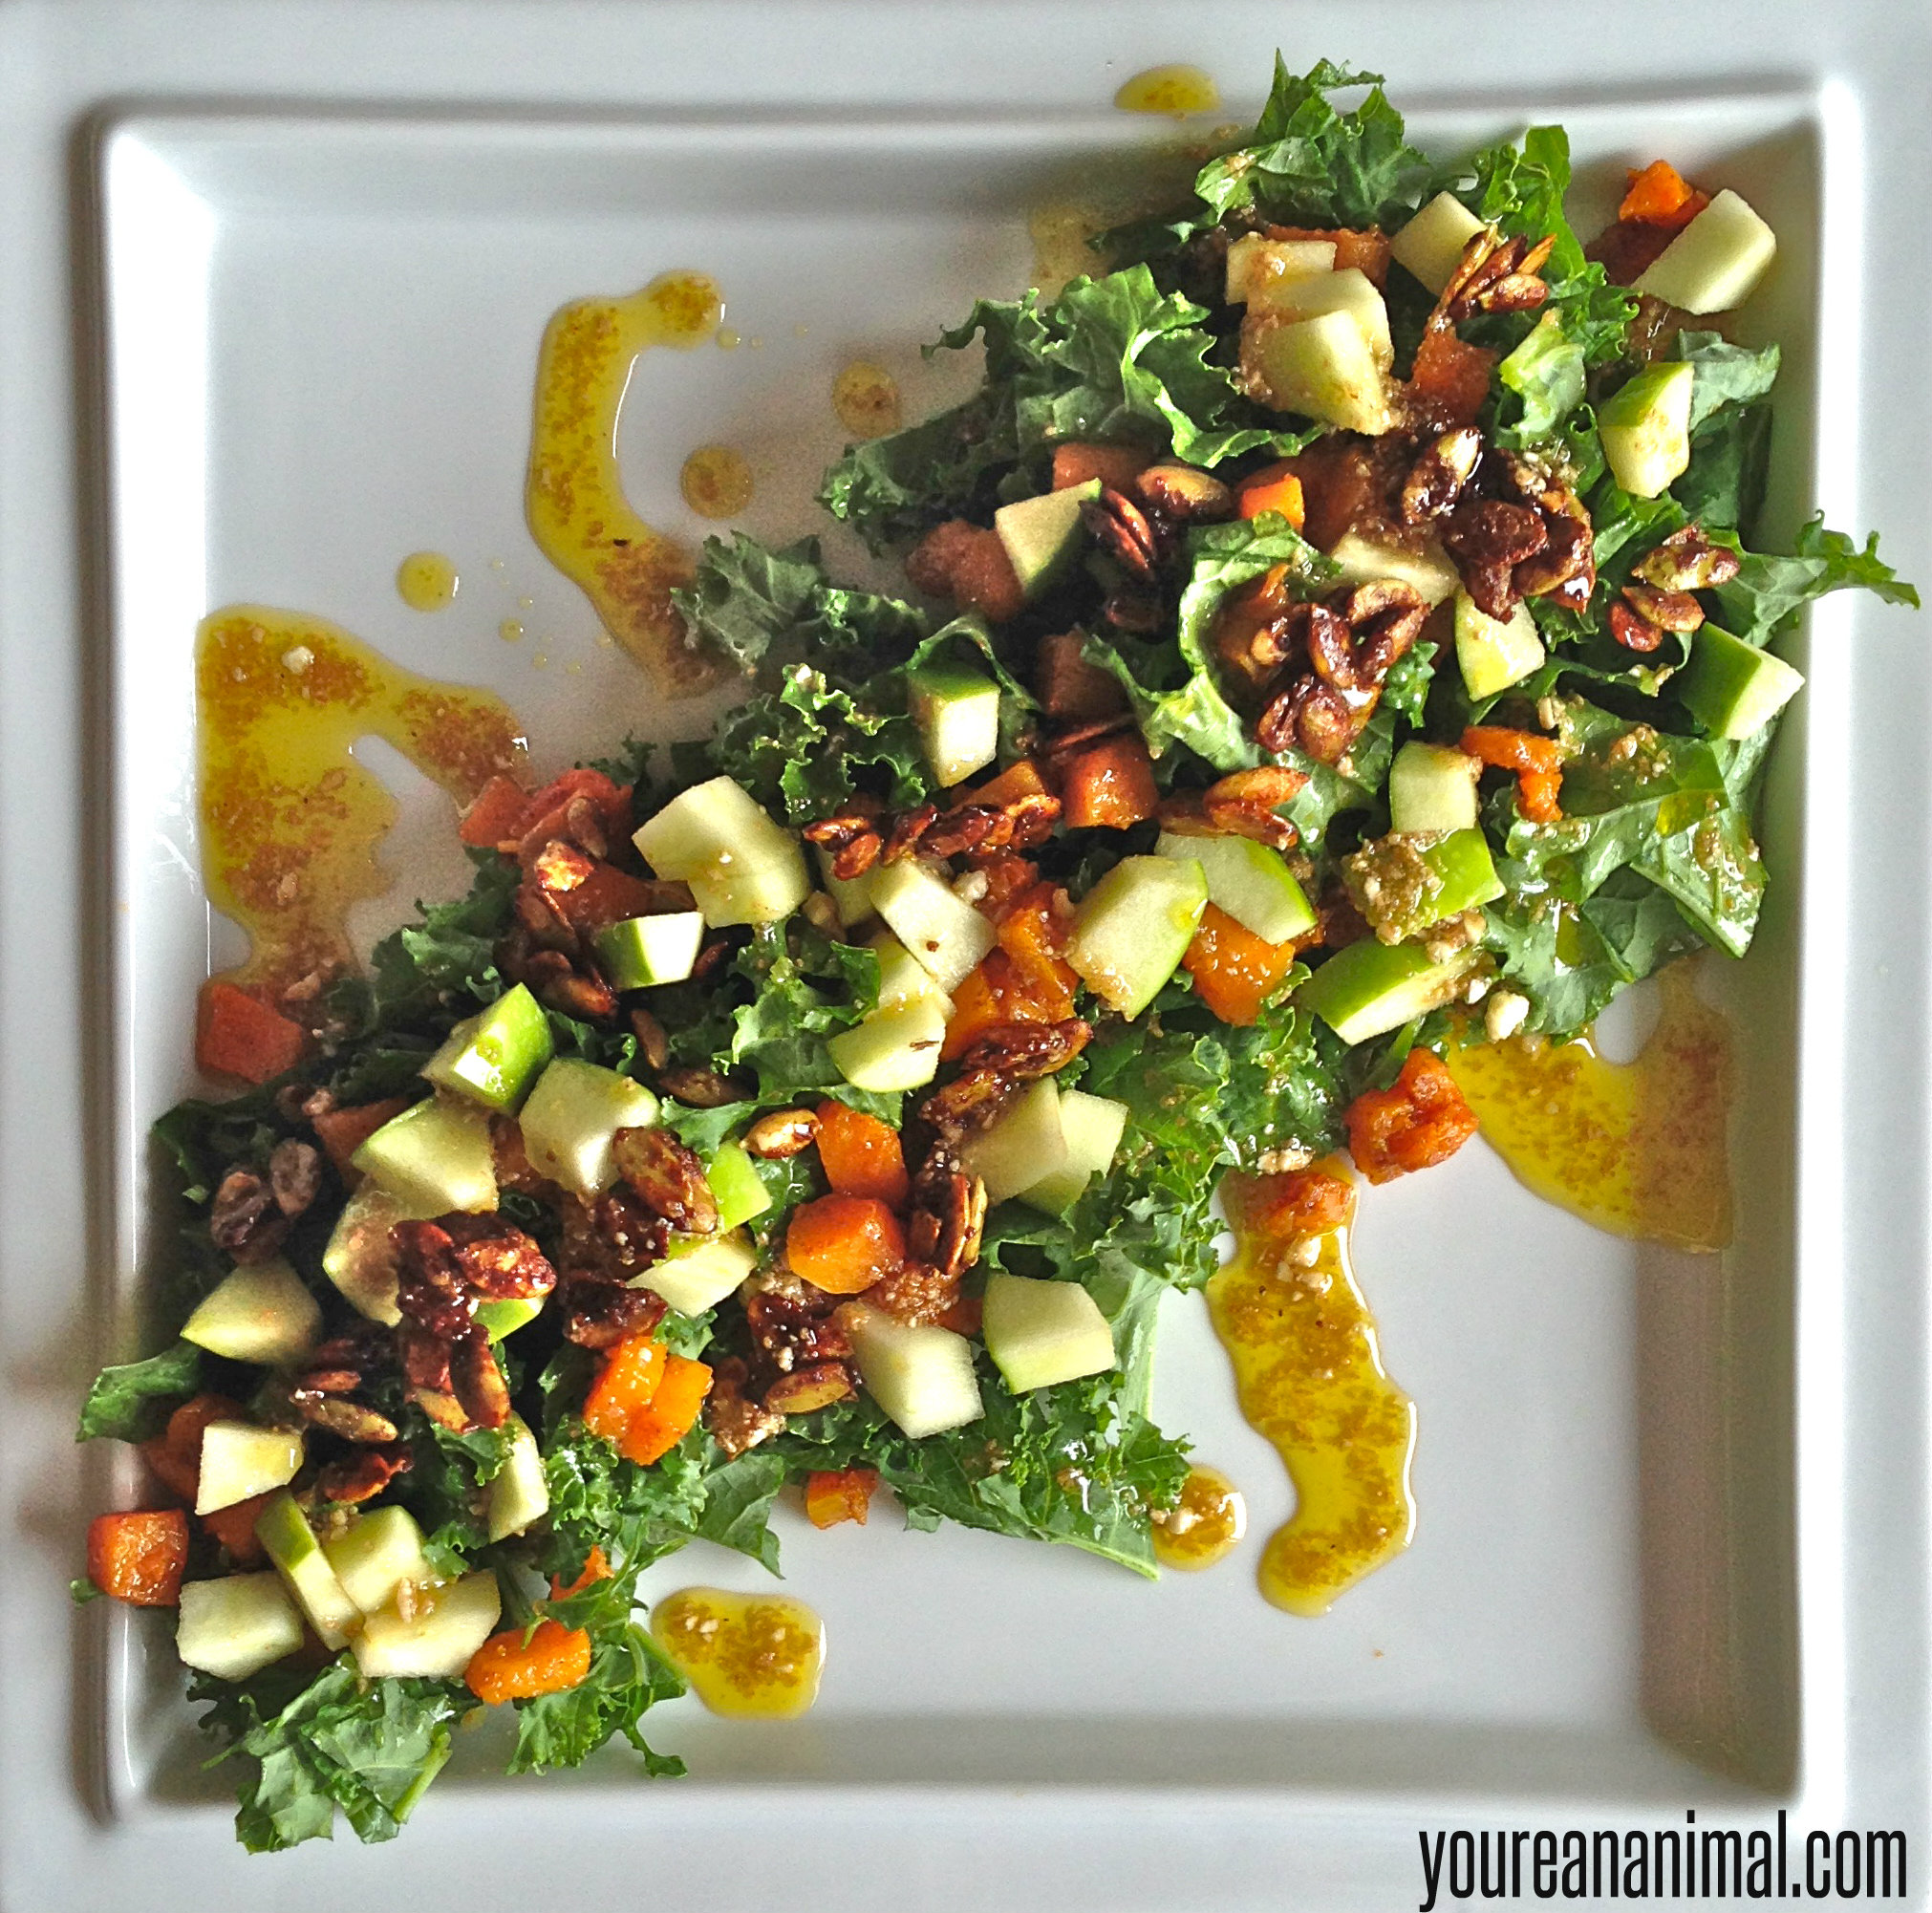
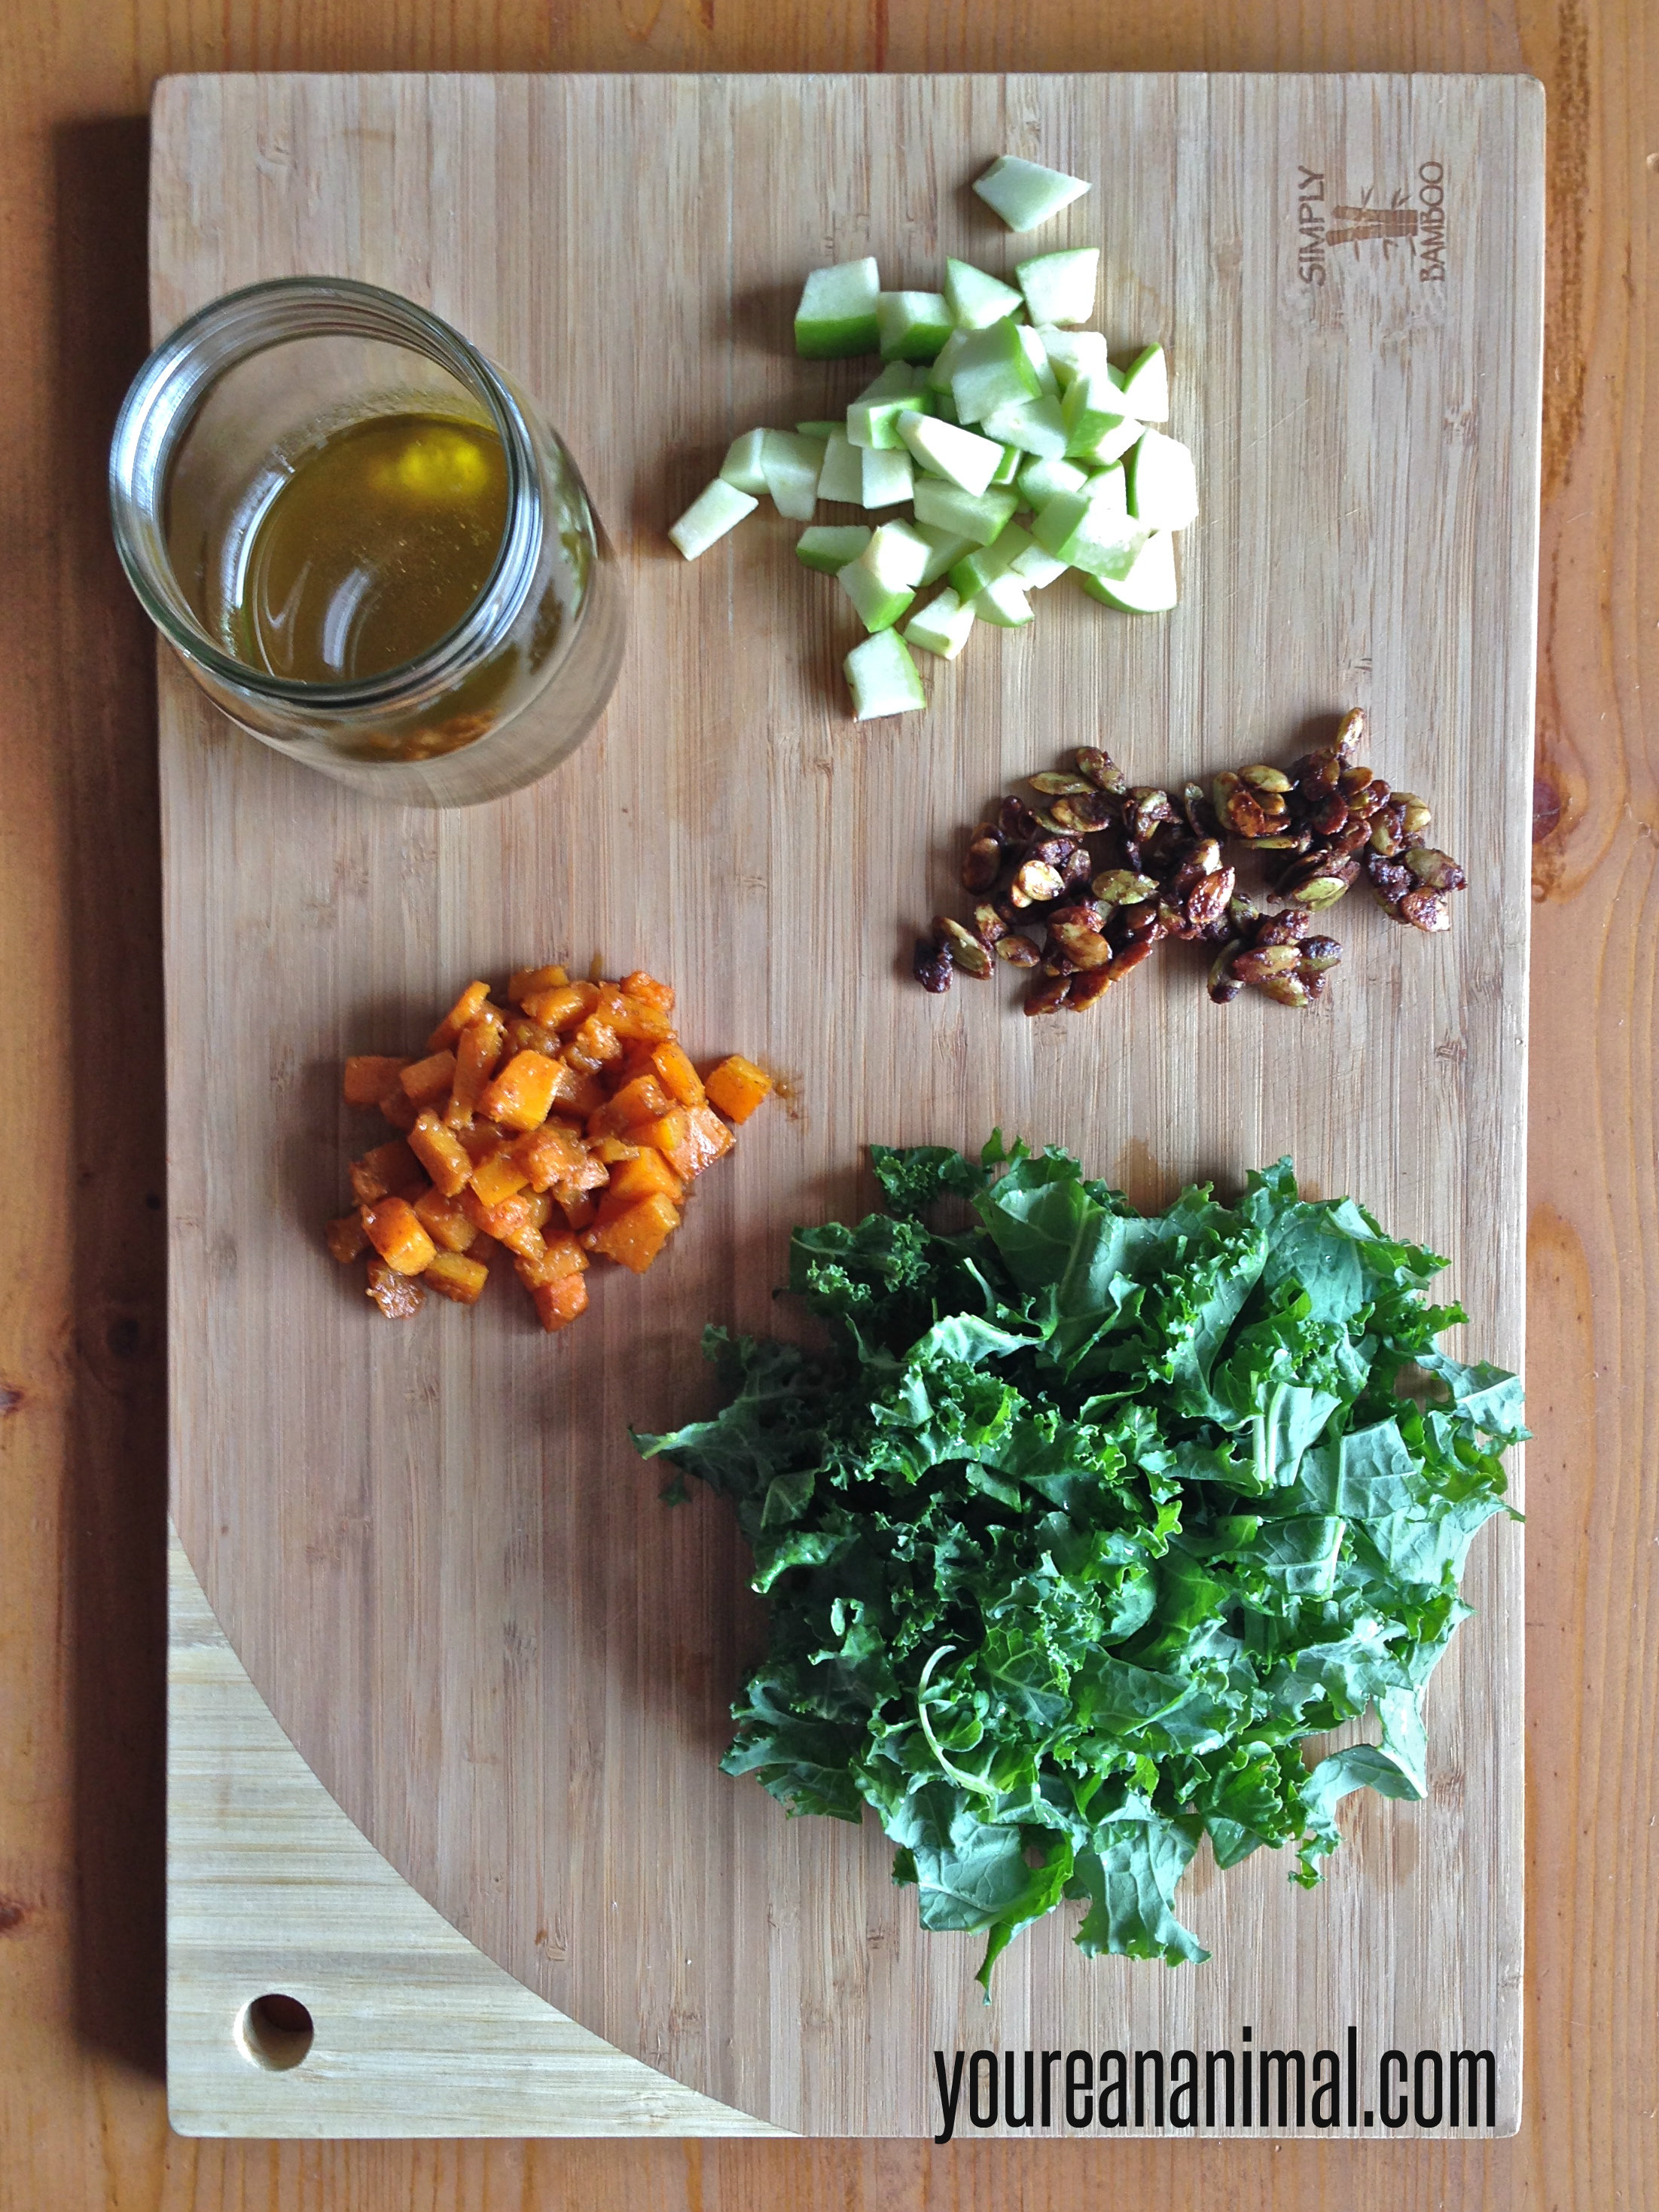
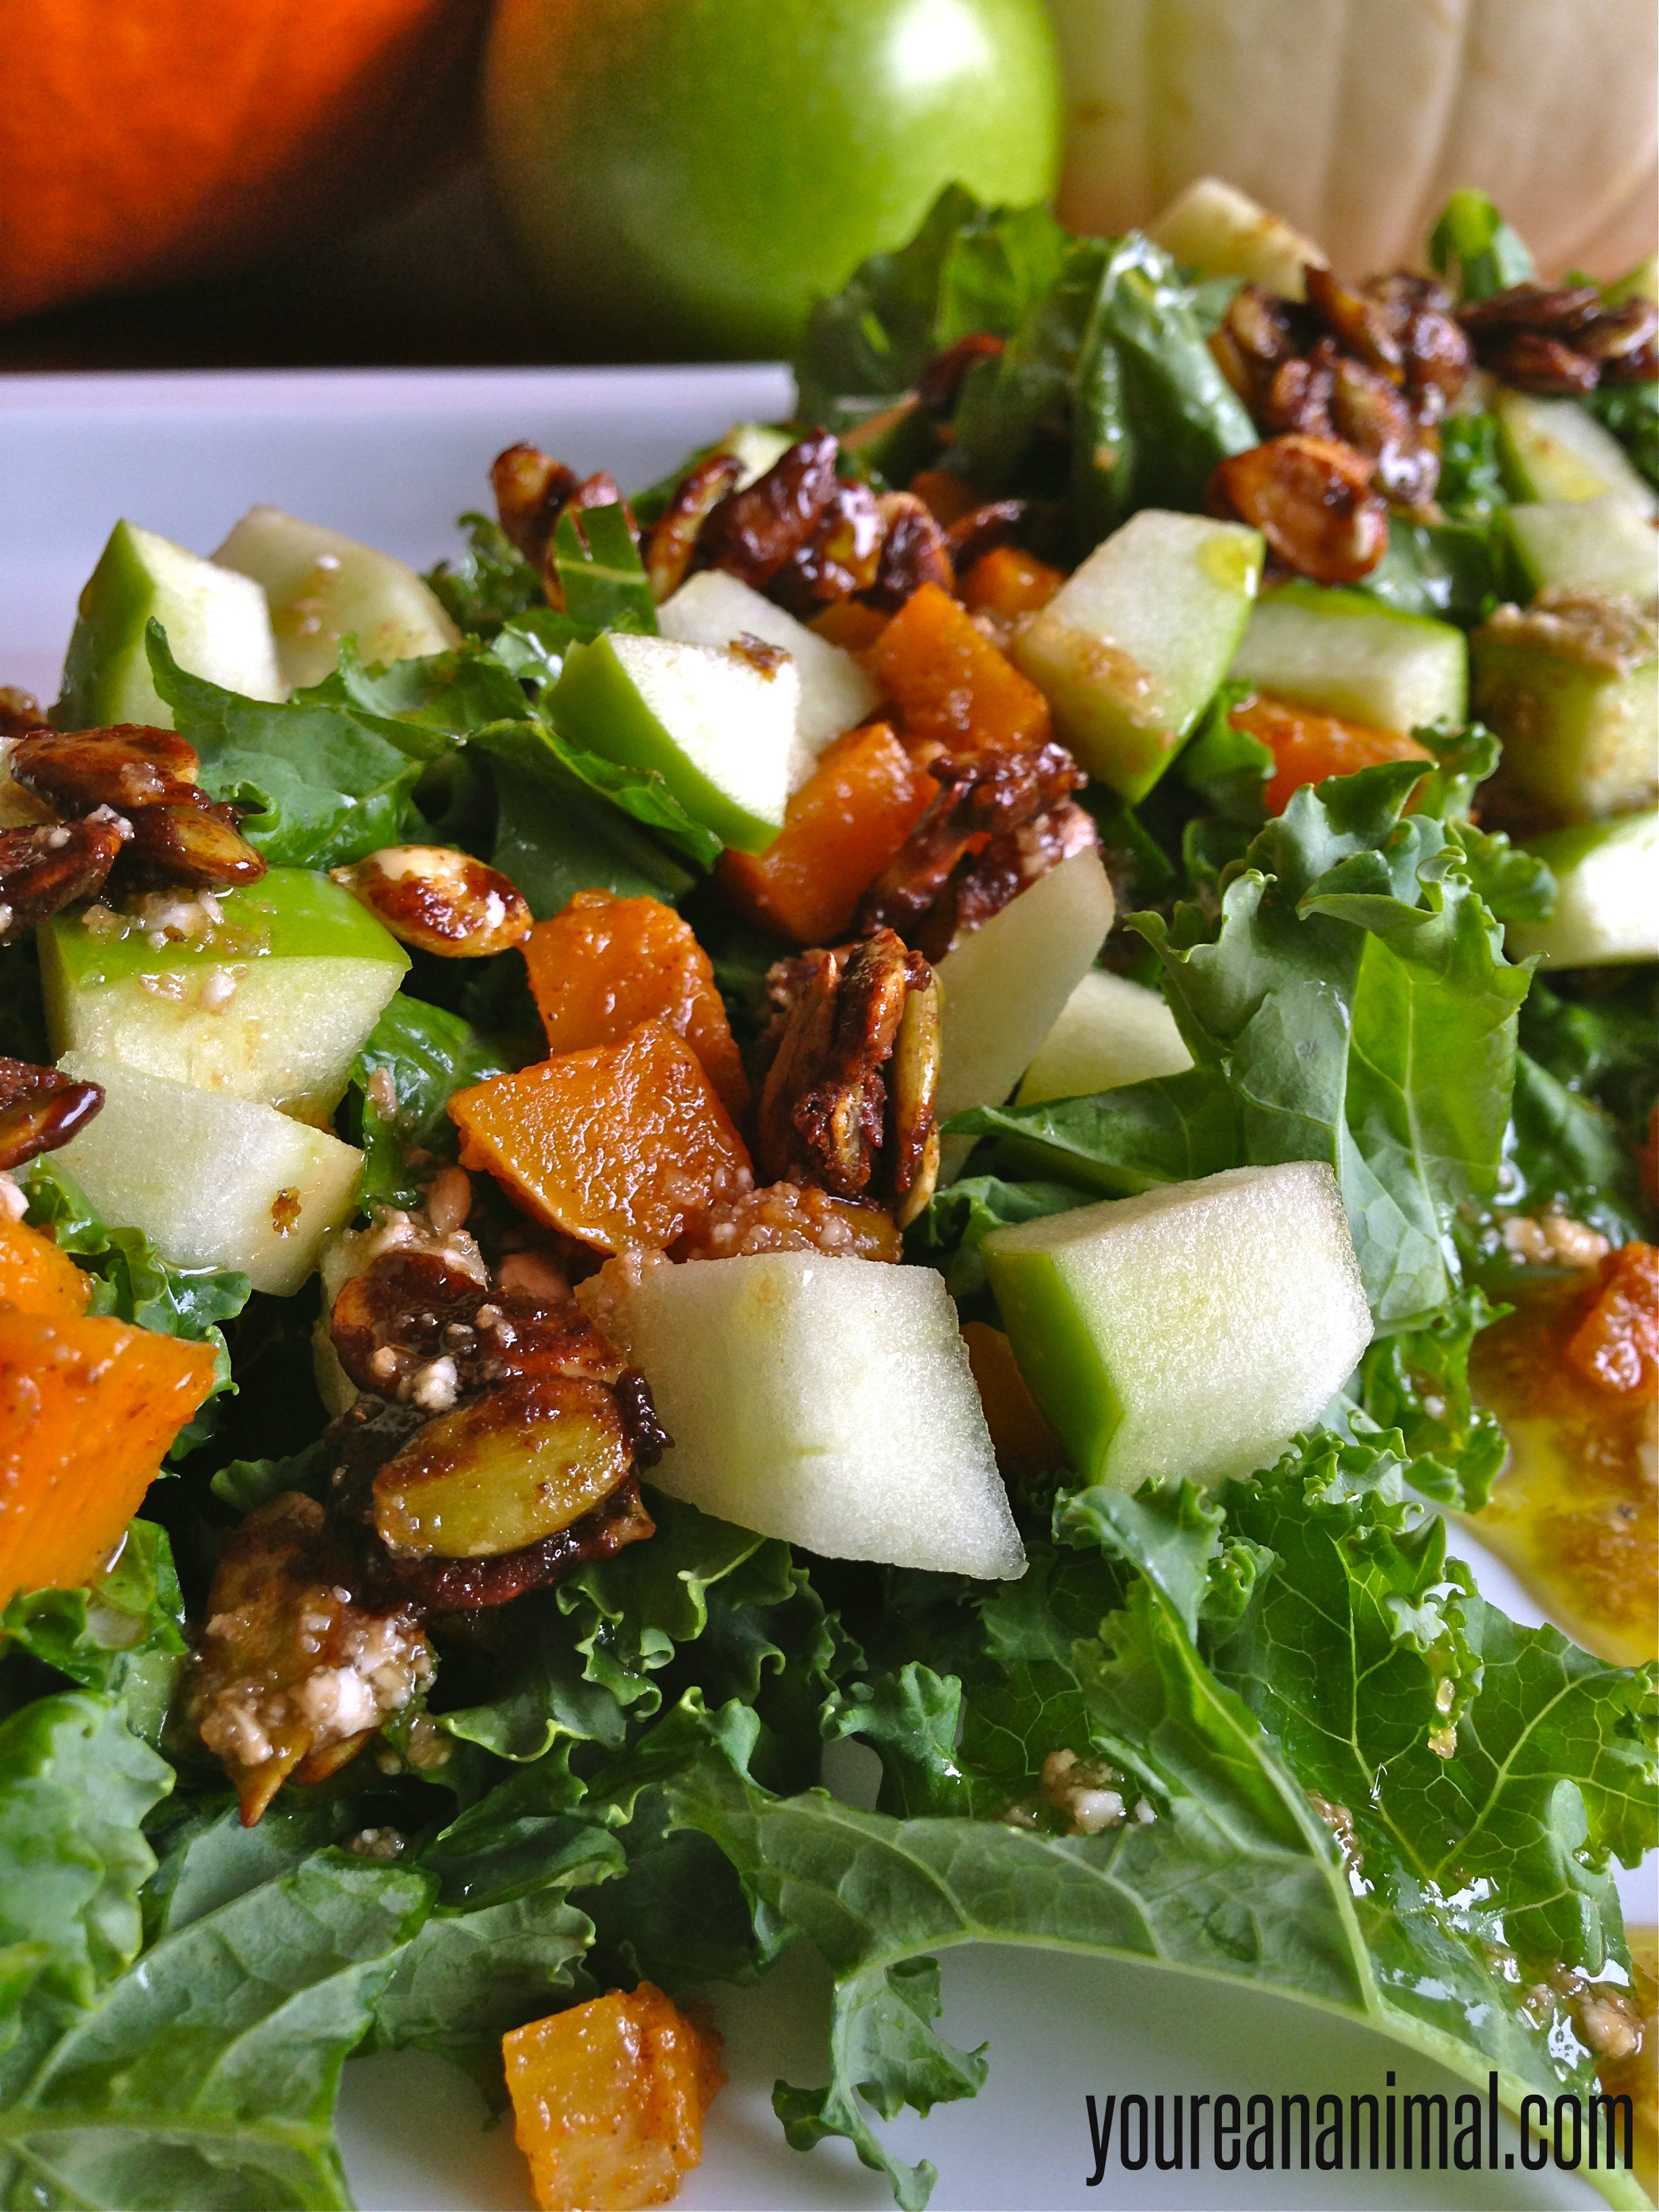
Autumn really is a great foodie season. Getting creative with the seasonal fruits, veggies, squashes, and spices has been really fun so far, and I love having a definite theme. Also, this is an amazing benefit of trying to consciously eat seasonal and local! A couple weekends ago, Andrew and I had dinner at one of our favorite restaurants here in RVA, Stella’s. Stella’s is a Greek restaurant owned by our friend Katrina, and we are frequent visitors. And by frequent, I mean pretty much all of the wait staff not only recognize us, but also know which appetizer is our favorite must-have. But one thing I love about Stella’s is that while I do have my favorite appetizer that I always order, I almost always get a different entree. I know I’m not alone in saying that at most restaurants I find my go-to dish and never venture outside of that comfort zone. But at Stella’s, I never know what I’m getting until I hear the specials. They have new specials all the time, and they’re always amazing. So I often wait for the server to rattle off those little delicacy options before choosing my dinner. The last time Andrew and I ate at Stella’s we tried the salad special… and I loved it so much I made my own version. Stella’s version had a kale base, with butternut squash, radishes, and spiced pumpkin seeds. For my version, I swapped the radishes for apples, added my favorite Goat Cheese Balsamic Vinaigrette, and let the autumn lovin’ begin.
This salad perfectly embodies everything Fall. It’s got fresh, crisp apples, creamy butternut squash (oh hellllooooo Vitamin A… win-win-win situation we’ve got going on here), and spiced pumpkin seeds that are a treat in themselves. Add the perfect blend of tangy and savory with the goat cheese balsamic dressing, and you’ve got a winner. Hearty kale just pulls that whole thing together for a healthy, mouth watering salad. You can make this a side dish at Thanksgiving (or you know… any other meal of the season), or add some protein (chicken or turkey perhaps?) and it’s a meal in itself!
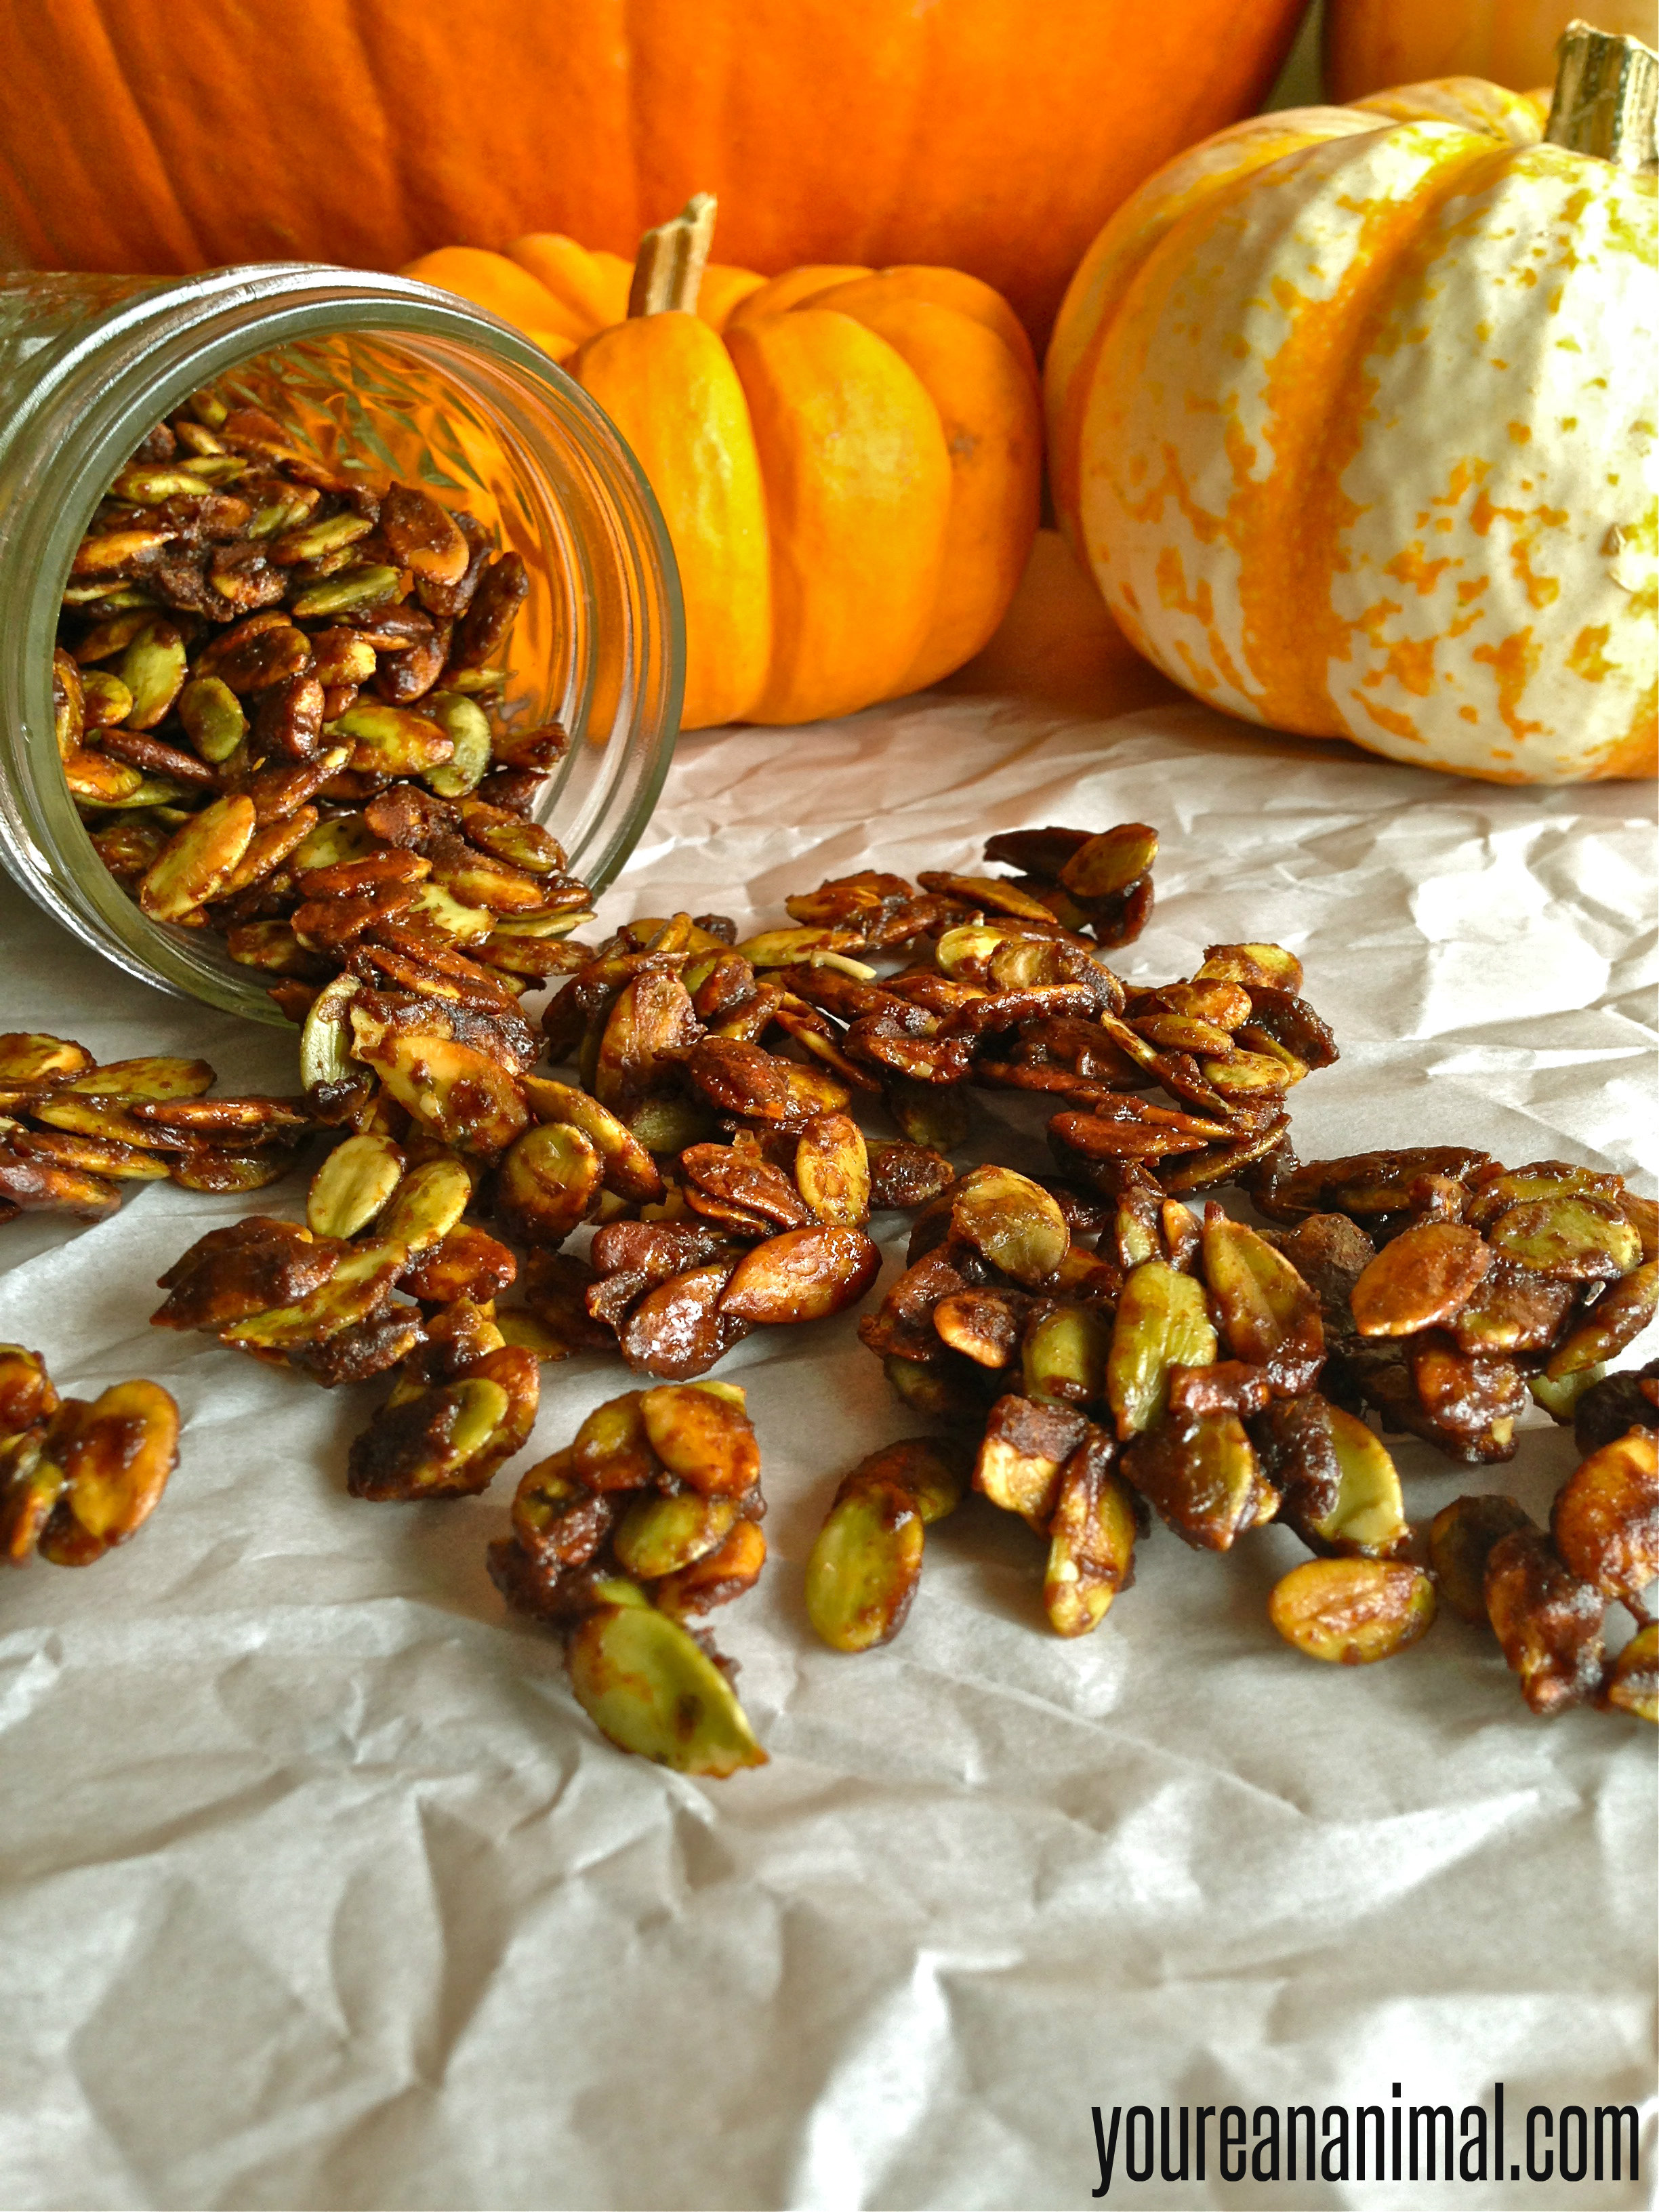
Remember how I said the spiced pumpkin seeds are a treat? Well, they are such a treat that they even get their own side recipe. Lucky little pepitas.
Lay out a sheet of aluminum foil or parchment paper to transfer the seeds to once done.
Combine the coconut sugar, molasses, cinnamon, salt, paprika, cumin and cayenne in a small bowl. You may need to use your fingers to fully incorporate the molasses.
Place the seeds in a nonstick skillet, and toast them just slightly until they smell nutty and are lightly browned.
Pour the sugar spice mixture over the seeds, and stir to combine.
Add the butter.
Stir the mixture until the sugar and butter are melted, and the seeds are coated.
Quickly transfer the seeds to the foil/parchment and spread them out as much as you can.
Allow them to completely cool, then break up any chunks. Store in cool dry place, or fridge.
These pumpkin seeds are sweet and spicy, and are really what ties together this Autumn salad. They would also be perfect for a topping on pumpkin bread or muffins, or on a pie, or just eaten by themselves! Anywhere you would use spiced pecans, you can use these spiced pumpkin seeds.
The other elements of this recipe are also fantastic alone, which is why this salad is such a winner. The whole is greater than the sum of its parts, and the sum of its parts is already pretty bangin’. The spices from the pumpkin seeds are carried over to the butternut squash, which brings those two elements together. The tart crunch of the apples provides perfect contrast to the creamy sweetness of the squash, and that tartness of the apple is also in perfect harmony with the sour balsamic in the dressing. Seriously… have I sold you yet?
Autumn Salad
3-4 large leaves of kale, de-ribbed and chopped (about 4-5 cups)
1 cup of butternut squash, diced into 1/4 inch pieces
1 Granny Smith apple, diced into 1/4 inch pieces
Spiced pumpkin seeds (see recipe above)
1/4 tsp each cinnamon, salt, cumin, paprika
cayenne to taste
avocado oil or olive oil to saute squash
Goat Cheese Balsamic Vinaigrette (mix all ingredients together in a mixing bowl, or shake in a mason jar)
3 tbsp avocado or olive oil
1 tbsp balsamic vinegar
1/2 tbsp of soft goat cheese
1/2 tsp each of salt, pepper, onion powder, garlic powder, and dried yellow mustard powder
Heat avocado oil/olive oil in a medium skillet over medium heat.
Add diced butternut squash to the heated oil.
Add spices (cinnamon, salt, cumin, paprika and cayenne) to the squash. Stir to coat the squash in the spices.
Saute the squash, stirring occasionally, until the squash is fork tender.
Once the squash is cooked, assemble your salads, evenly distributing the kale, apples, squash and topping the salad with your desired about of spiced pumpkin seeds and balsamic vinaigrette.
This makes either 2 entree-sized salads, or 4 side salads. Enjoy!
Please note that some of the links in the above post are affiliate links that will take you to an Amazon.com page. If you choose to purchase a product featured in this post using an affiliate link, you will be directly supporting You’re An Animal. Thanks!
https://nourishwild.com/cms/wp-content/uploads/2014/10/fallsalad15.jpg32642448Morgan Carrhttps://nourishwild.com/cms/wp-content/uploads/2016/02/Logo-Only-Large-300x212.pngMorgan Carr2014-10-12 18:55:502016-02-27 21:03:06Autumn Salad with Spiced Pumpkin Seeds
First, let me apologize for being MIA for a while. I’m in the midst of a 20-day work week… aka I haven’t had a day off which means no time for recipe fun! But this morning I was determined to get something done before work. And oh, it was a gooood choice. Apple butter (for me) is something that has become as much a staple of fall as pumpkin errythang. I first discovered apple butter while living in Harrisonburg. Every fall, my friend and I would head to a Mennonite auction/market and it was there that my love affair with apple butter began. And until now, I didn’t trust any other kind aside from that Mennonite-made goodness. I was most certainly not going to buy it from the store, and I don’t have the opportunity to get to the farmers markets around here (one of the downfalls of working the Saturday morning shift). However, since we got a crockpot, I figured I’d try my hand at making me own. Whoa baby, is this stuff easy and delicious! So today, you all are getting a double whammy: Apple Butter recipe AND Apple Butter Muffins recipe! I’m going to start with the Apple Butter.
If you have never had apple butter before, it’s essentially a spiced applesauce. But it also tastes like the manifestation of autumn itself. It has almost the exact same spices as a pumpkin spice combo, so just imagine those spices with an apple background rather than a pumpkin background and YUM. You can use apple butter in a lot of ways. I used to just eat it on an english muffin, or mix it in with oatmeal. Now, I’ll probably drizzle it over ice cream (maybe even make an apple butter ice cream… hmmm), use it in these delectable muffins, or eat it by the spoonful 🙂 The possibilities are as wide as your imagination! Oh and by the way… it’s ridiculously easy to make. I don’t even peel the apples, mostly because I think it’s a waste of time. And all of the nutrients are in the peels! You end up blending it anyway, so keep those peels people!
Crockpot Apple Butter
12 (organic) apples (I use Gala, because they’re my favorite)
Core the apples, and chop into 2-3 inch chunks. No need to peel!
Place in the crockpot.
Add the spices and honey, and stir to combine with the apples. Doesn’t need to be perfect, just incorporate it so the spices don’t dry out/burn sitting on the top.
Cook the mixture on low for 10 hours.
At the end of the 10 hours, use the back of a ladle/spoon to mash the apples.
Makes about 48 oz, depending on the size of your apples.
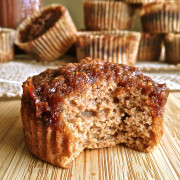
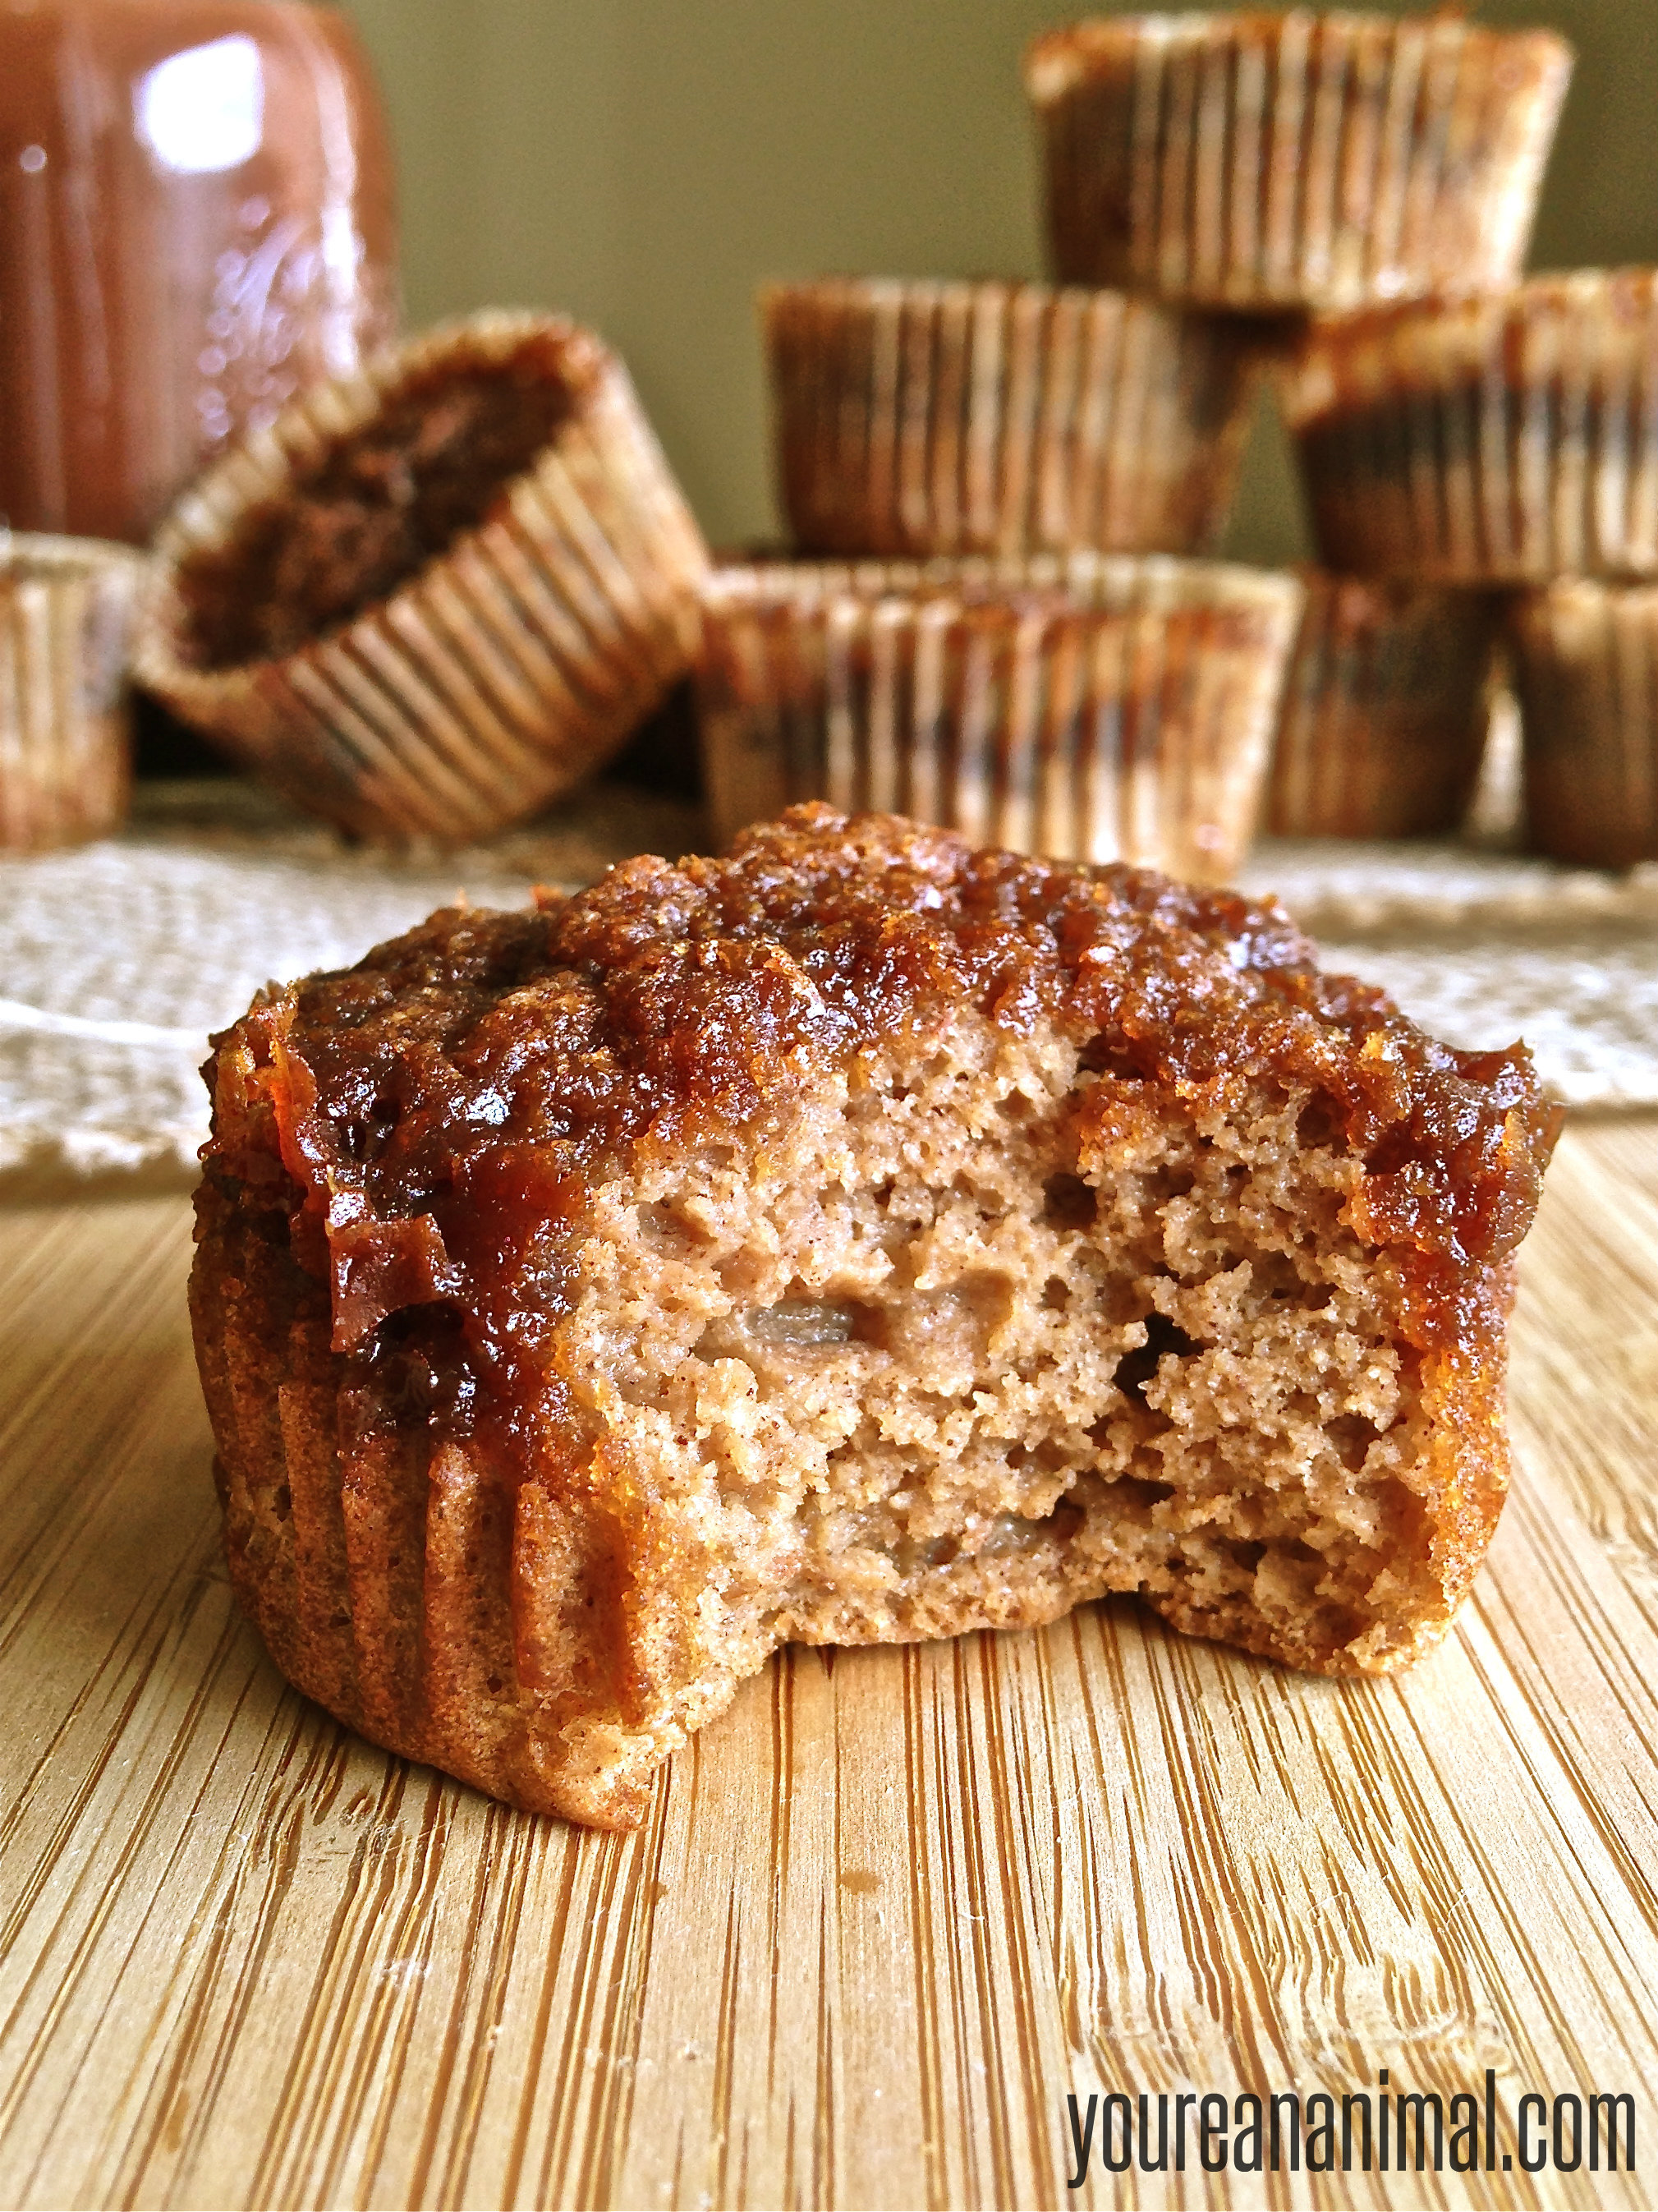
Okay, now onto the muffins. I love me a good muffin. After switching to a mostly grain-free lifestyle, breakfast pastries and baked goods were definitely the things I missed the most. To me, breakfast wasn’t breakfast without some kind of sweet carb. I’ve learned to move past that, and now usually have one of my Superfood Green Smoothies for breakfast, but every once in a while I like to get that sweet treat. And since it’s fall time, I really wanted to do something with my apple butter obsession. And with that, Apple Butter Muffins were born! These muffins are fluffy, moist, and sweet. The apple butter taste is very mild, so if you want a spicier muffin*, you can add about 1 tsp cinnamon, 1/4 tsp clove and 1/4 tsp nutmeg to your muffin batter. Or for lighter flavor, leave out the extra spices. It’s up to you! I also added the sweet topping, because I did not add any sugar to the muffin batter. I love a crisp, sweet topping, and it worked perfectly. However, if you don’t want the extra sugar, you can certainly leave it out. Or simply drizzle apple butter over the top. Any and all options would be delicious!
Line a muffin tin with muffin papers, or grease the pan liberally.
In a large mixing bowl, combine the 1 cup of apple butter, eggs, and apple cider vinegar.
Sift in the dry ingredients (coconut flour, potato starch, arrowroot, baking soda, baking powder, and optional spices).
Mix the ingredients by hand until smooth. Do not over mix, the batter should be light and loose.
Spoon the batter into your muffin tin, filling each cup about 2/3 full.
In a smaller mixing bowl, use a fork to combine all of your sugar topping ingredients. The mixture should be in the consistency of wet sand.
Evenly distribute the sugar topping over the muffins, pressing the topping into the batter slightly.
Place the muffins in the oven, and bake for 17-19 minutes, or until the muffins have risen and spring back in the center when touched.
Makes 12 regular sized muffins.
Please note that some of the links in the above post are affiliate links that will take you to an Amazon.com page. If you choose to purchase a product featured in this post using an affiliate link, you will be directly supporting You’re An Animal. Thanks!
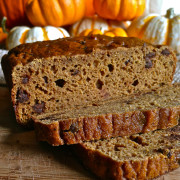
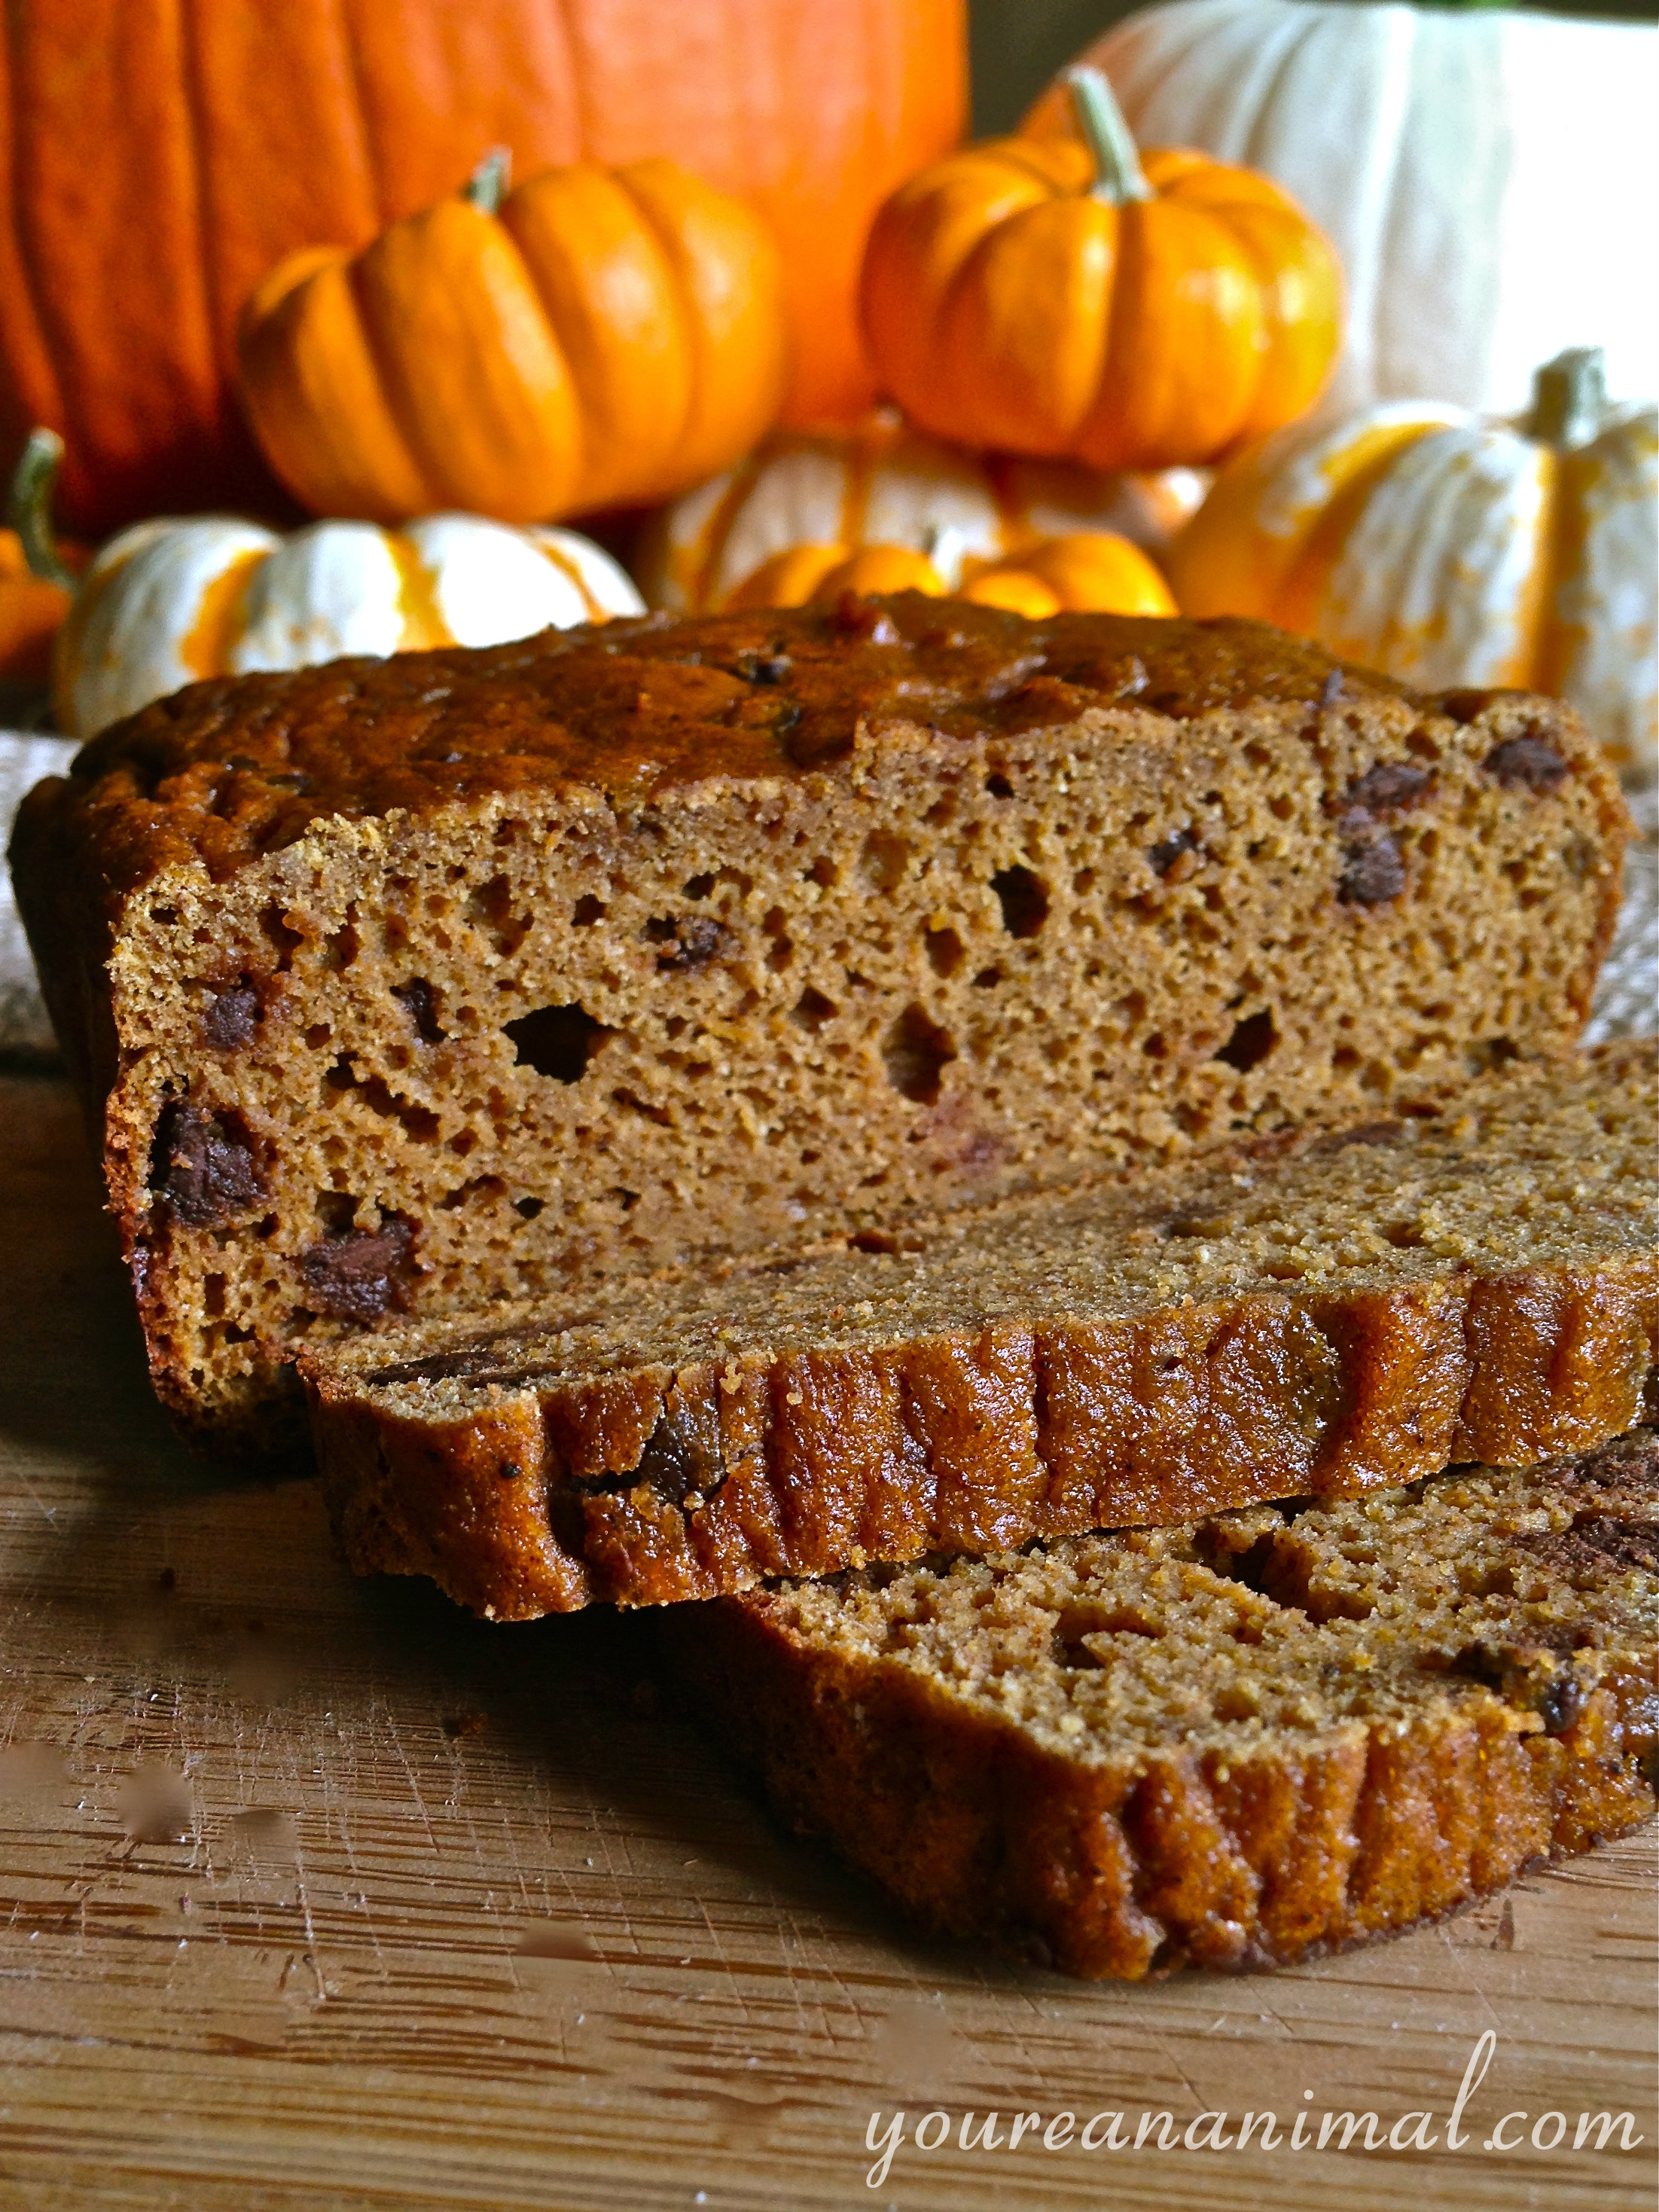
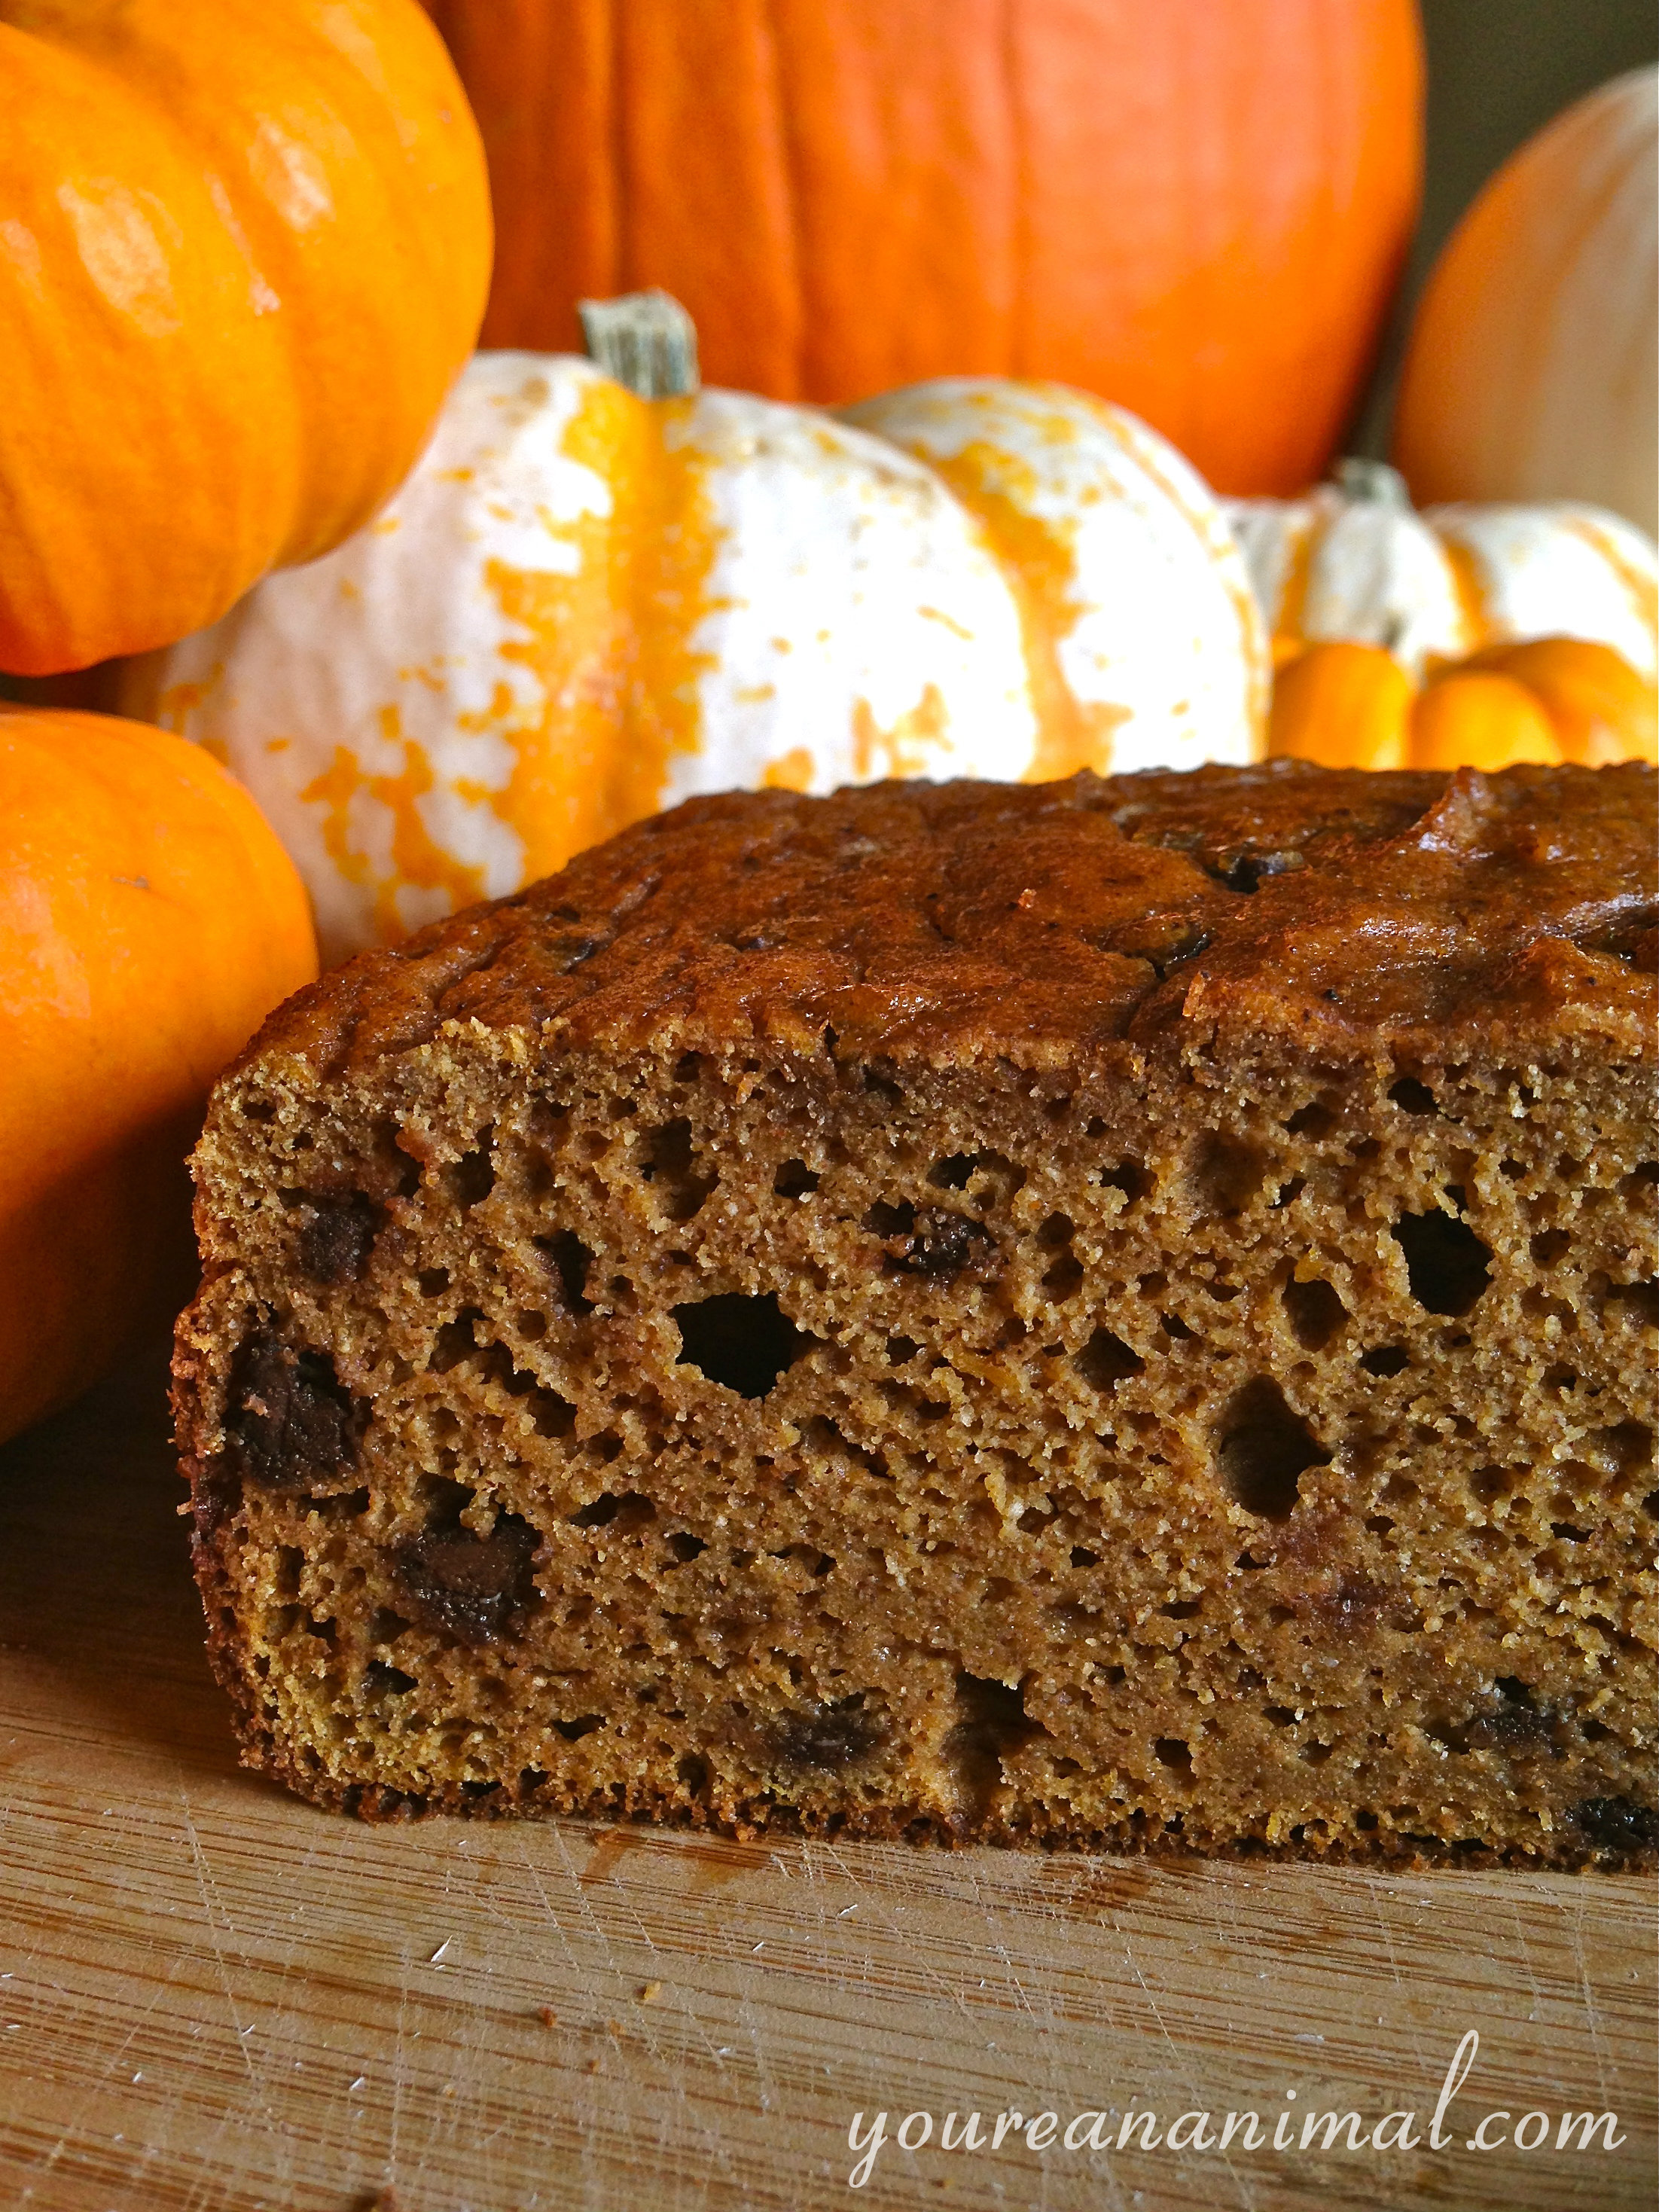
Welcome to Part 2 of my Pumpkin Everything obsession! I expressed my love for pumpkin season (aka I’m addicted to cinnamon) in my Dairy-Free Pumpkin Ice Cream post here, and am continuing the trend with a glorious grain-free, gluten-free, nut-free, white sugar-free, paleo (ish) pumpkin bread. Well what the heck is even in it? Coconut flour and starch, my dears! Andrew and I have decided to go without nuts and seeds, at least for a little while, after realizing how much phytic acid we were eating with our nut and seed intake. I had already cut out nuts last fall after getting rashes on my legs and face, but Andrew was having a weird reaction on his tongue (almost like a Geographic Tongue), and after a lot of research we decided that it might be worth a try to cut out the nuts and seeds. And guess what… so far so good! We both feel better without the nuts and seeds, so we’re sticking with it for now. However, that makes grain-free baking increasingly more difficult, since most grain-free baking uses almond meal or sunflower seed meal as a replacement. So I began experimenting with something different: starch. Specifically potato starch and arrowroot starch. I have come to prefer potato starch for baking, as I think arrowroot starch is a little too chewy and has a stronger taste when used in larger quantities. Now, I know there are mixed feelings about potatoes (helllllo carbs… and this is also why I dubbed this “paleo-ish” since for many paleo people white potatoes are a no-no) and therefore potato starch may throw up a red flag for a lot of people, but when we went to Portland we were introduced to an interesting concept. That concept is called Resistant Starch. I’m not going to go into the details here because it is still very new to me and I am no expert, but basically resistant starch can be found in cooled starches such as white potatoes and white rice, and is very beneficial for gut flora and essentially acts as a pro-biotic. You can read more about resistant starch in this article, and this article, but I also recommend you doing your own research. It’s been very fascinating to learn about.
On another note, our little blog here hit over 100 unique visitors for the first time yesterday! Thanks to foodgawker.com for sending people our way. I’m excited to hopefully continue to see this website grow and start reaching more people! I’m really enjoying this new hobby and creative outlet, plus I love working on it with my guy 🙂
Okay, let’s go back to this pumpkin bread. It’s everything you expect from this classic seasonal treat: moist, springy, dense, and spicy. But luckily it’s got none of the bad, guilt-driving stuff that the usual recipe contains. I added chocolate chips because chocolate makes everything better and I adore the combination of chocolate and cinnamon/spice, but that’s up to you! Last night we ate this pumpkin bread topped with my Pumpkin Ice Cream and, oh yes, it was the perfect way to welcome in Autumn. So here you go friends, pumpkin everything is in full swing!
1/2 tsp baking powder (note that baking powder often uses corn starch, so eliminate if this is an issue for you)
1/2 tsp baking soda
1/2 tsp apple cider vinegar
2 tsp cinnamon
1/2 tsp each of powdered ginger, clove and nutmeg
1 tsp vanilla extract
optional: about 1/2 cup of chocolate chips (I use Enjoy Life)
Preheat the oven to 350 degrees F.
Whisk together the wet ingredients (pumpkin, eggs, maple syrup, vanilla, and apple cider vinegar) in a large mixing bowl.
Sift the dry ingredients (coconut flour, potato starch, arrowroot starch, baking powder, baking soda, spices) into the wet ingredients. Sifting removes any lumps in the dry ingredients, and helps lighten up the batter.
Use an electric mixer to thoroughly combine the mixture, until all ingredients are incorporated and the batter is completely smooth.
Fold in the chocolate chips if desired.
Pour the batter into a lined loaf pan (I line mine with parchment paper to ensure easy removal).
Place in preheated oven, and bake for 45-50 minutes, or until the top is cracked and an inserted toothpick comes out clean.
Please note that some of the links in the above post are affiliate links that will take you to an Amazon.com page. If you choose to purchase a product featured in this post using an affiliate link, you will be directly supporting You’re An Animal. Thanks!
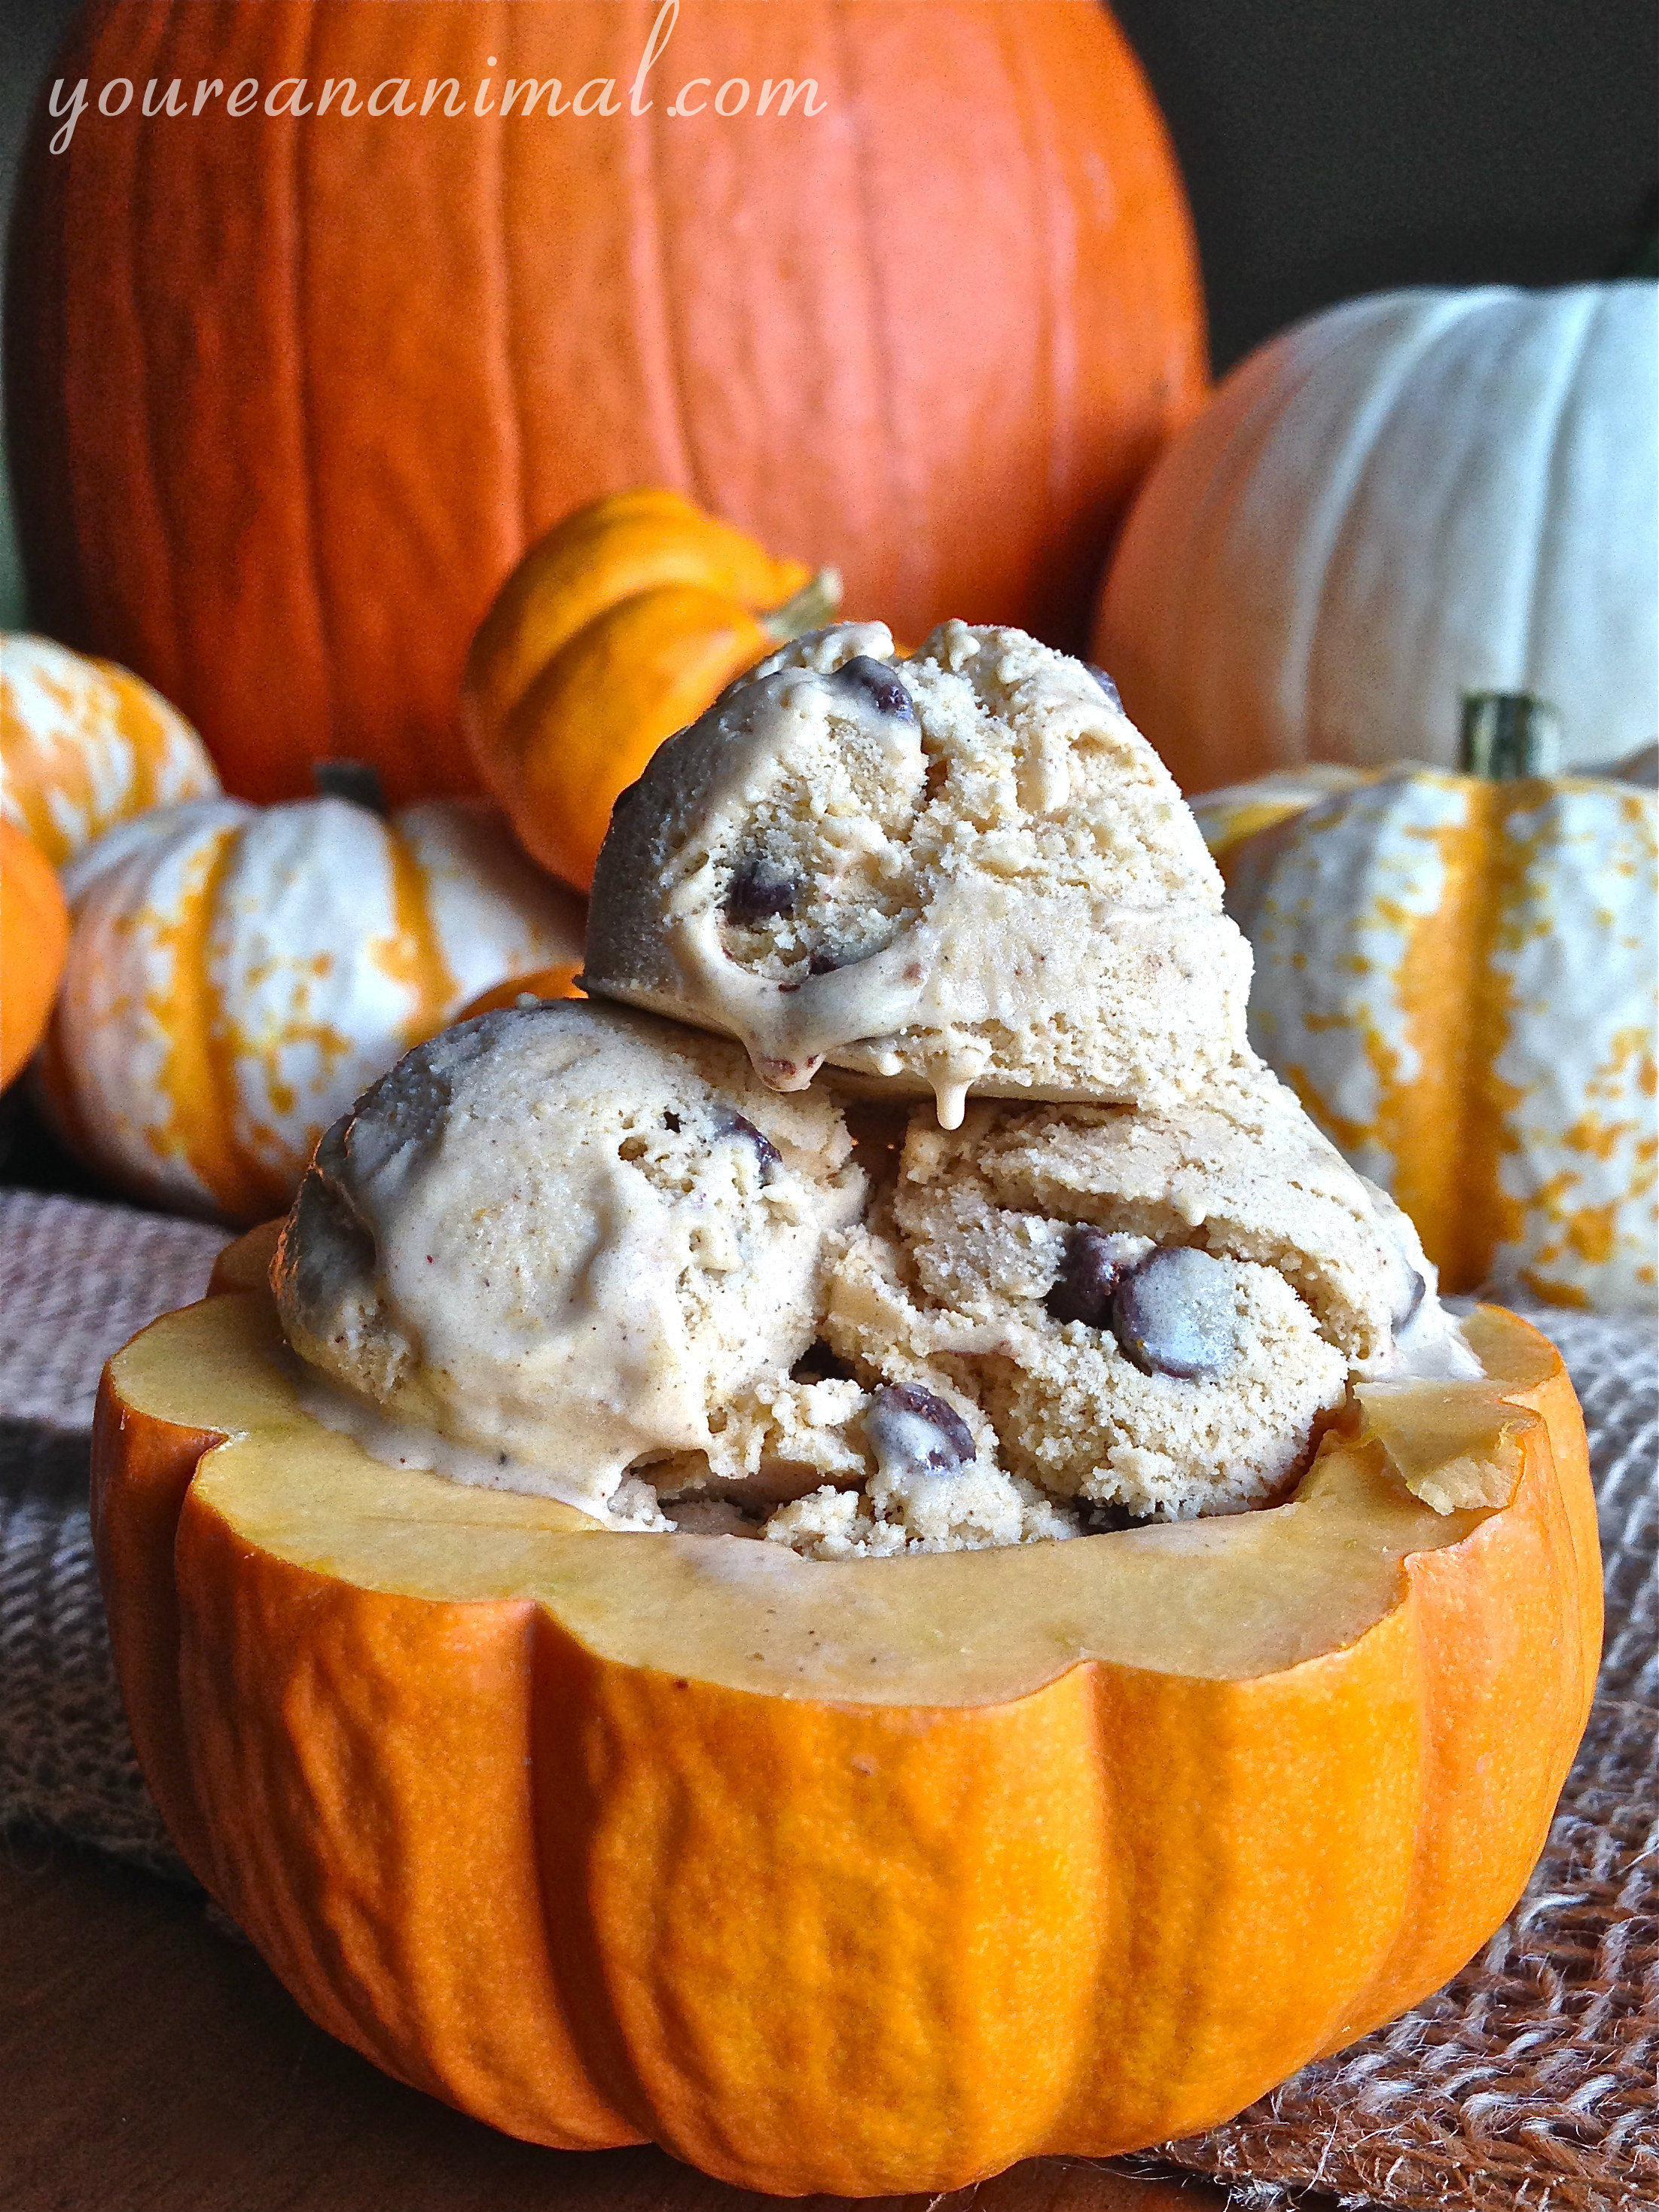
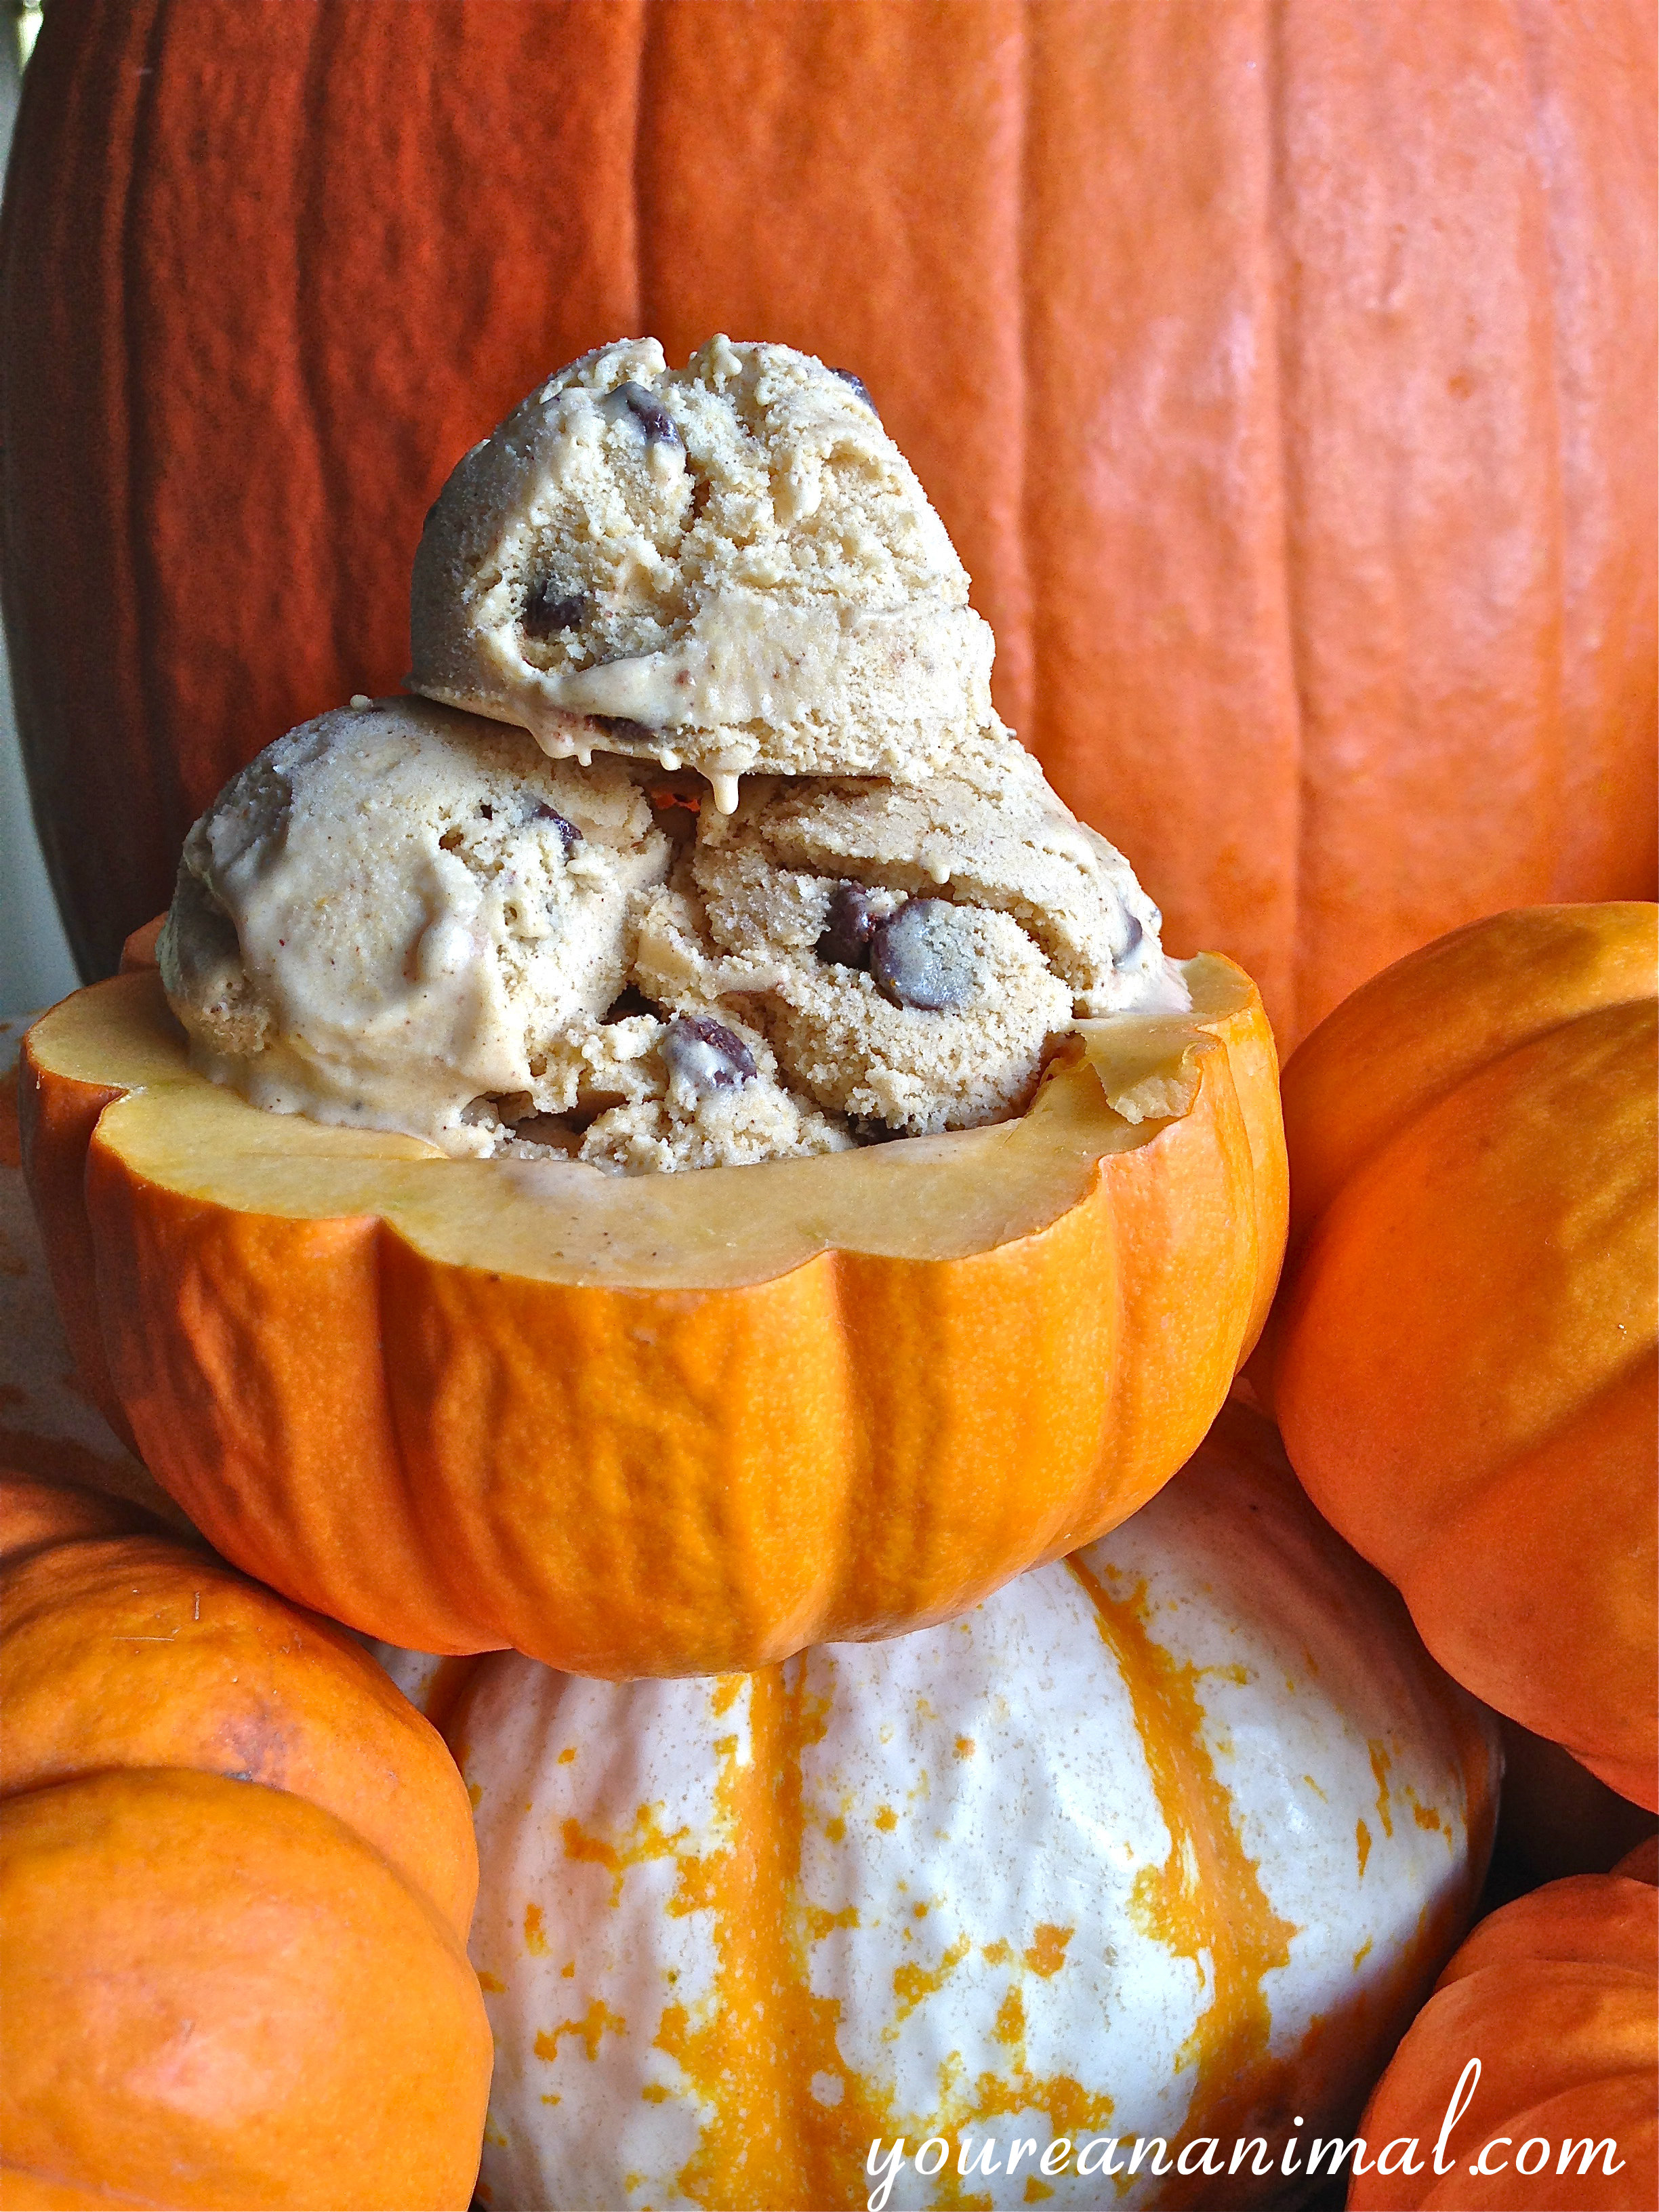
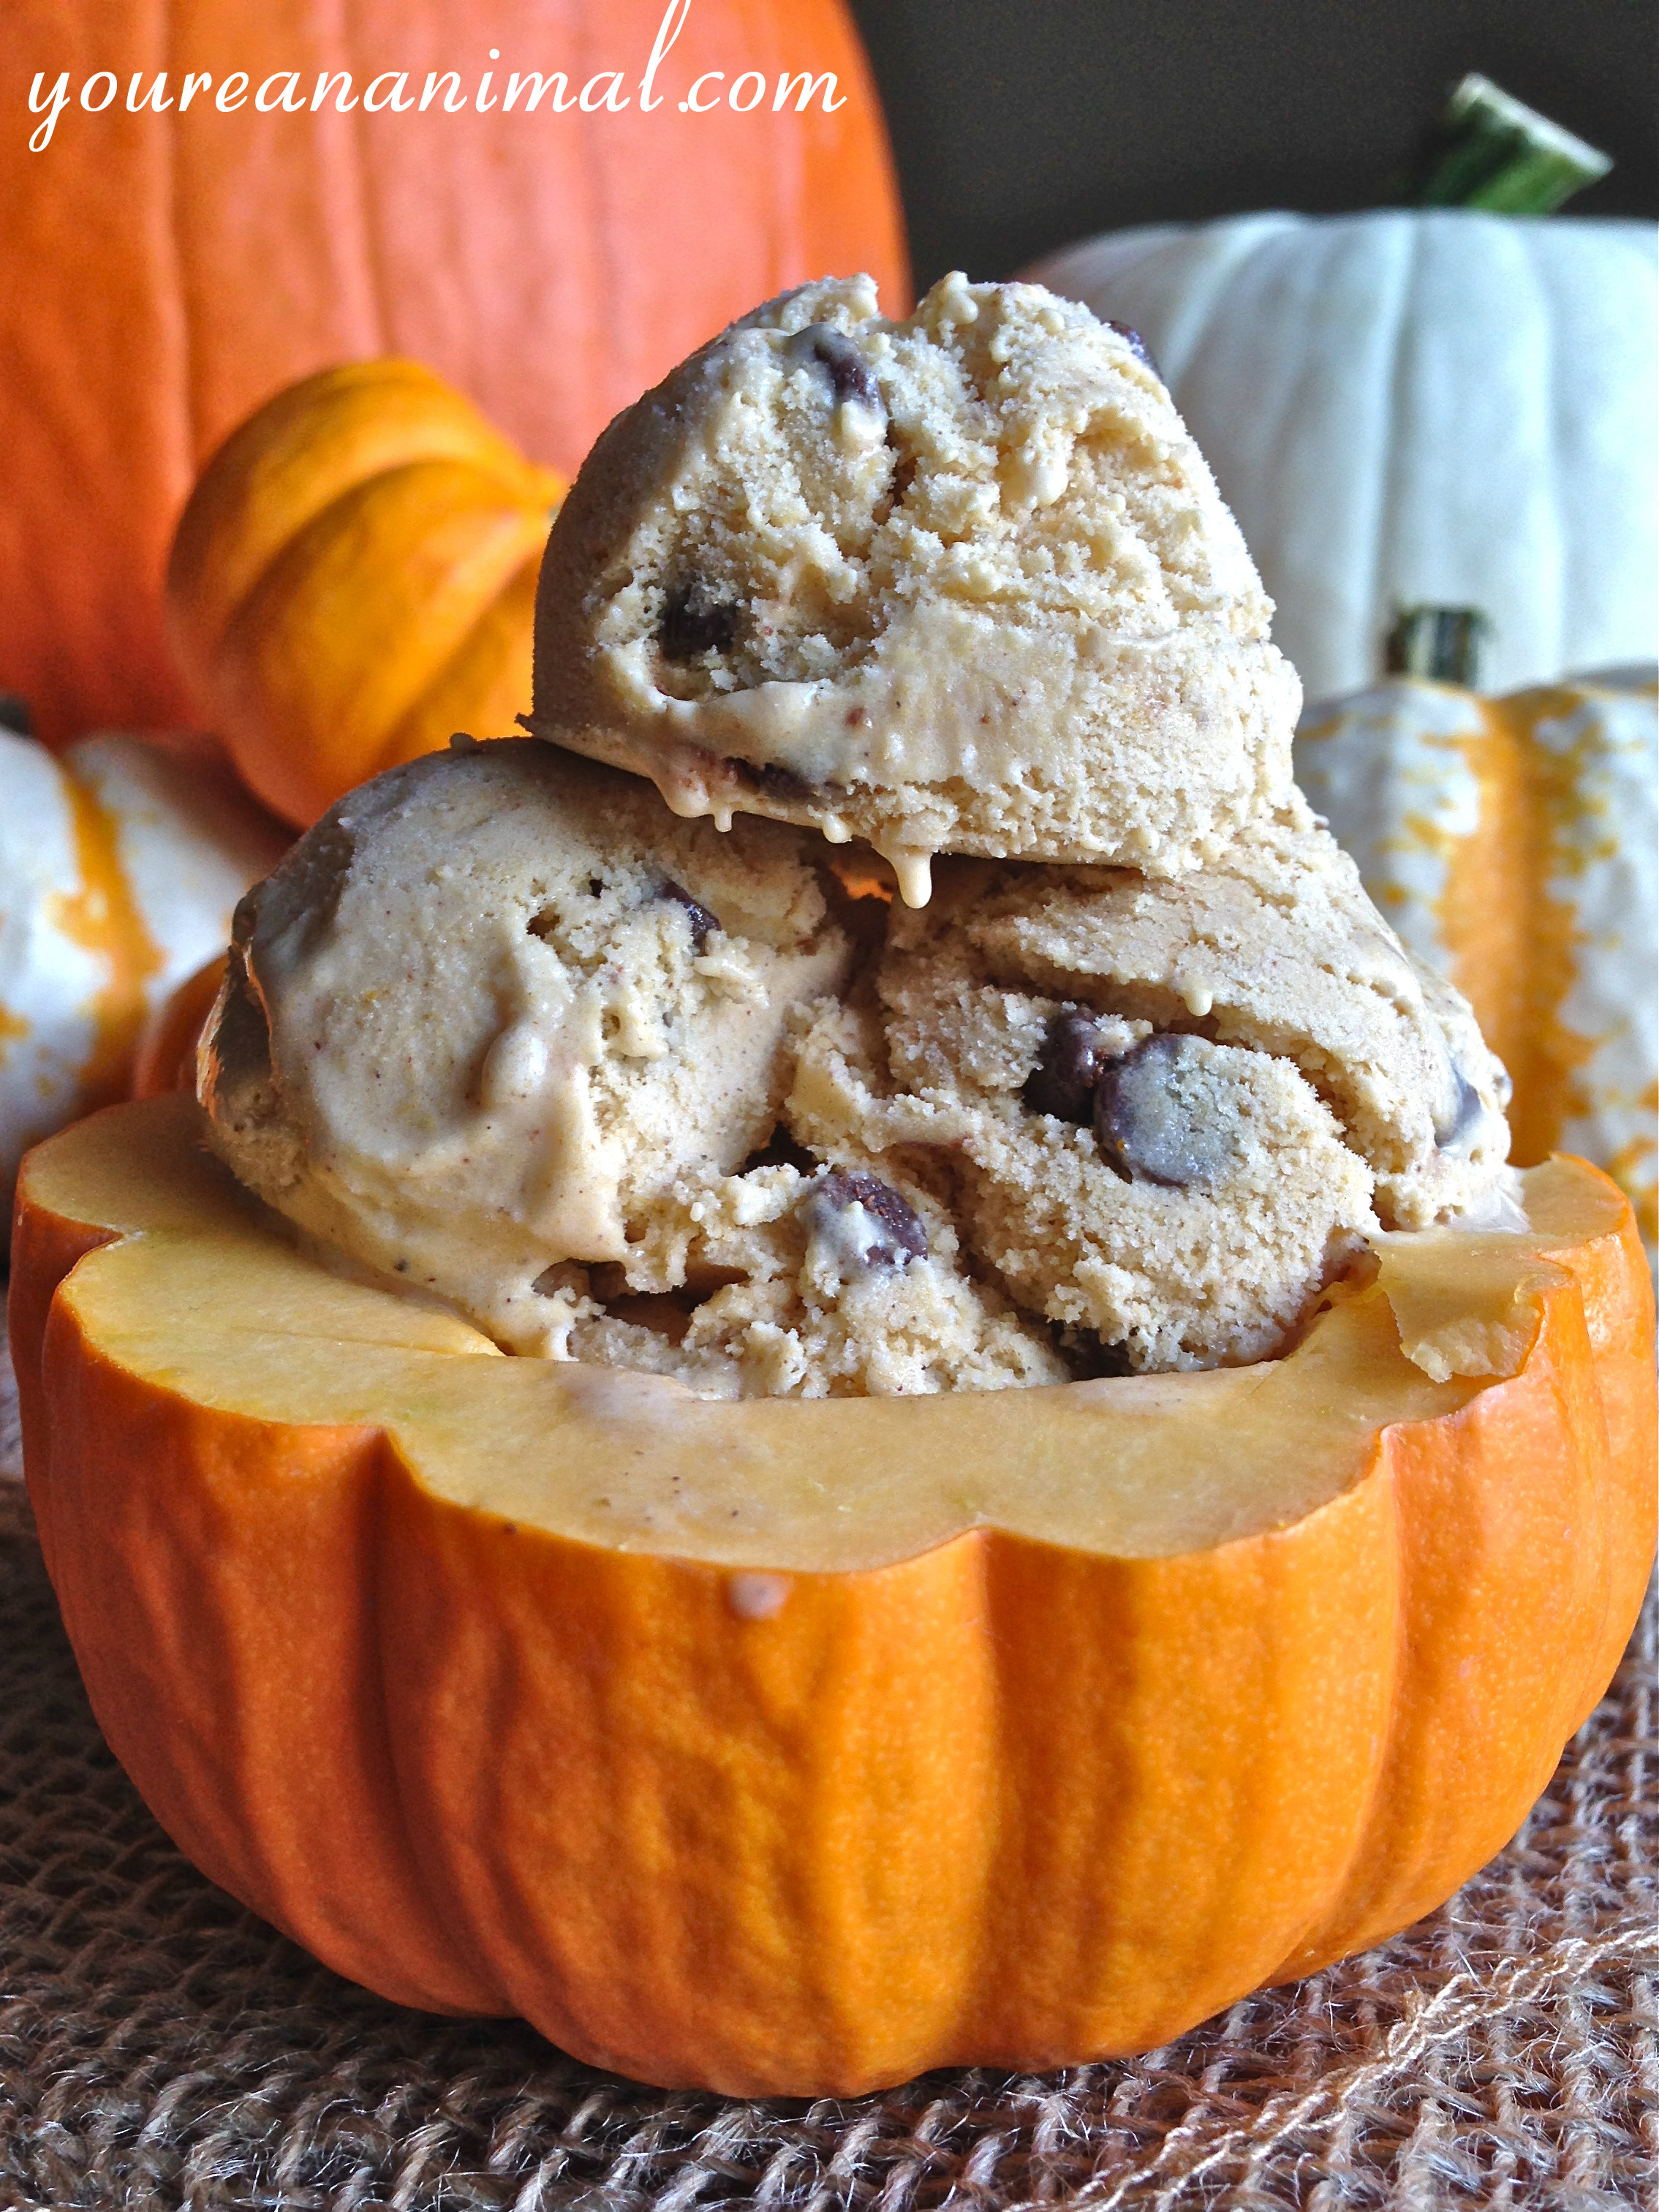
IT’S TIME FOR PUMPKIN EVERYTHING! This trend has grown more and more prevalent in the last couple of years, and I ain’t complainin’. I don’t know why we are all so obsessed with pumpkin season, but I know for me it’s the pumpkin spice combo. Cinnamon, in particular. I love me some cinny-mon. Cinnamon on everything pretty please! I can promise you that while this is the first pumpkin recipe I’ve posted, it most certainly won’t be the last. It’s here, people, it’s here.
Let’s talk about this ice cream. As I mentioned in my Dairy-Free Coconut Ice Cream with Salted Caramel and Chocolate Ganache post, we got this ice cream maker recently and I’m loving it. We haven’t been without ice cream since. I’m sadly (but not so sadly) completely serious. Obviously I had to make my pumpkin recipe debut somehow, and since it’s still currently almost 90 degrees here in VA, ice cream seemed like the way to go. Oh and it was the way to go, my friends, it definitely was. Not to mention allergies are running wild this week (again, darn you VA) so we needed something to sooth our poor wittle scratchy throats. Pumpkin ice cream to the rescue! This stuff is pretty much pumpkin bread in a cold, semi-liquid form. Perfect for those late summer/early fall days when it’s cool at night but still gets toasty during the day. Pumpkin latte for the chilly mornings, then pumpkin ice cream as the day heats up. Sounds like a plan to me! Annnnd it’s dairy-free, so my fellow lactose intolerant (or simply avoiding dairy) people can enjoy freely. And by “freely’ I mean eating the entire quart. Alone. In one sitting. No no, let’s not take it too far. Bring it back in. I know you all have stocked up on pumpkin by now, so go buy some cans of coconut milk while you’re at it, and continue your pumpkin exploration. It’s a lovely, spicy adventure!
Combine all of the ingredients in a medium saucepan.
Heat the mixture over medium heat, stirring frequently, until the mixture is hot but before it boils.
Place the mixture in the fridge (I find it easiest to just put the saucepan directly in the fridge) and let chill for at least 1-2 hours, or longer.
Once completely chilled, strain the mixture through a sieve to remove any lumps and ensure a smooth ice cream. I find it easiest to strain the mixture directly into the ice cream maker.
Process the ice cream in your ice cream maker according to manufacturer directions. If adding the chocolate chips, add them in about 5 minutes before the ice cream is done. Transfer into your storage container. Enjoy!
Please note that some of the links in the above post are affiliate links that will take you to an Amazon.com page. If you choose to purchase a product featured in this post using an affiliate link, you will be directly supporting You’re An Animal. Thanks!
It's time to take care of yourself.
It's time to nourish your wild side.
Are you always spending your energy on everyone else, and have nothing left for yourself? Let us remind you why YOU matter, and why the people in your life deserve to receive your best, healthiest self. Sign up for our newsletter and you'll instantly get a copy of our FREE eBook, Take Control: Your 7-Day Challenge to Reclaim Energy and Reduce Stress. You deserve it!
Nourish Wild, LLC and nourishwild.com is intended for educational and recreational purposes only. Please consult your physician before making any health or lifestyle changes.