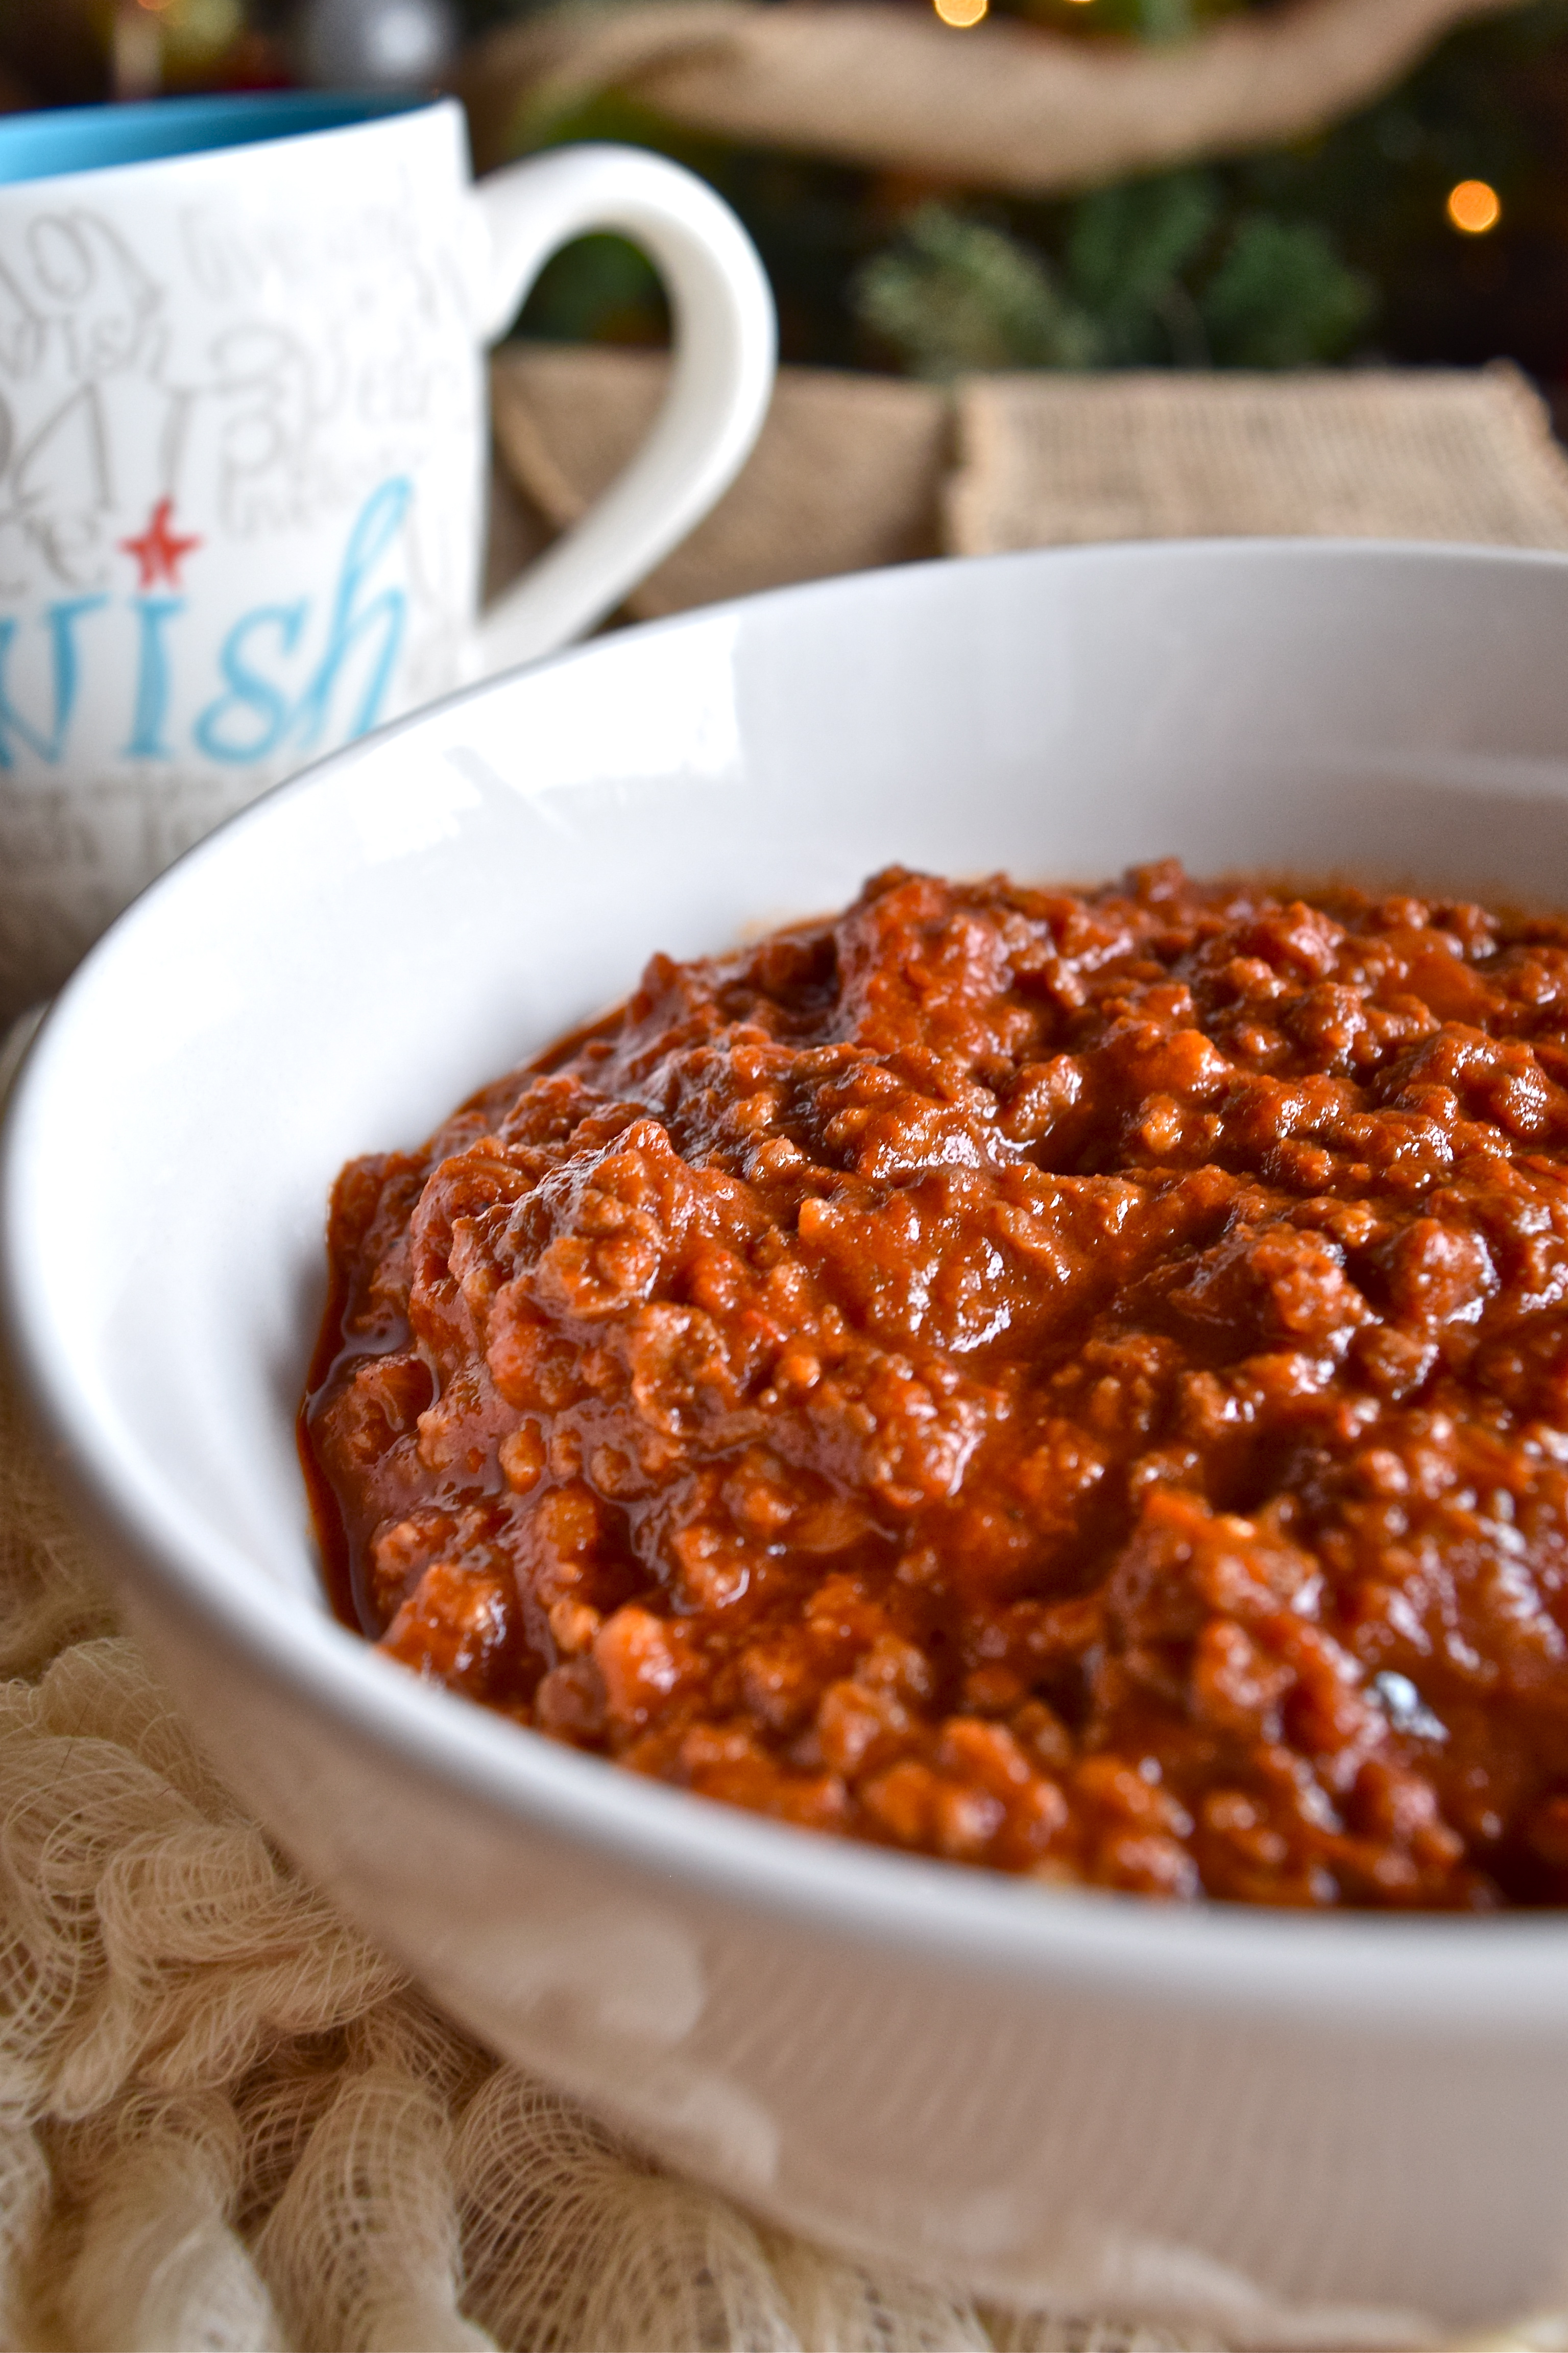
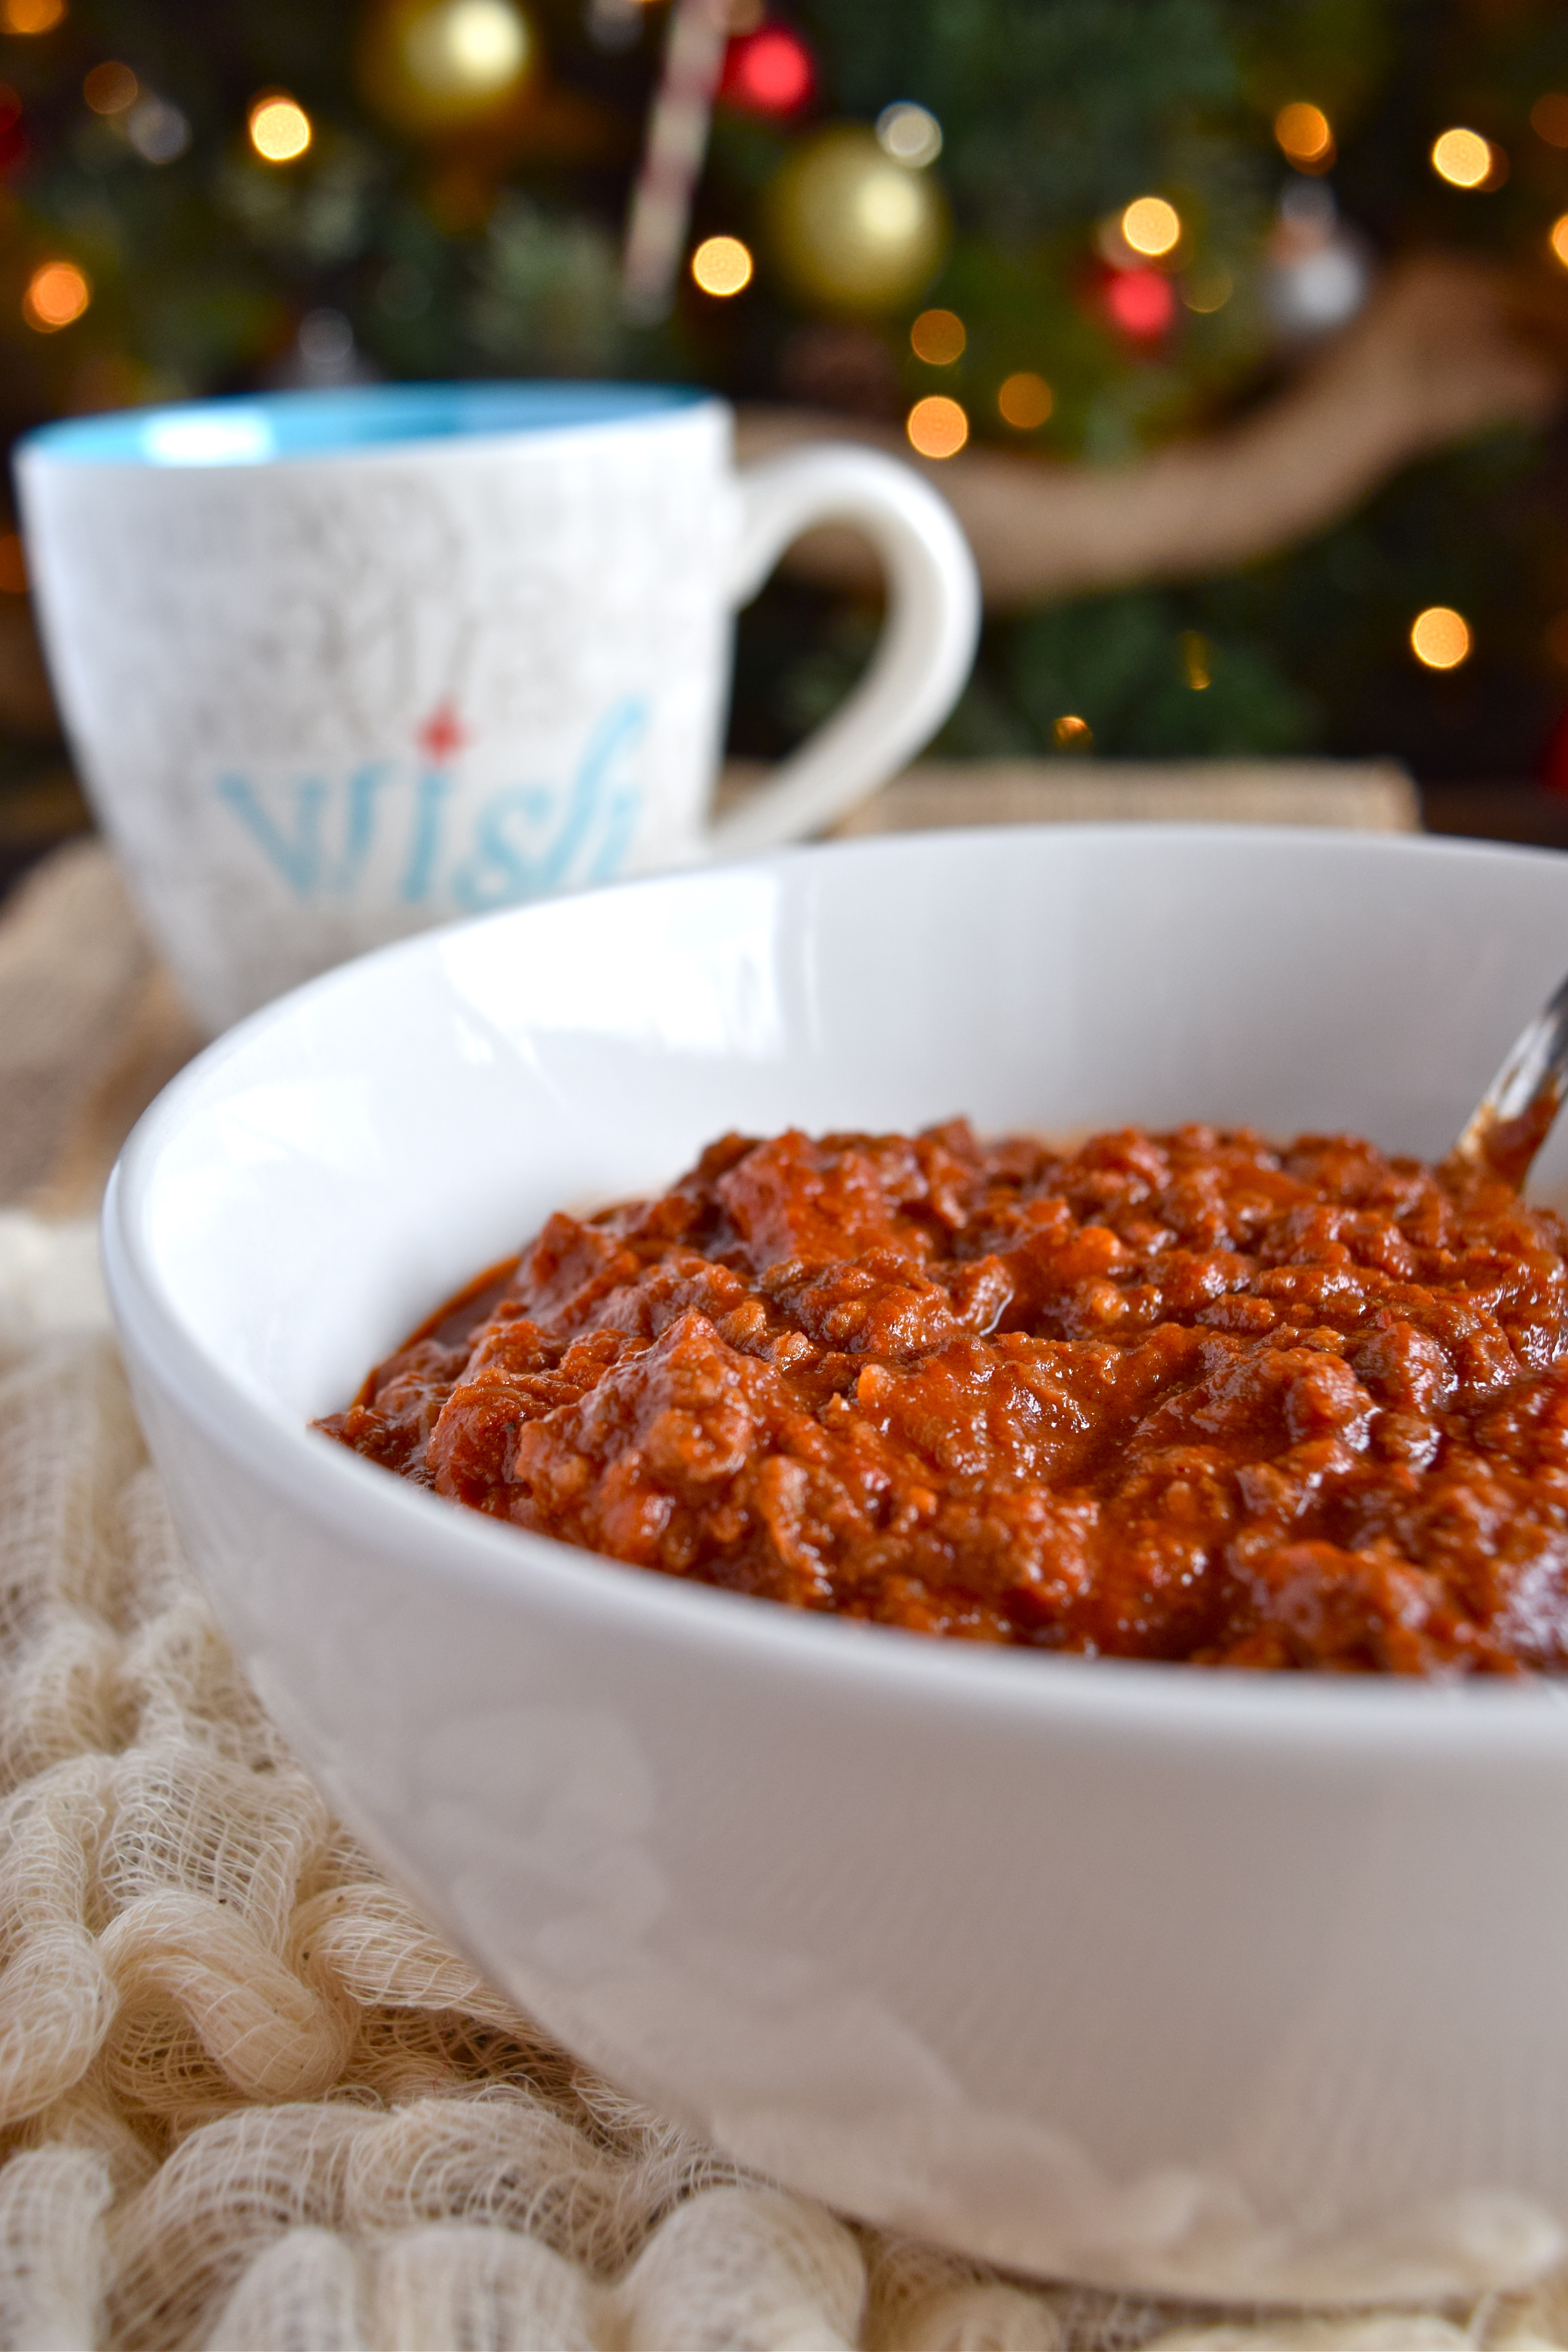
Asian Stir Fry (Soy-Free, Gluten-Free)

Let’s be honest, in most homes (at least here in the US) Chinese food is a weekly staple. Unfortunately, it’s hard to come by junk-free stir fry. Until now… Soy-Free, Gluten-Free, and none of the bad stuff means you can indulge. Filled with veggies, and real stir fry flavor. Don’t worry, the leftovers are just as good as your usual take-out. 

First, let’s address the elephant in the room. It’s been a ghost town the last few months here at YAA. Andrew and I both somehow found ourselves working 3 jobs (yes, I mean 6 total) plus I was taking a class while he was studying for his Health Coach certification. Let’s just say 2015 hasn’t been the most stress-free year so far. Unfortunately, that meant letting some things slide. Things such as our little creative outlet here… and our social lives… and our sanity. Luckily, we’ve moved past that tough spot, survived, and are heading forward. Onward and upward, my friends, onward and upward. Speaking of which, our website will be changing in the next few months! With Andrew getting his Health Coach certification, it’s going to get a makeover to be more focused on his business, which is incredibly exciting! Just you wait.

So what better way to say “we’re baaaack” than with some Asian Stir Fry? I can’t even talk about how much I love Asian flavors. In college, I would say about 4 or 5 out of my 7 dinners per week were Asian flavored. Mostly because it’s relatively easy. Cook some rice, throw some veggies in a skillet, and pour some sauce over it, ta da! Dinner of champions. But ever since refocusing my eating habits and eliminating that processed shtuff that is a usual go-to (I’m looking at you, Kikkoman) I’ve been really disappointed by my Asian flavored attempts. It was never right. Coconut aminos always seemed too sweet, but I wasn’t sure where else to go with it. After pouring over “paleo-fied” Asian recipes, I finally managed a combination that is not just sufficient, it’s amazing. I’m serious. I ate this for dinner last night and for lunch today and I was really, really sad when it was gone. If I had more ingredients to make it (and if Andrew wouldn’t think I was a crazy person) I would make it again tonight.

Soy-Free Gluten-Free Asian Stir Fry

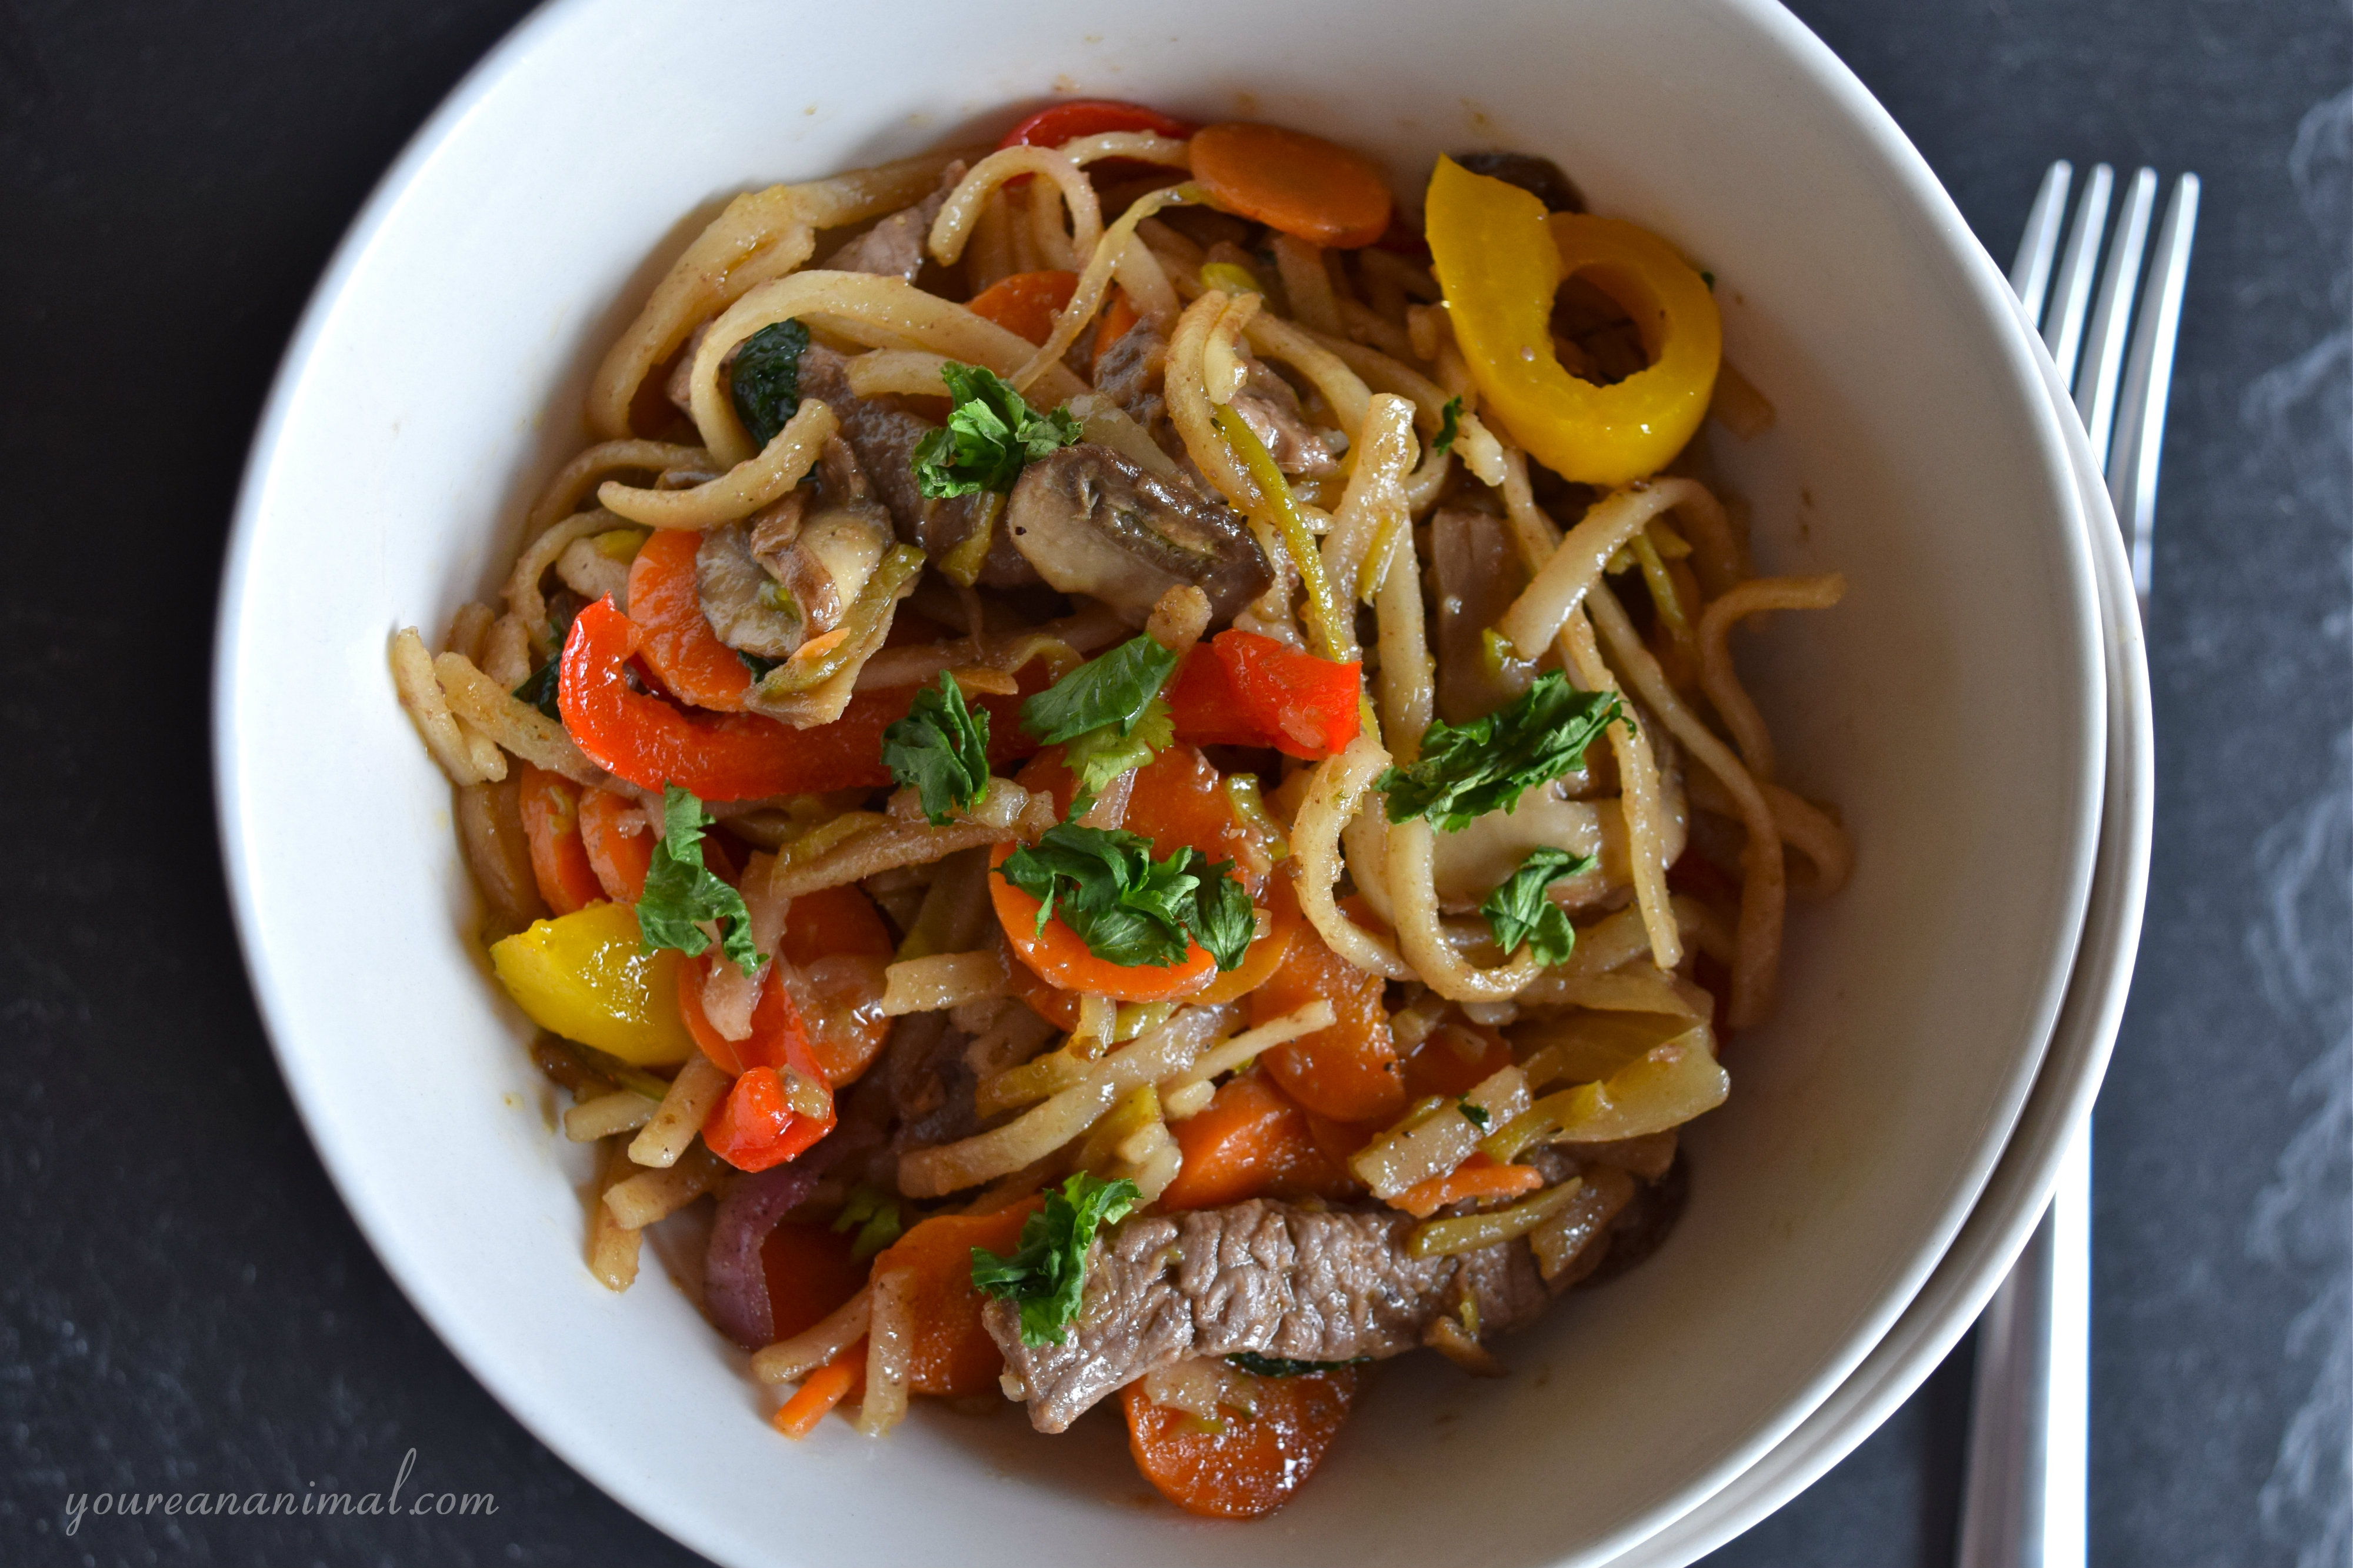
I used rice noodles because I had never used them before and thought it would be yummaayyy (I was right) but you could use regular rice, or no rice at all if you’re into that kind of thang. You could also sub different veggies, or meats. Chicken or shrimp would be perfect as well. Do whatever feels right in that Asian-inspired heart of yours. I topped it was fresh cilantro because we both lurve cilantro and I actually think the flavor adds a lot to this dish, but I know that apparently it tastes like soap to some of you, so ya know, don’t add it if that’s the case. Also, I put grass-fed butter in the sauce because it makes it thicker and creamier and silkier and delishier, but if you want it to be dairy-free, just leave it out.

Eat!

Soy-Free Gluten-Free Asian Stir Fry

Asian Stir Fry

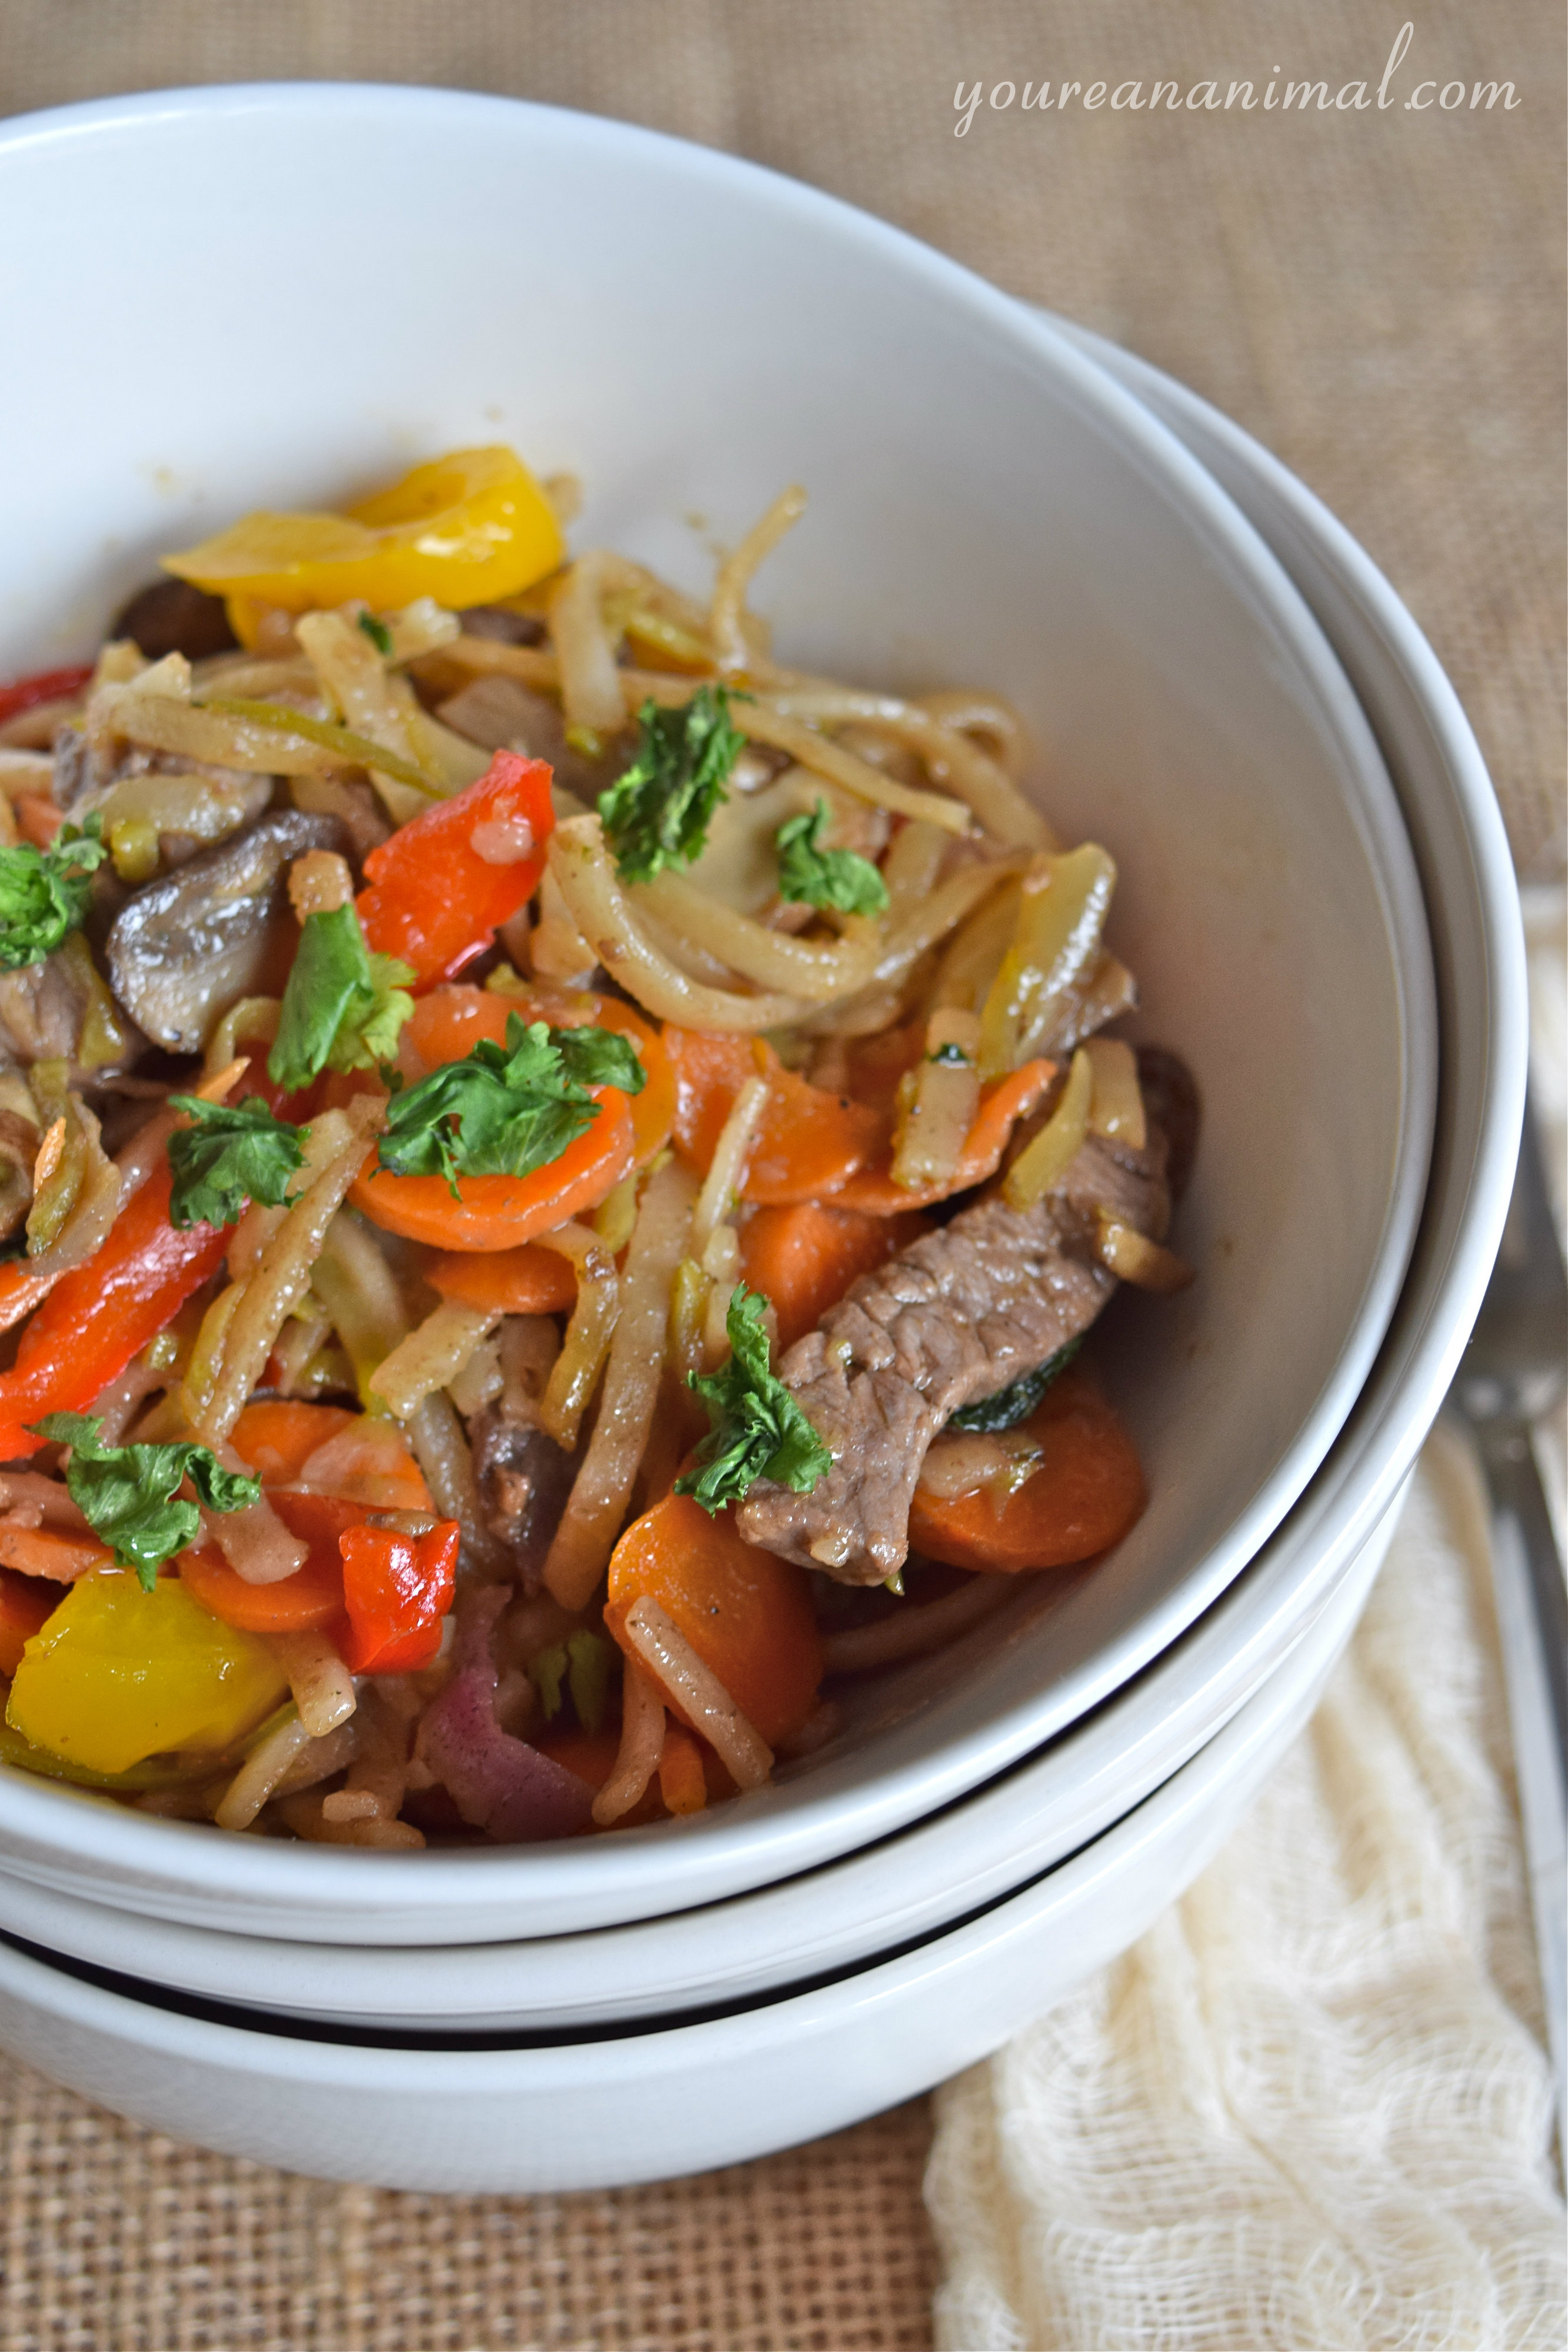
  • 1 lb grass-fed beef (flank steak works well), sliced
  • 1 red bell pepper, sliced
  • 1 yellow bell pepper, sliced
  • 2 medium carrots, sliced into coins
  • 1/2 yellow onion, sliced
  • 1 cup of broccoli slaw (the kind that comes pre-shredded in a bag)
  • 1/2 cup of baby bella mushrooms, sliced
  • 2 cloves of garlic, minced
  • 1/2 cup coconut aminos
  • 1/2 tsp fish sauce
  • 1/2 Tbsp unfiltered honey
  • 2 Tbsp grass-fed butter (I use Kerrygold)
  • 1/2 of a 14 oz box of Asian style rice noodles (make sure rice and water are the only ingredients)
  • 1/4 tsp each salt, black pepper, and ground ginger
  • Avocado or coconut oil to coat skillet
  • Red pepper flakes or hot sauce to taste
  • Fresh cilantro (optional)
  1. In a mixing bowl, combine coconut aminos, fish sauce, honey, garlic, ground ginger,and butter (butter doesn’t need to be melted). Set aside.
  2. Cook rice noodles according to manufacturer instructions. Set aside. Tip: If they seem like they are going to stick together, add some water into the pot/bowl in which they are sitting until you are ready to use.
  3. Add the avocado or coconut oil to a large hot skillet. Saute the beef in the oil until barely pink, and season with salt and black pepper. Remove the meat with tongs and set aside, leaving the residual liquid in the skillet.
  4. To the skillet, add your coconut aminos mixture. Cook this sauce over medium heat at a slow simmer until it starts to thicken. (You will notice that the bubbles seem thicker, this should take about 5 minutes. Don’t let it burn, low and slow is all it needs.)
  5. To the thickened sauce, add all of your veggies (onions, bell peppers, carrots, broccoli slaw and mushrooms). Stir until the veggies are coated in the sauce.
  6. Cook these veggies at medium to medium-high heat, until they are softened to your preference. The onions should be close to translucent.
  7. Add you noodles and meat to the veggies. Toss until thoroughly combined.
  8. Top with cilantro and serve!

Makes 4 servings


Hidden Veggie Muffins (Gluten-Free, Nut-Free, White Sugar-Free)

Can’t get your kids (or your spouse… or yourself) to eat their veggies? These double chocolate chip hidden veggie muffins are the perfect solution. The entire base for these muffins is a mixture of zucchini, carrots and green leaves. Not to mention they’re also gluten-free, grain-free, nut-free, dairy-free and white sugar-free. Oh, and they’re pretty darn tasty… who could resist a double chocolate chip muffin for breakfast?

Hidden Veggie Muffins (Gluten-Free, Grain-Free, Nut-Free, White Sugar-Free). The best way to sneak in some extra veggies is with chocolate!

While I’m not a mom, I have been surrounded by kids for a long, long time. I’ve gone from working as a camp counselor, to a preschool teacher, to a nanny, and there’s one thing I know for sure: it’s hard to get kids to eat green stuff. And for the most part, if the kids won’t eat it, the moms won’t buy it. That makes for breakfasts that are filled with sugary cereals, waffles, pastries… whatever the kid will actually put in their stomach before heading out to school. You can’t let them go hungry, right? Well, I have a solution for you that will hopefully make you feel a little better before putting your kid on the bus. Or putting yourself in your cubicle for that matter. Hidden Veggie Muffins. Actually… Double Chocolate Chip Hidden Veggie Muffins to be exact. A batch of these guys have 1 zucchini, 2 carrots, and 2 big handfuls of green leaves. And I promise you, you can’t taste a single one of them. All you taste is chocolately goodness, and all you see is a kid scarfing down his/her greens without even blinking an eyelash. Oh yeah, that’s a mom win for sure.

Hidden Veggie Muffins (Gluten-Free, Grain-Free, Nut-Free, White Sugar-Free). The best way to sneak in some extra veggies is with chocolate!

Who could resist a chocolate muffin for breakfast? Not I.

Hidden Veggie Muffins

  • 1 small zucchini, roughly chopped
  • 2 full-sized carrots, roughly chopped
  • 2 large handfuls of greens of your choice (baby spinach works great)
  • 2 Tbsp water
  • 1/2 cup + 1/4 cup chocolate chips (I use the brand Enjoy Life as they are allergen-free)
  • 2 pasture-raised eggs
  • 2 Tbsp Grade B Maple Syrup 
  • 2 Tbsp pure cocoa powder
  • 6 Tbsp Coconut Flour
  • 1/4 cup Unmodified Potato Starch
  • 2 Tbsp Arrowroot Starch Flour
  • 1 tsp apple cider vinegar
  • 1 tsp baking soda
  • 1 tsp baking powder (note that baking powder is usually made from corn starch, omit if necessary)
  • 1/2 tsp vanilla extract
  • pinch of salt
  1. Preheat your oven to 350 degrees F, and line a standard-sized (1 dozen) muffin tin with paper liners or liberally coat the pan with coconut oil.
  2. Add your zucchini, carrots, greens, and 2 Tbsp of water to a blender, and blend until it is a puree. This may require scraping down the sides of the blender a few times to get all of the pieces incorporated. When the mixture is a consistent color and texture, it is done. It should be almost like baby food.
  3. Over a double broiler, melt your 1/2 cup of chocolate chips and your 2 Tbsp of maple syrup. Heat and stir until the chocolate chips are completely melted and the syrup is thoroughly combined.
  4. Remove your chocolate/syrup mixture from the heat, and add in your veggie puree. Stir until combined.
  5. To your chocolate/veggie mixture, add your dry ingredients (cocoa powder, coconut flour, arrowroot, potato starch, baking soda, baking powder, salt). Again, stir to combine by either hand or electric mixer. Continue until the batter is a consistent color and texture.
  6. To your batter, add your eggs, vanilla, and apple cider vinegar. Again, stir until thoroughly combined.
  7. Fold in your 1/4 cup of chocolate chips.
  8. Evenly distribute your batter into the 12 cups of your muffin tin. I got about 2 Tbsp of batter per cup.
  9. Bake your muffins for 20-22 minutes, or until the middle of the muffin springs back when touched.

Make 12 muffins

Hidden Veggie Muffins (Gluten-Free, Grain-Free, Nut-Free, White Sugar-Free). The best way to sneak in some extra veggies is with chocolate!


Please note that some of the links in the above post are affiliate links that will take you to an Amazon.com page. If you choose to purchase a product featured in this post using an affiliate link, you will be directly supporting You’re An Animal. Thanks!


Brownie and Mint Chocolate Chip Ice Cream Cake (Gluten-Free, Dairy-Free, White Sugar-Free)

This is a brownie and mint chip ice cream cake treat with great credentials: gluten-free, dairy-free, and white sugar-free. And trust me, you won’t miss any of it. Creamy mint chocolate chip ice cream layered with dense, chewy brownie. Perfect for any celebration… especially a 27th birthday!

Brownie and Mint Chocolate Chip Ice Cream Cake (Gluten-Free, Dairy-Free, White Sugar-Free). Let's celebrate!

Happy birthday to my main man and partner in crime, Andrew! On the 22nd my favorite nutrition nerd turned 27, which of course called for a special birthday treat. He’s not much of cake fan and actually asked for mint chocolate chip ice cream instead, but I decided to take it a step further. Birthdays are supposed to have some form of cake, amiright? When I unveiled this creation, he literally did a happy dance and then threw me over his shoulder. I’d say I succeeded.

Brownie and Mint Chocolate Chip Ice Cream Cake (Gluten-Free, Dairy-Free, White Sugar-Free). Let's celebrate!

Yep, he’s loving it.

photo(3)

If you ask me, mint chocolate chip is the best ice cream flavor, best flavor combination, best thing ever. Add brownie and we’re done here, it’s a wrap. The brownie is dense and chewy, and the ice cream is creamy and fresh, even though it doesn’t have any of the “typical” ingredients. No gluten, no dairy. All the fun. Don’t have a birthday to celebrate? Celebrate any day that ends in a “y.” Done and done. Just make sure you share 🙂

Brownie and Mint Chocolate Chip Ice Cream Cake (Gluten-Free, Dairy-Free, White Sugar-Free). Let's celebrate!

Brownie and Mint Chocolate Chip Ice Cream Cake

Brownie

Mint Chocolate Chip Ice Cream

Chocolate Ganache Drizzle

  1. Start by making a double batch of my Flourless Classic Brownies recipe. Line the bottom of two 8″ round cake pans with parchment paper (I traced the pans and cut out the circles so the paper fit exactly in the bottom of the pan). Coat the bottom and corners of the pan with coconut oil or another fat source, place the paper on top of the oil, then coat the paper with the same oil. You don’t want these to stick! Distribute the brownie batter evenly into the two pans. Bake these brownies at 350 degrees F for about 30 minutes, or until the tops are cracked and an inserted toothpick comes out clean. Place these brownies in the freezer to cool (they need to be cold before you put the ice cream on top).
  2. Next, make the ice cream base. Place all of the ice cream ingredients in a medium saucepan, and stir until completely combined and the egg yolks are broken. Heat over medium-low heat, until the mixture is warm but not hot. Remove from the stove, cover with lid, then place in the fridge to cool for at least 1 hour.
  3. Once the ice cream base is cooled, strain the mixture so there are no lumps, and follow manufacturer instructions for your ice cream maker to make your ice cream. About 5 minutes before the end of the cycle while the machine is still running, add your chopped chocolate chips.
  4. Once your ice cream has finished, evenly distribute the ice cream over the brownies still in the pans. Don’t push the ice cream all the way to the edges of the pans because this will make it harder to remove– leave a gap between the ice cream and pan edges. Place the pans back in the freezer, and let the ice cream harden.
  5. Once the ice cream is hardened, remove both brownie/ice cream cakes from the pan (I just flipped them upside down and they came right out), peel off the parchment paper, and stack them on a plate.
  6. To make the ganache, place the chocolate chips and coconut milk in a double broiler, and heat until melted and combined. Remove from the heat and drizzle over the cake. Enjoy!


 Please note that some of the links in the above post are affiliate links that will take you to an Amazon.com page. If you choose to purchase a product featured in this post using an affiliate link, you will be directly supporting You’re An Animal. Thanks!


Quinoa and Spinach Patties (Gluten-Free)

These meatless (and gluten-free) quinoa and spinach burgers are easy to make in a big batch and freeze. Reheat in only 15 minutes, perfect for when you don’t have time or energy to cook. Plant-based protein and greens in one neat little patty package! Meatless Monday anyone?

Quinoa and Spinach Patties (Gluten-Free). Perfect freezer meal!

These little guys are something I used to make in college a lot, mainly because they freeze and reheat like a dream, so they’re awesome for making a big batch and having them stocked up and ready to go when you don’t feel like cooking. Now, Mr. Meat-Every-Meal Andrew wasn’t through the roof about the idea of a non-meat burger, but even he said it was good, so I’ll take it. I used sprouted quinoa, which is more easily digested than non-sprouted grains, but note that we do still monitor our grain intake. They aren’t something to go overboard with if you want to keep your gut health in check. Oh, and this is also a great way to get some extra greens in!

Quinoa and Spinach Patties (Gluten-Free). Perfect freezer meal!

I particularly like these for lunch. They would pair perfectly with a big, fresh salad. Yuuummm.

Quinoa and Spinach Patties (Gluten-Free). Perfect freezer meal!

Quinoa and Spinach Patties (Gluten-Free). Perfect as a freezer meal!

Quinoa and Spinach Patties (Gluten-Free)

  •  1.5 cups of sprouted quinoa (dry)
  • 3 cups of water
  • 1/2 cup white onion, minced
  • 1 clove garlic, minced
  • 2 eggs
  • 2 Tbsp coconut flour
  • 2 Tbsp potato starch
  • 2 large handfuls of baby spinach
  • 1/4 tsp each salt, black pepper, red pepper flakes, and italian seasoning
  • 1 Tbsp + 1/4 cup avocado oil
  1. In a medium saucepan, combine the dry quinoa and water, and cook as directed on the package until done.
  2. In a large pot, add your onion, garlic, avocado oil, salt, black pepper, red pepper and italian seasoning. Saute until the onions are translucent. Add the spinach and stir until the spinach is wilted.
  3. Once both the onion and quinoa are done, remove from heat and add the quinoa to the onion/garlic mixture in the large pot. To this mixture, add the eggs, coconut flour and potato starch. Mix until thoroughly combined. The mixture should stick together relatively well and should start to form a ball.
  4. Heat the 1/4 cup avocado oil over medium to medium-high heat in a large skillet.
  5. Drop 1/4 cup sized balls of your quinoa batter into the hot skillet, being sure to give each patty space to cook and not overcrowd the pan.
  6. Cook each patty until it is firm, and golden brown on each side. Add more oil to the pan as needed. Repeat until no batter is left.

Makes about 14 patties.


 Please note that some of the links in the above post are affiliate links that will take you to an Amazon.com page. If you choose to purchase a product featured in this post using an affiliate link, you will be directly supporting You’re An Animal. Thanks!


Freezer Meal: Breakfast Burritos (Gluten-Free, Grain-Free)

These powerhouse breakfast burritos are perfect for Sunday Meal Prep! Stick them in the freezer, and heat them up in the morning when you’re ready. With both veggies and protein, they are an easy way to get yourself going on those hectic weekday mornings.

Freezer Meal Breakfast Burritos. Perfect for Sunday Meal Prep! Grain-free, gluten-free

You know those mornings when you get to sit down and have a wonderful, elaborate, healthy breakfast before work or school? No? Me neither. If you’re like me, on the mornings you need to get out the door, you’re scrounging for something that takes little-to-no effort, or can be taken on the go. Oh and yeah… it’s supposed to actually nourish my body for the start of the day. Let me introduce your mornings’ new best friend: the Freezer Breakfast Burrito. If you have about 30 minutes to spare on your Sunday afternoon, you can get yourself ready for every morning of the week mindlessly and painlessly.

Freezer Meal Breakfast Burritos. Perfect for Sunday Meal Prep! Grain-free, gluten-free

Wrap these guys up in foil, stick them in the freezer, and then the night before you want to eat one (or two), put it in the fridge overnight to thaw. This will save you precious reheat time in the morning. Ten minutes of reheat time before you head out the door (or if you’re like me, once you get to work) and voila, you’re good to go to start your day!

Freezer Meal Breakfast Burritos. Perfect for Sunday Meal Prep! Grain-free, gluten-free

Tell me that doesn’t look like something you want to eat in the morning sun. Peppers, bacon (!), potatoes, and kale all wrapped up in the grain-free, egg-based tortilla. I think that’s also spelled b-r-e-a-k-f-a-s-t.

Freezer Meal Breakfast Burritos. Perfect for Sunday Meal Prep! Grain-free, gluten-free

Breakfast Burritos

  • Grain-Free Tortillas (from Stupid Easy Paleo):
    • 4 eggs
    • 1/2 cup of your choice of starch (arrowroot, tapioca or potato… I use potato because it has a mild flavor)
    • 2 tsp of coconut flour
    • 3 Tbsp water
    • 1 Tbsp olive oil
    • 1/4 tsp each of garlic powder, onion powder, salt, and black pepper
  • 2 cups of diced white potatoes (diced into about 1/2 inch chunks)
  • 6 slices of nitrate-free bacon (sliced into about 1/2 inch pieces)
  • 6 mini sweet peppers sliced into 1/4-1/2 inch pieces (or 1 large green, yellow, orange, or red bell pepper)
  • 2 handfuls of baby kale
  • hot sauce to taste (I used about 2 tsp) (I use Frank’s Hot Sauce)
  • 1/4 tsp each garlic powder, onion powder, salt, and black pepper
  • Avocado oil or olive oil to coat pan
  1. Heat a large skillet with your avocado or olive oil over medium-high heat. Add your diced potatoes to the skillet, and allow them to start to cook.
  2. Next, work on the tortillas. In a large mixing bowl, combine all of your tortilla ingredients. Use an electric mixer to combine the ingredients, in order to most effectively eliminate the lumps from your mixture, until very smooth but not to the point of frothing the eggs.
  3. Use a 10-inch, non-stick skillet to make the tortillas. Heat the skillet on medium heat. Once heated, pour about 1/4 cup of the tortilla batter onto the skillet, and roll the batter around in the skillet so it is evenly coated (like making a french crepe). Cook about 1 minute on each side, until lightly browned. The edges will curl away from the pan. If you have any issues with this process, you can refer to the original recipe and instructions for these tortillas here. This will make 6 tortillas.
  4. As you are working on the tortillas, check on the potatoes. As they are starting to brown and soften slightly (about 5-10 minutes into the cooking process), add your sliced peppers and sliced bacon. Allow these to cook, letting the peppers soften and the bacon crisp, stirring occasionally.
  5. Once your potatoes, peppers, and bacon have cooked to desired texture, add the hot sauce, garlic powder, onion powder, salt, pepper, and kale to your mixture. Stir to combine, until the kale wilts into your mixture.
  6. Evenly divide your potato/pepper/bacon/kale mixture onto your tortillas. Roll into burritos (they will be relatively small in size).
  7. To make it a freezer meal: Wrap your burritos in tin foil, and store in the freezer. The night before you want to eat one, place your burrito in the refrigerator and allow to thaw overnight. In the morning, set your oven or toaster oven to 400 degrees F. Place your foil-wrapped burrito in the oven for 10 minutes. Now run off to whatever you’re (almost) late for!

Makes 6 burritos

Freezer Breakfast Burritos. Perfect for Sunday Meal Prep! Grain-free, gluten-free


Chocolate Covered Peppermint Marshmallows (Made with Honey)

peppermint-marshmallow

This is a Christmas post, coming to you on December 30th. It was fully intended to be in perfect holiday timing, ready for you to make and take to your favorite host or hostess and share with your family and friends. However, last Tuesday, the 23rd, when I intended to create this post, I instead woke up with the flu and was completely derailed. No website, no last-minute Christmas errands, just me and my couch, my two blankets, my hoodie, and copious amount of Turmeric Tea. So now it is coming to you, in fully restored health, an entire week overdue. But, better late than never, right? It’s almost New Year’s Eve, and this would still make the perfect host/hostess gift. Use up the last of those candy canes, and indulge in one last sweet treat before the bewitching day of January 1st when the gyms are full of wide-eyed people looking to make a change, and healthy cookbook sales skyrocket.

peppermint-marshmallows2

Speaking of which, I should mention that this will be the last sugar-laden recipe I make for a little while. Sugar has always been my downfall, and I have tried and tried to give it up. However, the restrictive nature of a “detox” always makes me want it even more. So I’ve decided to take a different approach. Instead of telling myself that I am not making sugary treats, I have decided to see it as an opportunity to explore new recipes… you know, with actual veggies and meats and… stuff. I’ve always been a baker, but I want to try my hand at more actual “cooking.” And so, with the turn of the calendar, I start that adventure. Yay!

peppermint-marshmallows3

As for this recipe, making marshmallows probably sounds totally daunting and not worth it. But I can promise you, it is so much easier than you would think. And when you realize how much crappy HFCS and other who-knows-what ingredients go into your store-bought marshmallows, making your own, with just honey, water and gelatin, seems like the obvious choice. Homemade marshmallows, if you’ve never had them, are incredibly light and delicate. As trite as it may sound, they actually do just melt in your mouth. I love this version, because my favorite flavor combination is chocolate and peppermint. There is just something about that combo that says “holidays” for me. This is very reminiscent of chocolate bark, which is a beautiful holiday tradition in itself. Not to mention that all of your fellow guests will be totally impressed that you made your own candy. Who does that? You do, of course!

peppermint-marshmallows4

Chocolate Covered Peppermint Marshmallows

This recipe is adapted from this one by Urban Poser. If you have any issues, she has many trouble-shooting tips that can be very helpful.

  • 1 cup unfiltered honey
  • 1 cup water
  • 2.5 Tbsp powdered gelatin
  • 1 tsp vanilla extract
  • 1/2 tsp peppermint extract
  • 8 candy canes, crushed (I used TruJoy candy canes, which are organic, corn syrup free, and colored with fruit juice)
  • 1.5 cups of chocolate chips, finely chopped (I use Enjoy Life, allergy-free chocolate)
  • Note: you will need a candy thermometer for this recipe
  1. Line an 8×8 inch baking dish with parchment paper.
  2. In a large mixing bowl, add your gelatin, and 1/2 cup of water. Allow this to sit while you work with your sugar mixture. Also, have an electric hand mixer ready to go for when your sugar is ready.
  3. To a medium saucepan, add your other 1/2 cup of water, and all of your honey. Turn the heat up to medium-high, and bring to a boil. The mixture will foam up significantly, so be very careful to not let it boil over. If it starts to get to close to the top, remove from the heat briefly. Stir consistently.
  4. Using a candy thermometer (very important, you cannot do this without one. But good news is you can get one cheap at Walmart!), bring your sugar/water mixture up to the “soft ball” level, or 240 degrees F. This will take between 15-30 minutes. Continue stirring your mixture throughout the entire process, you do not want it to burn on the bottom. Watch your temperature very closely.
  5. As soon as the temperature is exactly at the “soft ball” mark, remove it from the heat. Immediately start to drizzle your sugar mixture over the gelatin, and mix the two together with your electric mixer on medium. This is a relatively delicate process, because this means you are pouring hot, liquid sugar with one hand, and are using the electric mixer to mix the ingredients with the other. Slowly pour in all of your sugar, in a thin stream, until it is all in your bowl.
  6. Now use your electric mixer, on high, to combine the gelatine and sugar. This process will take about 5-10 minutes, but as you continue to mix and incorporate, you will notice that the mixture will begin to froth up, slowly lighten in color, and then thicken into a fluff. Even if it seems like it isn’t doing anything in the beginning, just keep going!
  7. Continue to mix until you have a fluffy, marshmallow-like texture. There will be ripples in your fluff, and it will easily coat your finger. At this point, add the vanilla extract, and peppermint extract, and continue to mix until combined.
  8. Once you mixture is the consistency of marshmallow fluff, use a rubber spatula to transfer the mixture into your parchment-lined baking dish. Evenly distribute the fluff, and allow to sit for at least 2 hours, or until completely set. Note that this will be VERY sticky, even once set. Do not touch the top. (If you do, it will be like when Clark gets tree sap on his fingers in Christmas Vacation. Yep, I just went there.)
  9. Once your mixture is set, use a pizza cutter to cut the marshmallows into equal-sized squares (whatever size you prefer). Again, the marshmallows will still be VERY sticky, so it may be helpful to grease the pizza cutter, or your fingers. However, you want them to remain sticky so you can easily coat them, so try not to get the marshmallows too oily.
  10. Add the chopped candy canes and chocolate into a large bowl and combine. In small batches, add the marshmallows to the candy cane and chocolate mixture, and toss to coat. Repeat until all of the marshmallows are coated. Store in a jar or Tupperware container, and enjoy!

peppermint-marshmallows5

No-Bean Chili

no-bean-chili

Ah chili. The most soul-warming, hearty meal around. In college, I made chili often in the winter because it was cheap to make. I made it meatless with a store-bought packet of who-knows-what, a can of tomato sauce and a can of beans, and it was ready in 10 minutes after just throwing everything in a pot and heating it up. It got the job done, but little did I know the damage those kind of nutrient-lacking meals were doing to my body. Now, I’m cooking a tastier, healthier, heartier chili that is full of grass-fed meat and a bunch of veggies. The perfect meal to curl up next to the Christmas tree and snuggle up in a blanket with.

no-bean-chili

This is a completely customizable recipe. Change out the meat (turkey, chicken), add different veggies (squash, zucchini), make it spicier… whatever chili means for you! The reason we skipped out on the beans, however, is because beans are not that great for our intestinal system. You know what kind of reputation beans have, don’t you? Well, when a food creates an uncomfortable situation, it often is a signal that your body is having a hard time processing it. And for me, well, beans and I definitely do not get along. As we all know, all bodies are created differently, but if you’re interested in reading more about the potential harm of legumes, you can check out this write up, or do a google search about legumes and “leaky gut”!

No-Bean Chili

  • 1 lb grass-fed ground beef
  • 1 small onion, minced
  • 2 cloves of garlic, minced (check out how to prepare garlic to maximize the health benefits here)
  • 2 stalks of celery, chopped to your size preference
  • 2 carrot sticks, chopped to your size preference
  • 1 green pepper (or 5 mini sweet peppers), chopped to your size preference
  • 1 cup chicken stock, or bone broth
  • 1 16oz can of tomato sauce
  • 1 8oz can of tomato paste
  • 2 Tbsp dark chili powder
  • 1/2 Tbsp cocoa powder
  • 1/2 tsp each: paprika, cumin, ground yellow mustard
  • 1/4 tsp each: salt, cinnamon
  • cayenne to taste
  • 2 Tbsp grass fed butter
  • 2 Tbsp olive oil
  1. Heat the olive oil and butter in a large sauce pot (one that has a lid) at medium/high heat.
  2. Add all chopped veggies (celery, carrot, pepper, onion, garlic) to the heated oil. Saute for 2-4 minutes, or until they just start to soften.
  3. Add the meat and all of your spices to the veggies. Brown the meat through, chopping with a spoon or spatula as it cooks to break up the meat and allow it all to get cooked evenly, and to distribute the spices. Saute until the meat is crumbled, and no pink remains.
  4. Add the chicken stock, tomato sauce, and tomato paste. Stir until combined.
  5. Reduce the heat to low, cover the pot, and allow the flavors to meld for at least 10 minutes… but the longer it sits, the better the flavors combine.

Makes approximately 4 servings.

DSC_0048

Fluffy Banana Pancakes (Grain-Free, Nut/Seed-Free)

DSC_0020

Sunday morning meant a pancake breakfast for my entire childhood. My dad was up every Sunday, making pancakes for the whole family, even if it was before a soccer tournament or family event. So now, although I don’t do it every week, I often will make a Sunday pancake brunch. It’s been quite a journey over the past year or so, trying to cut out grains and then also realizing I needed to cut out nuts and eventually seeds as well. I have one recipe, my 3 Ingredient Protein Pancakes, which was good for a while and is still a great recipe for those who can eat nuts or seeds. But unfortunately for us, it just isn’t a good choice anymore. Even using Sunbutter got to be too much for us, and Andrew was having a reaction on his tongue when he would eat too much. We think it was due to the high levels of phytic acid in sunflower seeds. But we still craved a pancake brunch, so I decided to go another direction that uses coconut flour and arrowroot starch instead.

DSC_0006

I know that some people still can’t have coconut, but for us it’s been okay– at least much better than almond flour or sunbutter. These pancakes did not disappoint! Fluffy, yet dense at the same time, these pancakes are filling and satisfy that brunch craving perfectly. I like to add cinnamon, chocolate chips, and a little pure maple syrup… I think it’s the perfect complement to the banana flavor. You know what else would go great with these though? Mimosas, that’s what.

DSC_0010

These also would make a great Christmas morning treat. Since I can’t stop thinking about Christmas. Falalala. Don’t you just want to demolish that stack?

DSC_0033

Fluffy Banana Pancakes

  • 4 pasture-raised eggs
  • 2 medium bananas
  • 3 Tbsp Coconut Flour
  • 1 Tbsp Arrowroot Starch
  • 1 tsp baking powder (Note that baking powder often has cornstarch in it. If this is an issue for you, use baking soda instead.)
  • pinch of salt
  • pinch of cinnamon
  • grass-fed (Kerrygold) butter to grease skillet
  1. Add all of the ingredients (except the butter) to a large mixing bowl. Mash the bananas roughly with a fork. Then use an electric hand mixer to thoroughly combine your ingredients into a smooth batter. The batter should be about the consistency of a muffin batter. You may have a few chunks of banana.
  2. Heat a small non-stick skillet over medium-low heat. Add a small slice of butter to your heated skillet, and allow it to melt.
  3. Once the butter is melted, add about 1/4 cup of batter to your skillet.
  4. Cook the first side of your pancake until the edges become dry looking, and the underside is golden brown. Flip with a spatula, and repeat on the second side until both sides are golden brown.
  5. Remove your first pancake and place on a plate to rest. In between pancakes, I like to wipe the skillet down so the excess butter will not burn, and remove the skillet from the eye to let the pan cool down for just a few seconds. This helps to not burn the next pancake.
  6. Repeat the process until the batter is gone. Add more butter with each new pancake.
  7. Top with your choice of add ons, and enjoy!

Makes 6-7, 5″ pancakes

DSC_0032


Please note that some of the links in the above post are affiliate links that will take you to an Amazon.com page. If you choose to purchase a product featured in this post using an affiliate link, you will be directly supporting You’re An Animal. Thanks!


Flourless (Pea)Nut Butter Blossom Cookies (White Sugar-Free)

DSC_0034

Tis the season for Christmas cookies! I love making Christmas cookies, and when I asked Andrew what his favorite Christmas cookie is, he said “the peanut butter ones with the Hershey kiss in the middle.” Aka Peanut Butter Blossoms. Well, to be honest I’ve never made those before, so I don’t even know what the “normal” recipe is. But I do know that they often use some kind of flour, and they have a big ol’ processed chunk of chocolate in the middle. So in keeping with tradition, I used peanut butter and then subbed in coconut palm sugar to create an updated Peanut Butter Blossom. Now, that being said, we rarely (and I mean pretty much never) eat peanut butter. The main reason for this is because peanuts are highly inflammatory. The omega-6 to omega-3 ratio is off the charts. Not to mention peanuts have a reputation for harboring all kinds of mold and fungi. Yuuuu-mmy. So if you’d rather not use peanuts, you can certainly use any other kind of nut butter. Almond butter would work perfectly, and so would Sunbutter. This is your cookie, eat it the way you want! Whatever you use though, get a kind with nothing added. If possible, go to a store like Whole Foods that has it’s own peanut/almond grinder, that way you know for sure that you’re only getting the ground nut in your butter.

Oh hey, by the way, we put up our Christmas decor! Gotta love Gnomie.

photo(3)

Image from Instagram. Follow us at youreananimal

And also, I got a snazzy new DSLR camera for my birthday! Thanks mom and dad! I have no idea how to use it properly yet, but check out that picture quality:

DSC_0058

Also, did I mention these cookies only have 5 ingredients? Because they do. Which makes them simple, yet scrumptious. Chewy, dense, and full of flavor. Everything you want from your Christmas cookie!

DSC_0016

Nomz. I know Santa wouldn’t mind a big plate of these waiting for him next to the stockings. He needs some protein for all of those toy deliveries, right?

DSC_0050

Flourless (Pea)Nut Butter Blossoms:

  • 1 cup nut butter of your choice
  • 1/2 cup Coconut Palm Sugar
  • 1 egg
  • 1/2 tsp baking soda
  • Enjoy Life Mega Chunk chocolate chips (at least enough for 1 per cookie)
  1. Preheat your oven to 350 degrees F and line a baking sheet with parchment paper.
  2. In a large mixing bowl, combine all of your ingredients until one consistent texture. The dough will be sticky.
  3. Form balls of cookie dough, about 2 teaspoons of dough each. You should get close to 20 dough balls.
  4. Place each ball of dough on your parchment-lined baking sheet, leaving at least 1-2 inches of space in between.
  5. Bake for 10-12 minutes, until golden brown and cracked.
  6. Immediately after removing them from the oven, press a chocolate chunk into the middle.
  7. Allow to cool, and enjoy!

Makes about 20 cookies.

DSC_0067


Please note that some of the links in the above post are affiliate links that will take you to an Amazon.com page. If you choose to purchase a product featured in this post using an affiliate link, you will be directly supporting You’re An Animal. Thanks!


Grain-Free Drop Biscuits: Thanksgiving Cleaned Up Part 4

thanksgiving43

Thanksgiving is such a wonderful day. No presents, no pressure, just an abundance of food and family. But Thanksgiving can be a minefield of gluten-filled carbs, and sugar-overload. So in this series of “Thanksgiving Cleaned Up,” I’ve taken some classic Thanksgiving staple foods and made them a little bit less detrimental. You can check out my other posts, Sweet Potato Casserole, Garlic Kale Mashed Potatoes, and Pinot Noir Cranberry Sauce and have yourself a slightly less guilty, but certain not less hearty, Thanksgiving feast! Wonderful additions to this series would be my Autumn Salad and my Grain-Free Pumpkin Bread!

thanksgiving6

These biscuits are super easy to make (although they do require a little bit of clean up), and I pretty much always have the ingredients on hand. For that reason, they have become a weekend brunch go-to in our house. But they also fit right in while traditional Thanksgiving fare! I adapted this recipe from this one by Paleo Comfort Foods. I tried the original recipe first, but they tasted too coconutty, and crumbled way too easily. So I changed the flour combo, and they turned out perfectly. Slightly flaky, insanely buttery, with pockets to hold your jelly 🙂 Or in this case, Pinot Noir Cranberry Sauce!

thanksgiving15

Grain-Free Drop Biscuits

  • 4 eggs, yolks and whites divided (place your egg white in a large mixing bowl, and your yolks in a small bowl off to the side)
  • 1/4 cup coconut flour
  • 2 Tbsp arrowroot starch
  • 2 Tbsp potato starch
  • 1/2 tsp cream of tartar
  • 1/2 tsp baking soda
  • 4 Tbsp cold butter
  1. Preheat oven to 400 degrees F and line a baking sheet with parchment paper.
  2. In a medium sized mixing bowl, combine your dry ingredients (coconut flour, arrowroot, potato starch, cream of tartar and baking soda)
  3. To your dry ingredients, cut in your cold butter. This is like making a pastry or pie crust. You can use a pastry cutter, but I just quickly use my hands to combine the butter with the dry ingredients, until the butter is in pea-sized bits. Place this flour/butter combo in the fridge so it stays cold.
  4. Using an electric mixer, beat the egg whites until they become a foam. Continue to beat until soft peaks form at the end of your beaters when you remove it from the mixture.
  5. Carefully fold your egg yolks into your egg white mixture using a rubber spatula, until no streaks remain and the mixture is a solid, light yellow color. The whites will lose a little volume, but should still be pretty fluffy.
  6. Fold in your flour and butter mixture with your rubber spatula, again being careful to mix thoroughly without losing too much volume in the egg whites. The batter will be runny, like a cake batter.
  7. Spoon the batter onto the parchment paper into 4 equal drops. Give each biscuit space, as they will expand while baking. Do not flatten them out, just leave them in the shape in which they drop on the parchment.
  8. Bake the biscuits for 12-17 minutes, or until they have risen and are golden brown on top.
  9. Serve hot.

Makes 4 large biscuits.

thanksgiving73